Mazda CX-9 Grand Touring. Manual - part 489
AUTO LIGHT/WIPER CONTROL MODULE CONFIGURATION
1. Connect the M-MDS to the DLC-2.
2. After the vehicle is identified, select the following items from the initialization screen of the M-MDS.
When using the IDS (laptop PC)
1. Select "Module Programming".
operation
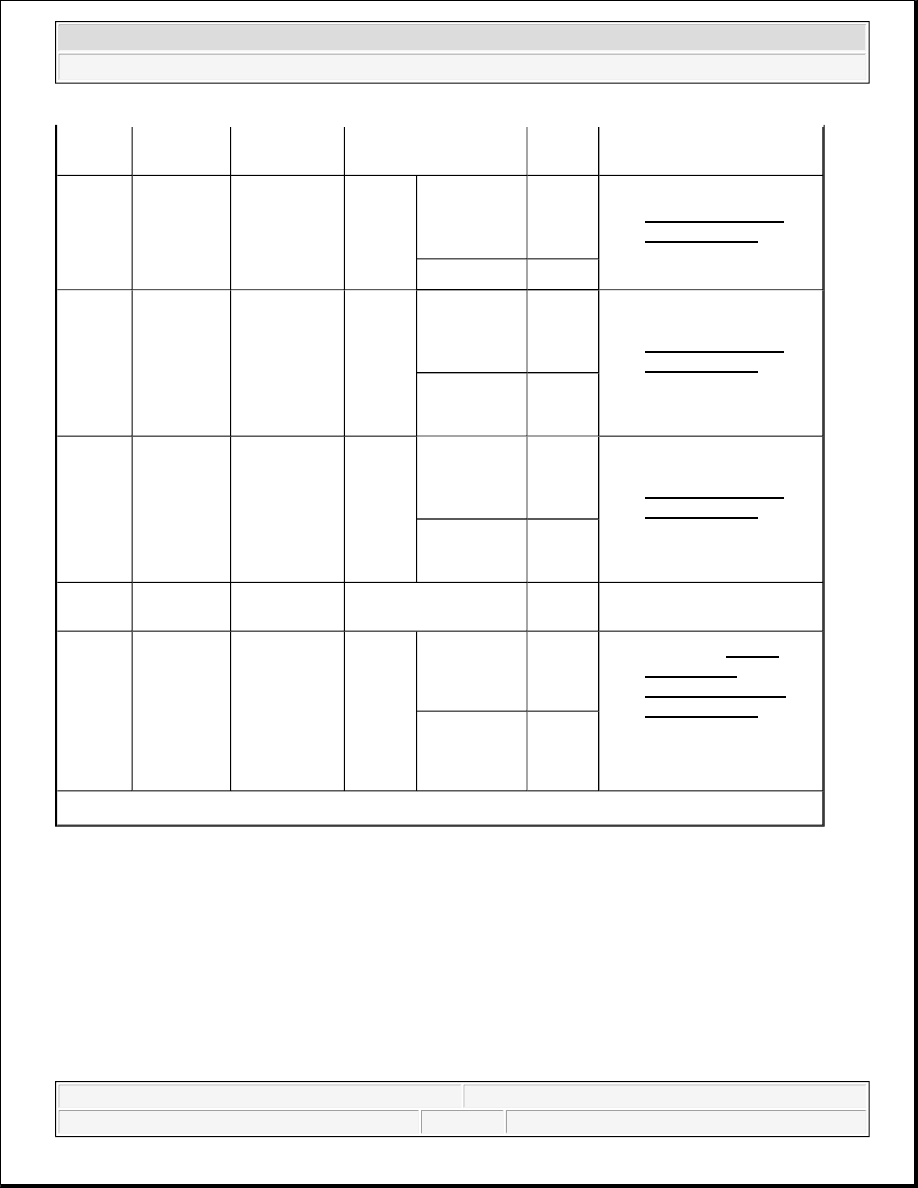
relay
Light switch at OFF or
low-beam position
B+
Related wiring
harnesses
2L
Light switch
signal
Light switch
Ignition
switch at
ON
Light switch
at AUTO
position
1.0 or
less
Light switch (See
LIGHT SWITCH
INSPECTION.)
Related wiring
harnesses
Other
B+
2M
TNS switch
on/off
Light switch
Ignition
switch at
ON
Light switch
at low-beam
or high-beam
position
1.0 or
less
Light switch (See
LIGHT SWITCH
INSPECTION.)
Related wiring
harnesses
Light switch
at OFF
position
B+
2N
Light switch
on/off
Light switch
Ignition
switch at
ON
Light switch
at low-beam
or high-beam
position
1.0 or
less
Light switch (See
LIGHT SWITCH
INSPECTION.)
Related wiring
harnesses
Light switch
at OFF
position
B+
2O
GND
GND
Under any condition
1.0 or
less
Related wiring
harnesses
2P
(1)
Parking
brake switch
on/off
BCM
Parking
brake
switch
Ignition
switch at
ON
Parking brake
switch on
1.0 or
less
BCM (See BODY
CONTROL
MODULE (BCM)
INSPECTION .)
Parking brake switch
Related wiring
harnesses
Parking brake
switch OFF
B+
(1)
For vehicles with DRL only.
NOTE:
Use the IDS (laptop PC) because the PDS (Pocket PC) does not support
the AUTO LIGHT/WIPER CONTROL MODULE CONFIGURATION.
2008 Mazda CX-9 Grand Touring
2008 BODY & ACCESSORIES Lighting Systems - Mazda CX-9
Microsoft
Sunday, November 15, 2009 10:39:06 AM
Page 37
© 2005 Mitchell Repair Information Company, LLC.