Mazda CX-9 Grand Touring. Manual - part 114


  Index      Mazda     Mazda CX-9 Grand Touring - service repair manual 2008 year


Search            


Content   ..  112  113  114  115   ..


Mazda CX-9 Grand Touring. Manual - part 114


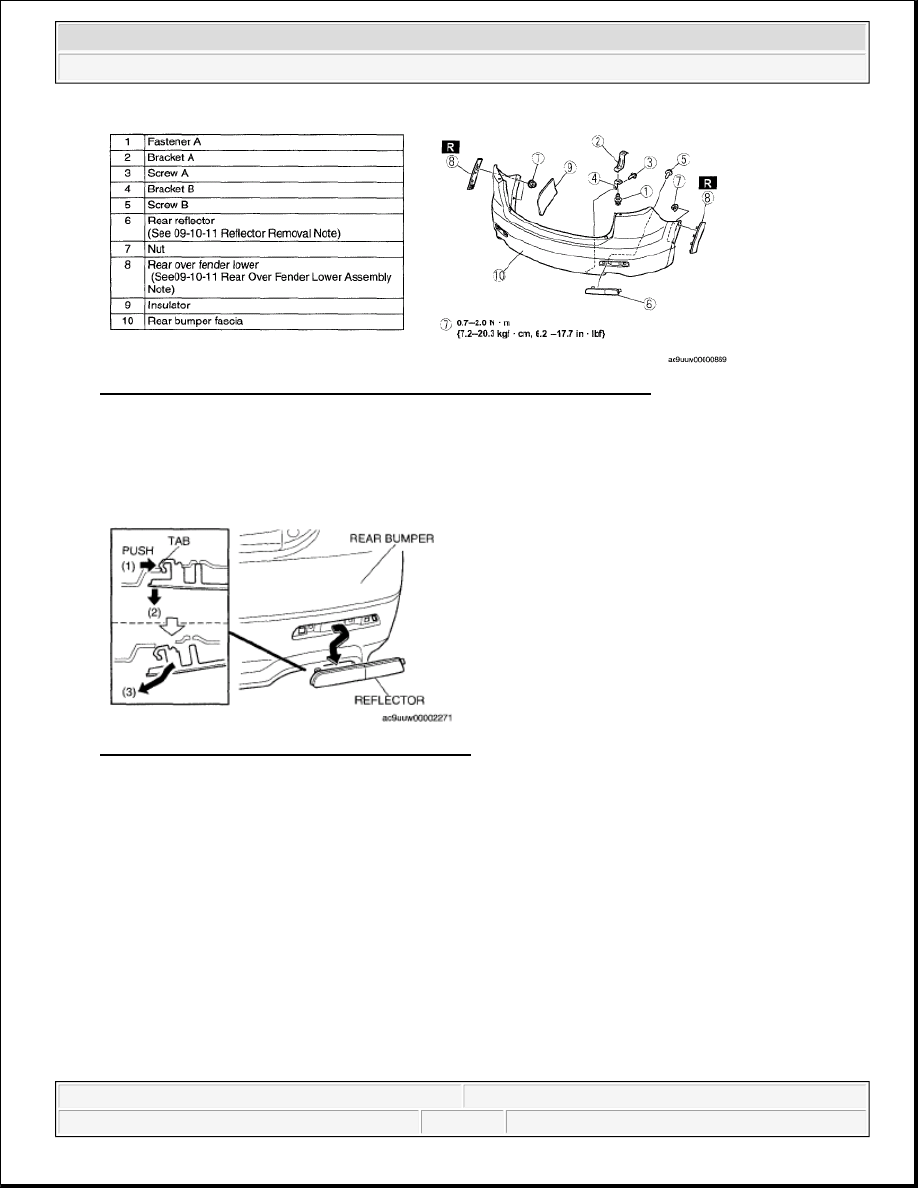
Fig. 20: Identifying Rear Bumper Components & Torque Specifications 
Courtesy of MAZDA MOTORS CORP. 

REFLECTOR REMOVAL NOTE 

1. Pull off the reflector from the rear bumper in the direction and in the order as shown by the arrows. 

Fig. 21: Identifying Rear Bumper And Reflector 
Courtesy of MAZDA MOTORS CORP. 

REAR OVER FENDER LOWER ASSEMBLY NOTE 

1. Attach the rear over fender lower to the rear bumper fascia with nuts.  

2. Use a soldering copper and thermally deform the tab in order to fasten the stiffening rib. 


2008 Mazda CX-9 Grand Touring 

2008 ACCESSORIES & BODY, CAB Body Panels - Mazda CX-9


Microsoft 


Sunday, November 15, 2009 10:44:45 AM

Page 14 

© 2005 Mitchell Repair Information Company, LLC. 

Fig. 22: Identifying Rear Over Fender Lower And Rear Bumper Fascia With Nuts 
Courtesy of MAZDA MOTORS CORP. 

FRONT FENDER PANEL REMOVAL/INSTALLATION 

1. Disconnect the negative battery cable.  

2. Remove the following parts: 

1. Windshield wiper arm and blade (See WINDSHIELD WIPER ARM AND BLADE 

REMOVAL/INSTALLATION )  

2. Side cowl grille (See COWL GRILLE REMOVAL/INSTALLATION )  

3. Front over fender (See OVER FENDER REMOVAL/INSTALLATION )  

4. Front bumper (See FRONT BUMPER REMOVAL/INSTALLATION)  

5. Front combination lights (See FRONT COMBINATION LIGHT 

REMOVAL/INSTALLATION )  

6. Sail garnish (See SAIL GARNISH REMOVAL/INSTALLATION ) '  

3. Remove in the order indicated in the table.  

4. Install in the reverse order of removal. 

Fig. 23: Identifying Removing Sequence Of Front Fender Panel Components & Torque 
Specifications
 
Courtesy of MAZDA MOTORS CORP.


2008 Mazda CX-9 Grand Touring 

2008 ACCESSORIES & BODY, CAB Body Panels - Mazda CX-9


Microsoft 


Sunday, November 15, 2009 10:44:45 AM

Page 15 

© 2005 Mitchell Repair Information Company, LLC. 

SHROUD PANEL REMOVAL/INSTALLATION

1. Disconnect the negative battery cable.  

2. Remove the following parts: 

1. Front bumper (See FRONT BUMPER REMOVAL/INSTALLATION)  

2. Front combination lights (See FRONT COMBINATION LIGHT 

REMOVAL/INSTALLATION )  

3. Front bumper reinforcement (See FRONT BUMPER REINFORCEMENT 

REMOVAL/INSTALLATION)  

4. Ambient temperature sensor (See AMBIENT TEMPERATURE SENSOR 

REMOVAL/INSTALLATION )  

5. Crash zone sensor (See CRASH ZONE SENSOR REMOVAL/INSTALLATION )  

6. Hood latch (See HOOD LATCH AND RELEASE LEVER REMOVAL/INSTALLATION )  

3. Put the oil cooler aside.  

4. Remove the front crossmember extension. (See FRONT CROSSMEMBER 

REMOVAL/INSTALLATION .)  

5. Remove in the order indicated in the table.  

6. Install in the reverse order of removal. 

Fig. 24: Identifying Removing Sequence Of Shroud Panel Components & Torque Specifications 
Courtesy of MAZDA MOTORS CORP. 

UPPER MOUNT RUBBER BRACKET REMOVAL NOTE 

1. Remove the upper mount rubber bracket while pressing down the upper mount rubber bracket tab in the 

direction of the arrow. 


2008 Mazda CX-9 Grand Touring 

2008 ACCESSORIES & BODY, CAB Body Panels - Mazda CX-9


Microsoft 


Sunday, November 15, 2009 10:44:45 AM

Page 16 

© 2005 Mitchell Repair Information Company, LLC. 

Fig. 25: Identifying Upper Mount Rubber Bracket 
Courtesy of MAZDA MOTORS CORP. 

COWL PANEL REMOVAL/INSTALLATION 

1. Disconnect the negative battery cable.  

2. Remove the following parts: 

1. Windshield wiper arm and blade (See WINDSHIELD WIPER ARM AND BLADE 

REMOVAL/INSTALLATION )  

2. Cowl grille (See COWL GRILLE REMOVAL/INSTALLATION )  

3. Windshield wiper motor (See WINDSHIELD WIPER MOTOR 

REMOVAL/INSTALLATION )  

3. Remove the bolts, then remove the cowl panel.  

4. Install in the reverse order of removal. 

Fig. 26: Identifying Cowl Panel With Nuts, Bolts & Torque Specifications 
Courtesy of MAZDA MOTORS CORP.


2008 Mazda CX-9 Grand Touring 

2008 ACCESSORIES & BODY, CAB Body Panels - Mazda CX-9


Microsoft 


Sunday, November 15, 2009 10:44:45 AM

Page 17 

© 2005 Mitchell Repair Information Company, LLC. 


Content   ..  112  113  114  115   ..