Mazda CX-9 Grand Touring. Manual - part 43
 

  Index      Mazda     Mazda CX-9 Grand Touring - service repair manual 2008 year


Search            


Content   ..  41  42  43  44   ..


Mazda CX-9 Grand Touring. Manual - part 43


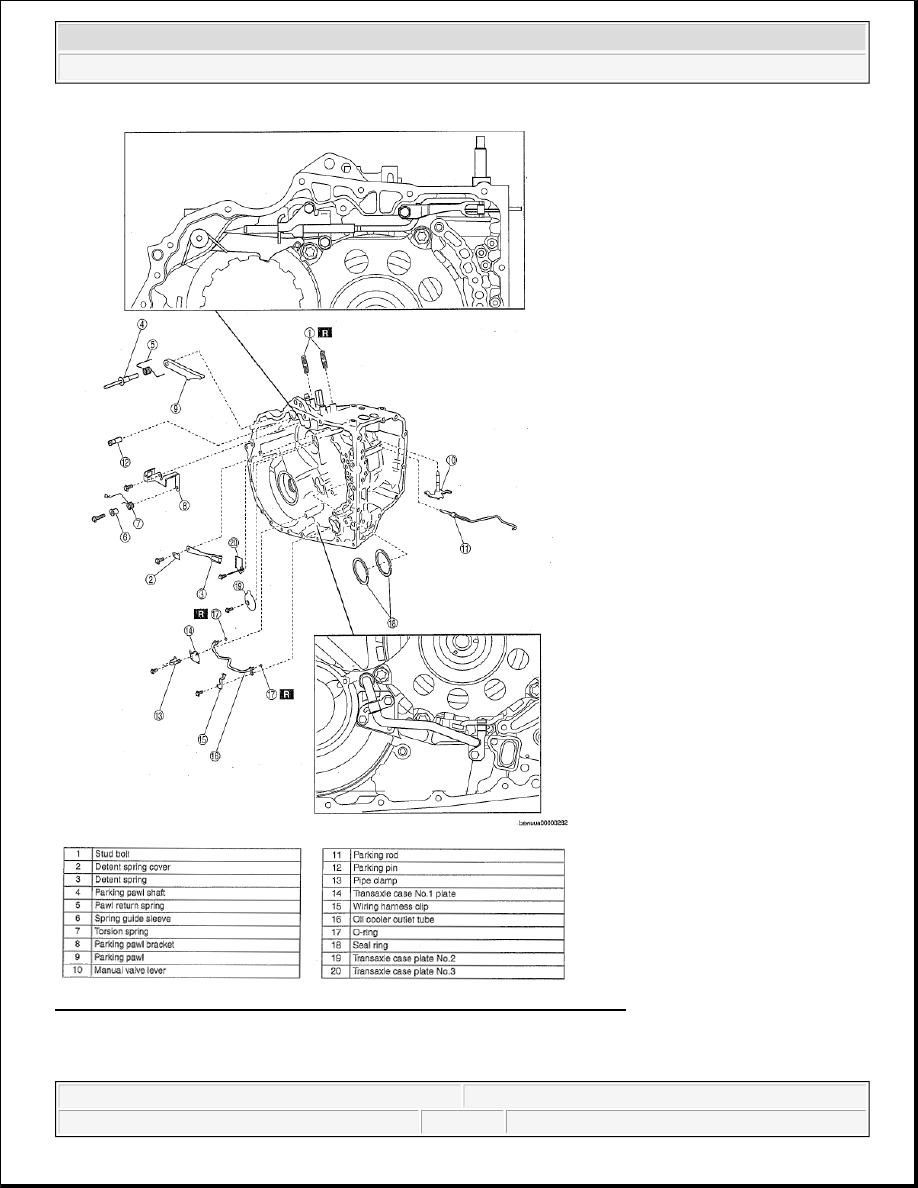
Fig. 4: Identifying Automatic Transaxle Disassembly Components (4 Of 4) 
Courtesy of MAZDA MOTORS CORP. 

Disassembly procedure 


2008 Mazda CX-9 Grand Touring 

2005-08 TRANSMISSION Automatic Transaxle Overhaul (AW6A-EL) - CX-7, CX-9 & Mazda 6


Microsoft 


Sunday, November 15, 2009 10:28:15 AM

Page 6 

© 2005 Mitchell Repair Information Company, LLC. 

1. Remove the oil pipes and O-rings. (Refer to the appropriate article .) 

2. Remove the torque converter. 

Fig. 5: Identifying Torque Converter 
Courtesy of MAZDA MOTORS CORP. 

3. Remove the drain plug and gasket.  

4. Drain the ATF. 

5. Remove the stud bolts. 

CAUTION:

Do not damage the oil seal.  

Do not drop the torque converter. 

CAUTION:

Do not repair the threads using a tap or other tools. 

Fig. 6: Identifying Drain Plug And Gasket 
Courtesy of MAZDA MOTORS CORP. 


2008 Mazda CX-9 Grand Touring 

2005-08 TRANSMISSION Automatic Transaxle Overhaul (AW6A-EL) - CX-7, CX-9 & Mazda 6


Microsoft 


Sunday, November 15, 2009 10:28:15 AM

Page 7 

© 2005 Mitchell Repair Information Company, LLC. 

Fig. 7: Identifying Stud Bolts 
Courtesy of MAZDA MOTORS CORP. 

6. Remove the TCM. 

Fig. 9: Identifying TCM Mounting Bolt 
Courtesy of MAZDA MOTORS CORP. 

7. Set the SST as shown in the figure. 

CAUTION:

Do not touch the terminals. 

Fig. 8: Caution - Do Not Touch Terminals 
Courtesy of MAZDA MOTORS CORP. 


2008 Mazda CX-9 Grand Touring 

2005-08 TRANSMISSION Automatic Transaxle Overhaul (AW6A-EL) - CX-7, CX-9 & Mazda 6


Microsoft 


Sunday, November 15, 2009 10:28:15 AM

Page 8 

© 2005 Mitchell Repair Information Company, LLC. 

8. Install the SST to the position where the transaxle stud bolts were removed. 

Fig. 11: Identifying SST And Transaxle Position 
Courtesy of MAZDA MOTORS CORP. 

9. Remove the control valve body cover installation bolt. 

CAUTION:

When installing the SST to the transaxle, use bolts (M12x1.25) 
with a thread length of 90 mm {3.54 in}. 

Fig. 10: Identifying SST 
Courtesy of MAZDA MOTORS CORP. 

CAUTION:

Do not damage the fitting surface of the transaxle case and the 
control valve body cover.  

Do not deform the control valve body cover. 


2008 Mazda CX-9 Grand Touring 

2005-08 TRANSMISSION Automatic Transaxle Overhaul (AW6A-EL) - CX-7, CX-9 & Mazda 6


Microsoft 


Sunday, November 15, 2009 10:28:15 AM

Page 9 

© 2005 Mitchell Repair Information Company, LLC. 


Content   ..  41  42  43  44   ..