Mazda CX-9 Grand Touring. Manual - part 38


  Index      Mazda     Mazda CX-9 Grand Touring - service repair manual 2008 year


Search            


Content   ..  36  37  38  39   ..


Mazda CX-9 Grand Touring. Manual - part 38


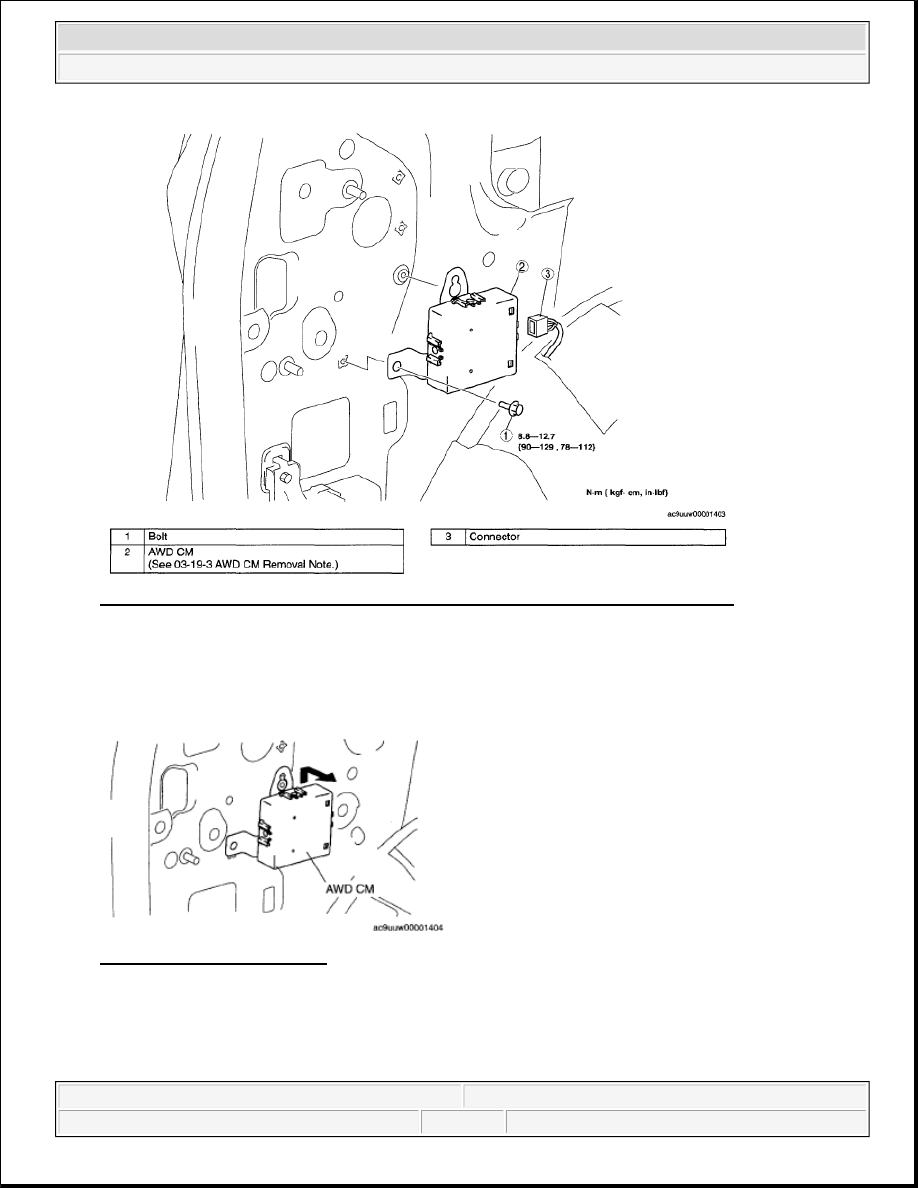
Fig. 3: Identifying AWD Control Module Connector, Bolt & Torque Specifications 
Courtesy of MAZDA MOTORS CORP. 

AWD CM REMOVAL NOTE 

1. Push up the AWD CM slightly, and remove it. 

Fig. 4: Pushing Up AWD CM 
Courtesy of MAZDA MOTORS CORP. 

COUPLING COMPONENT REMOVAL/INSTALLATION 

1. Drain the rear differential oil into a container. 


2008 Mazda CX-9 Grand Touring 

2008 DRIVELINE/AXLE All Wheel Drive (AWD) - Mazda CX-9


Microsoft 


Sunday, November 15, 2009 10:31:22 AM

Page 4 

© 2005 Mitchell Repair Information Company, LLC. 

2. Remove the under guard (LH). (See CHARCOAL CANISTER, CANISTER VENT (CV) SOLENOID 

VALVE, AIR FILTER COMPONENT REMOVAL/INSTALLATION [MZI-3.7] .)  

3. Remove the presilencer. (See EXHAUST SYSTEM REMOVAL/INSTALLATION [MZI-3.7] .)  

4. Remove the presilencer insulator. (See REFRIGERANT LINE REMOVAL/INSTALLATION .)  

5. Remove the propeller shaft. (See PROPELLER SHAFT REMOVAL/INSTALLATION .)  

6. Remove in the order indicated in the table.  

7. Install in the reverse order of removal.  

8. Add rear differential oil. (See DIFFERENTIAL OIL REPLACEMENT .) 

Fig. 5: Identifying Coupling Components & Torque Specifications 
Courtesy of MAZDA MOTORS CORP. 

FRONT DIFFERENTIAL MOUNTING RUBBER REMOVAL NOTE 

1. Detach clips as shown in the figure. 


2008 Mazda CX-9 Grand Touring 

2008 DRIVELINE/AXLE All Wheel Drive (AWD) - Mazda CX-9


Microsoft 


Sunday, November 15, 2009 10:31:22 AM

Page 5 

© 2005 Mitchell Repair Information Company, LLC. 

Fig. 6: Identifying AWD Solenoid Connector 
Courtesy of MAZDA MOTORS CORP. 

2. Support the rear differential using a jack.  

3. Remove the front differential mounting rubbers. 

Fig. 7: Supporting Rear Differential 
Courtesy of MAZDA MOTORS CORP. 

COUPLING COMPONENT REMOVAL NOTE 

1. Support the coupling unit with a transmission jack.  

2. Cut away the coupling unit using an oil pan seal cutter. 


2008 Mazda CX-9 Grand Touring 

2008 DRIVELINE/AXLE All Wheel Drive (AWD) - Mazda CX-9


Microsoft 


Sunday, November 15, 2009 10:31:22 AM

Page 6 

© 2005 Mitchell Repair Information Company, LLC. 

Fig. 8: Cutting Coupling Unit 
Courtesy of MAZDA MOTORS CORP. 

COUPLING COMPONENT INSTALLATION NOTE 

1. Apply sealant to the coupling case surface that contacts the rear differential case.  

2. Install the coupling unit to the rear differential so that the two tabs on the coupling unit engage the rear 

differential grooves (two locations). 

Tightening torque  

22.6-26.4 N.m {2.31-2.69 kgf.m, 16.7-19.4 ft.lbf}  

Fig. 9: Identifying Tabs On Coupling Unit 
Courtesy of MAZDA MOTORS CORP. 

COUPLING COMPONENT DISASSEMBLY 

1. Disassemble in the order indicated in the table. 

NOTE:

Clean away the old sealant before applying the new sealant.  

Install the coupling unit within 10 min after applying sealant.  

Allow the sealant to set at least 30 min after installation before filling the 
differential with the specified oil.  

WARNING:

The engine stand is equipped with a self-lock mechanism, however, 
if the coupling unit is in a tilted condition, the self-lock mechanism 
could become inoperative. If the coupling unit unexpectedly rotates 
it could cause injury, therefore do not maintain the coupling unit in a 
tilted condition. When turning the coupling unit, grasp the rotation 
handle firmly.  


2008 Mazda CX-9 Grand Touring 

2008 DRIVELINE/AXLE All Wheel Drive (AWD) - Mazda CX-9


Microsoft 


Sunday, November 15, 2009 10:31:22 AM

Page 7 

© 2005 Mitchell Repair Information Company, LLC. 


Content   ..  36  37  38  39   ..