Mazda CX 7. Manual - part 426


  Index      Mazda     Mazda CX 7 - service repair manual 2007 year


Search            


Content   ..  424  425  426  427   ..


Mazda CX 7. Manual - part 426


WIPER/WASHER SYSTEM 

09-19–11

09-19

REAR WASHER MOTOR REMOVAL/INSTALLATION

id091900802600

1. Disconnect the negative battery cable.
2. Remove the mudguard (RH).
3. Disconnect the connector.
4. Disconnect the rear washer hose.
5. Remove the rear washer motor, then remove the 

grommet.

6. Install in the reverse order of removal.

End Of Sie

REAR WASHER MOTOR INSPECTION

id091900802700

1. Connect battery positive voltage to rear washer motor terminal A and terminal B to ground.
2. Verify that the rear washer motor operates 

normally.

• If there is any malfunction, replace the rear 

washer motor.

End Of Sie

WM: REAR WASHER NOZZLE

REAR WASHER NOZZLE REMOVAL/INSTALLATION

id091900802200

1. Remove the liftgate upper trim. (See 09-17-25 LIFTGATE UPPER TRIM REMOVAL/INSTALLATION.)
2. Remove the rear spoiler. (See 09-16-12 REAR SPOILER REMOVAL/INSTALLATION.)
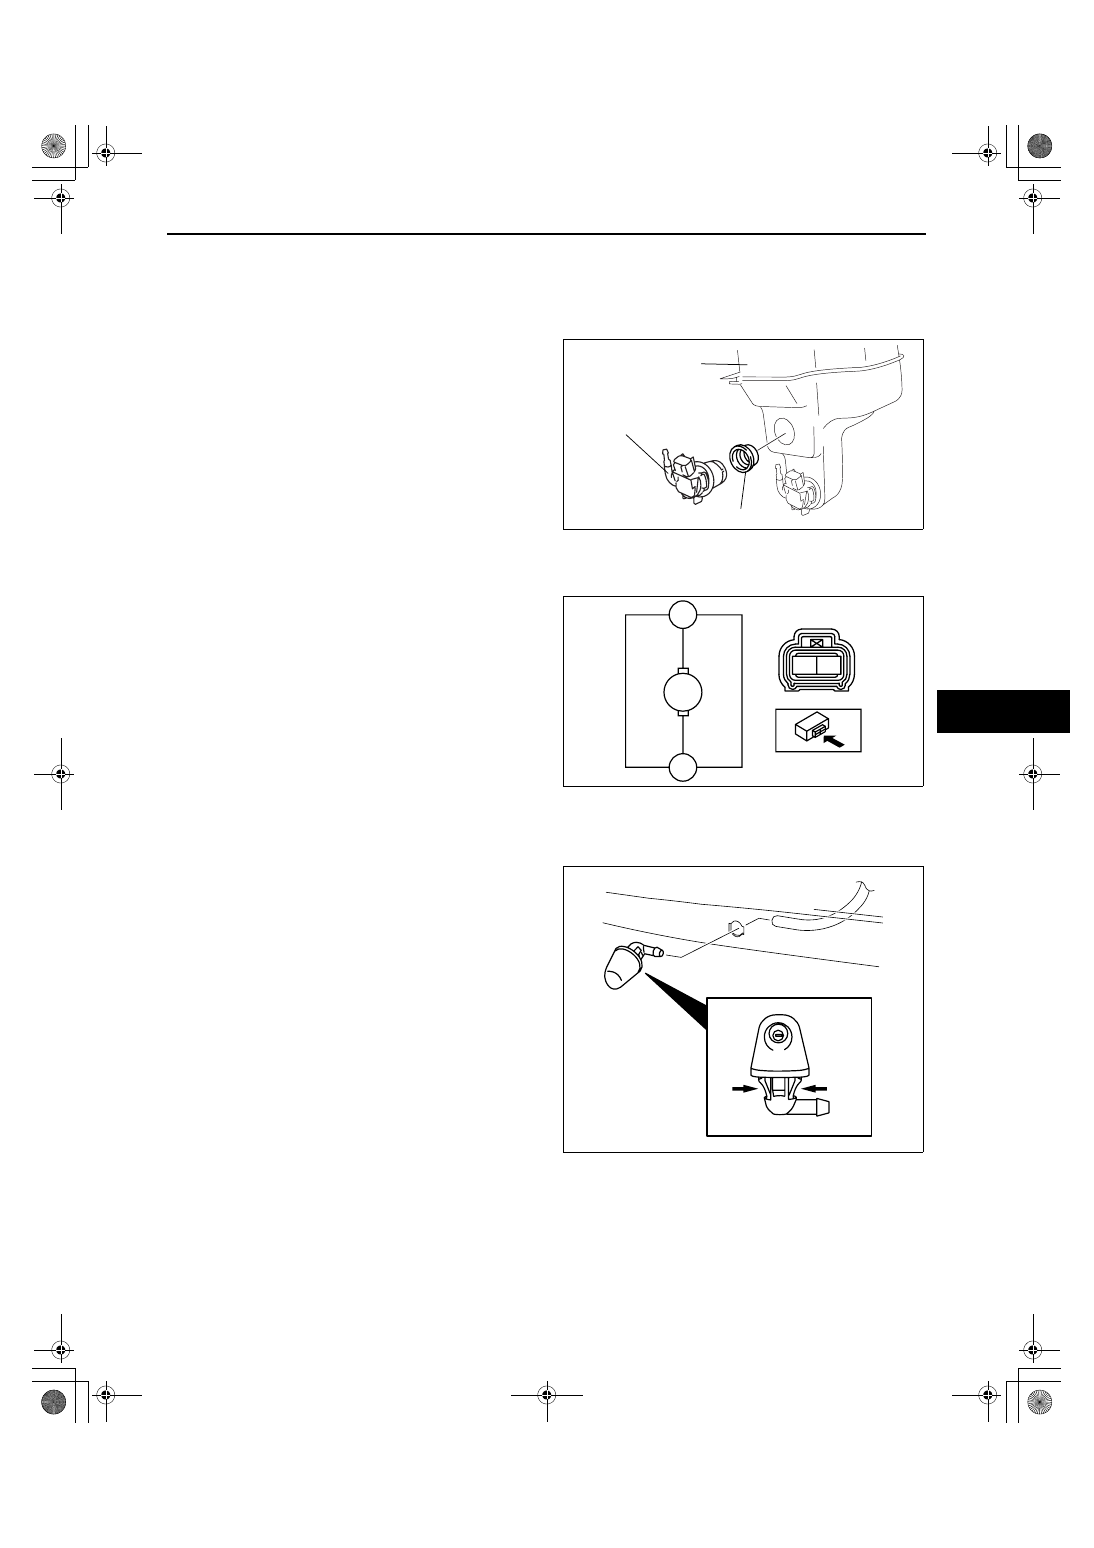
3. Press the tabs and remove the rear washer 

nozzle.

4. Install in the reverse order of removal.
5. Adjust the rear washer nozzle. (See 09-19-12 

REAR WASHER NOZZLE ADJUSTMENT.)

End Of Sie

REAR WASHER 
MOTOR

WASHER TANK

GROMMET

acxuuw00002278

A

M

B

B

A

CPJ919ZWB105

TAB

acxuuw00001632

WIPER/WASHER SYSTEM 

09-19–12

REAR WASHER NOZZLE ADJUSTMENT

id091900802300

1. Insert a needle or an equivalent tool into the spray 

hole of the rear washer nozzle and adjust the 
nozzle direction as shown.

End Of Sie

WM: REAR WASHER HOSE

REAR WASHER HOSE REMOVAL/INSTALLATION

id091900801600

1. Disconnect the negative battery cable.
2. Remove the mudguard (RH).
3. Disconnect rear washer hose A from the washer tank.
4. Remove rear washer hose A from clip A.
5. Disconnect joint pipe A and remove rear washer 

hose A.

6. Remove the following parts:

(1) Console panel (See 09-17-15 CONSOLE 

PANEL REMOVAL/INSTALLATION.)

(2) Console (See 09-17-13 CONSOLE 

REMOVAL/INSTALLATION.)

(3) Front scuff plate inner (See 09-17-19 FRONT 

SCUFF PLATE REMOVAL/INSTALLATION.)

(4) Front side trim (See 09-17-18 FRONT SIDE 

TRIM REMOVAL/INSTALLATION.)

(5) Dashboard under cover
(6) Glove compartment (See 09-17-8 GLOVE 

COMPARTMENT REMOVAL/
INSTALLATION.)

(7) Hood release lever (See 09-14-25 HOOD 

LATCH AND RELEASE LEVER REMOVAL/
INSTALLATION.)

(8) Lower panel (See 09-17-9 LOWER PANEL 

REMOVAL/INSTALLATION.)

(9) Center panel (See 09-17-8 CENTER PANEL 

REMOVAL/INSTALLATION.)

(10)Audio unit (See 09-20-4 AUDIO UNIT 

REMOVAL/INSTALLATION.)

(11)Climate control unit (See 07-40-25 CLIMATE 

CONTROL UNIT REMOVAL/INSTALLATION [FULL-AUTO AIR CONDITIONER].) (See 07-40-25 CLIMATE 
CONTROL UNIT REMOVAL [MANUAL AIR CONDITIONER].) (See 07-40-26 CLIMATE CONTROL UNIT 
INSTALLATION [MANUAL AIR CONDITIONER].)

(12)Knee bolster (See 09-17-12 KNEE BOLSTER REMOVAL/INSTALLATION.)
(13)Meter hood (See 09-17-10 METER HOOD REMOVAL/INSTALLATION.)
(14)Column cover (See 09-17-8 COLUMN COVER REMOVAL/INSTALLATION.)
(15)Instrument cluster (See 09-22-2 INSTRUMENT CLUSTER REMOVAL/INSTALLATION.)
(16)Driver-side air bag module (See 08-10-6 DRIVER-SIDE AIR BAG MODULE REMOVAL/INSTALLATION.)
(17)Steering wheel (See 06-14-6 STEERING WHEEL AND COLUMN REMOVAL/INSTALLATION.)
(18)Combination switch (See 09-18-13 COMBINATION SWITCH REMOVAL/INSTALLATION.)
(19)Steering shaft (See 06-14-6 STEERING WHEEL AND COLUMN REMOVAL/INSTALLATION.)
(20)A-pillar lower trim (See 09-17-16 A-PILLAR LOWER TRIM REMOVAL/INSTALLATION.)
(21)A-pillar trim (See 09-17-15 A-PILLAR TRIM REMOVAL/INSTALLATION.)
(22)Dashboard (See 09-17-4 DASHBOARD REMOVAL/INSTALLATION.)

mm

4.3

5.8

2.1

19

182

1.8

GLASS END LINE

acxuuw00001789

JOINT PIPE A

JOINT 
PIPE C

JOINT 
PIPE B

JOINT PIPE D

CLIP A

CLIP B

REAR WASHER HOSE A

REAR WASHER 
HOSE C

REAR WASHER HOSE D

a

REAR WASHER 
HOSE B

acxuuw00001822

WIPER/WASHER SYSTEM 

09-19–13

09-19

7. Disconnect joint pipe B and remove rear washer hose B.
8. Disconnect joint pipe C and remove rear washer hose C.
9. Remove rear washer hose C from clips B.

10. Disconnect joint pipe D and remove rear washer hose C.
11. Detach clips B.
12. Remove the following parts:

(1) Rear scuff plate inner (See 09-17-19 REAR SCUFF PLATE REMOVAL/INSTALLATION.)
(2) B-pillar lower trim (See 09-17-16 B-PILLAR LOWER TRIM REMOVAL/INSTALLATION.)
(3) Front seat belt upper anchor installation bolt (See 08-11-2 FRONT SEAT BELT REMOVAL/

INSTALLATION.)

(4) B-pillar upper trim (See 09-17-16 B-PILLAR UPPER TRIM REMOVAL/INSTALLATION.)
(5) Rear seat (See 09-13-7 REAR SEAT REMOVAL/INSTALLATION.)
(6) Sub trunk box (See 09-17-25 SUB TRUNK BOX REMOVAL/INSTALLATION.)
(7) Trunk end trim (See 09-17-24 TRUNK END TRIM REMOVAL/INSTALLATION.)
(8) Trunk side trim (See 09-17-24 TRUNK SIDE TRIM REMOVAL/INSTALLATION.)
(9) C-pillar trim (See 09-17-17 C-PILLAR TRIM REMOVAL/INSTALLATION.)
(10)D-pillar trim (See 09-17-18 D-PILLAR TRIM REMOVAL/INSTALLATION.)
(11)Map light (See 09-18-22 MAP LIGHT REMOVAL/INSTALLATION.)
(12)Sunvisor (See 09-17-26 SUNVISOR REMOVAL/INSTALLATION.)
(13)Assist handle (See 09-17-27 ASSIST HANDLE REMOVAL/INSTALLATION.)

13. Disconnect joint pipe E.
14. Remove the headliner. (See 09-17-27 

HEADLINER REMOVAL/INSTALLATION.)

15. Remove rear washer hose D from clips C and D.
16. Cut the urethane of the headliner and remove the 

tape and rear washer hose D.

Note

• After installing the rear washer hose, 

reinforce the urethane that was cut when 
removing.

17. Remove rear washer hose E from the rear washer 

nozzle.

18. Install in the reverse order of removal.

End Of Sie

CLIP D

TAPE

TAPE

CLIP C

JOINT PIPE E

a

REAR WASHER HOSE D

REAR WASHER HOSE E

acxuuw00001823


Content   ..  424  425  426  427   ..