Mazda CX 7. Manual - part 385


  Index      Mazda     Mazda CX 7 - service repair manual 2007 year


Search            


Content   ..  383  384  385  386   ..


Mazda CX 7. Manual - part 385


GLASS/WINDOWS/MIRRORS 

09-12–27

09-12

QUARTER WINDOW GLASS REMOVAL

id091200801700

1. Remove the following parts:

(1) Rear scuff plate inner (See 09-17-19 REAR SCUFF PLATE REMOVAL/INSTALLATION.)
(2) Rear seat (See 09-13-7 REAR SEAT REMOVAL/INSTALLATION.)
(3) Sub trunk box (See 09-17-25 SUB TRUNK BOX REMOVAL/INSTALLATION.)
(4) Trunk end trim (See 09-17-24 TRUNK END TRIM REMOVAL/INSTALLATION.)
(5) Trunk side trim (See 09-17-24 TRUNK SIDE TRIM REMOVAL/INSTALLATION.)
(6) C-pillar trim (See 09-17-17 C-PILLAR TRIM REMOVAL/INSTALLATION.)
(7) D-pillar trim (See 09-17-18 D-PILLAR TRIM REMOVAL/INSTALLATION.)

2. Set the headliner out of the way.
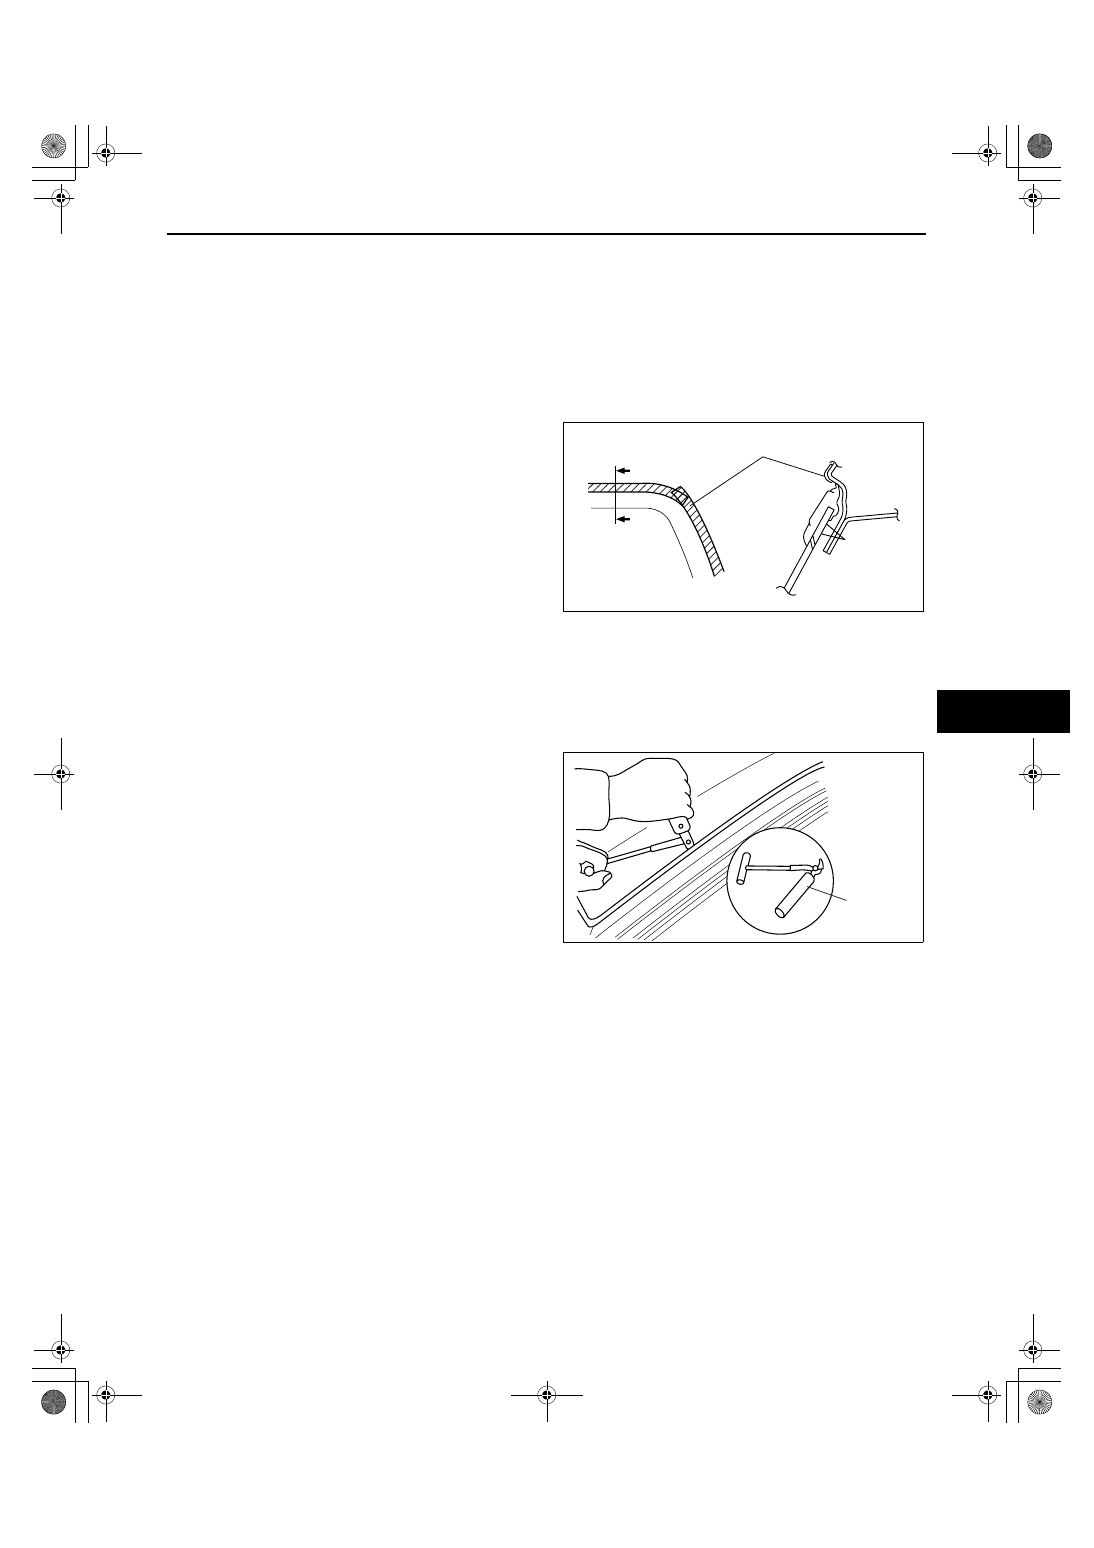
3. Apply protective tape along the edge of the body 

and the quarter window glass.

Not Reusing Windshield

Note

• For the areas of the sealant that are difficult to cut, use the piano wire and follow the procedure under 

“Reusing Windshield”.

1. Cut out the sealant all around the glass from 

inside the vehicle using a sealant remover.

Warning

• Using a razor with bare hands can cause 

injury. Always wear gloves when using a 
razor.

2. Remove the quarter window glass.

PROTECTIVE TAPE

A

A

GLASS SIDE

BODY SIDE

SEC. A—A

acxuuw00001577

49 G050 1A0

SEALANT 
REMOVER

acxuuw00001579

GLASS/WINDOWS/MIRRORS 

09-12–28

Reusing Windshield

Warning

• Using the piano wire with bare hands can cause injury. Always wear gloves when using the piano 

wire.

1. Avoiding the pin on the inside of the vehicle, insert 

the piano wire which has been cut to sufficient 
length.

2. Wind each end of the piano wire around a bar.

Note

• Use a long sawing action to spread the work over the whole length of the piano wire to prevent it from 

breaking due to localized heating.

3. Secure one end of the piano wire, and while 

pulling the other end, cut the sealant around the 
quarter window glass.

4. Pull the quarter window glass outward and detach 

the pins from the body.

5. If a pin or spacer is damaged, remove it.

Note

• Before removing the pins or spacers from 

the quarter window glass, place alignment 
marks on the quarter window glass.

End Of Sie

PIN

PIN

FASTENER

PRIMER

acxuuw00001580

GLASS

SEALANT

PROTECTIVE TAPE

PIANO WIRE

acxuuw00001581

PIANO WIRE

acxuuw00001578

PIN

PIN

QUARTER WINDOW GLASS

SEC. A—A

SEC. B—B

B

B

A

A

acxuuw00001582

GLASS/WINDOWS/MIRRORS 

09-12–29

09-12

QUARTER WINDOW GLASS INSTALLATION

id091200801800

Warning

• Using a razor with bare hands can cause injury. Always wear gloves when using a razor.

Caution

• If a door is opened or closed when all the window glass is closed, the resulting change in air 

pressure could cause the sealant to crack preventing the proper installation of the glass. Keep the 
door glass open until the quarter window glass installation is completed.

1. Remove sealant along the perimeter of the glass using a razor or scraper. (when reusing the glass)
2. Clean and degrease the ceramic part along the perimeter of the glass.
3. Inspect the glass for cracks. If it is cracked, chamfer it using sandpaper.
4. If the glass is reused, attach the pins and fastener to the glass as shown in the figure.

Align with the alignment marks marked before removing the glass.

5. Apply glass primer along the hollowed marks in the ceramic coating on the new glass, along the sealant tracks 

on the reused glass, then allow it to dry for approx. 30 min.

Caution

• To prevent weakening of the primer adhesion, keep the bonding surface free of dirt, moisture, and 

grease. Do not touch the surface with your hand.

Note

• Apply primer to the hollowed marks in the ceramic coating.

6. Cut away the old sealant using a razor or scraper so that 1— 2 mm {0.04— 0.079 in} thickness of sealant 

remains along the perimeter of the frame.

7. If the sealant has come off completely in any one place, apply some primer after degreasing, and allow it 

approx. 30 min to dry. Then apply 2 mm {0.079 in} thickness of new sealant.

8. Clean and degrease the bonding surface along the perimeter of the body.

PIN

PIN

FASTENER

acxuuw00001623

*: POSSIBLE PRIMER APPLICATION AREA

mm [in}

B

B

E

C

D

D

C

E

A

A

SEC. A—A

SEC. B—B

SEC. D—D

SEC. C—C

SEC. E—E

9.5 
{0.37 }

9.5 {0.37 }

9.5 {0.37 }

9.5 {0.37 }

9.5 {0.37 }

4.3 
{0.17 }*

*

PRIMER

4.3 
{0.17 }*

acxuuw00001624

GLASS/WINDOWS/MIRRORS 

09-12–30

9. Apply body primer on the body as shown in the figure, then allow it to dry for approx. 30 min.

Caution

• To prevent weakening of the primer adhesion, keep the bonding surface free of dirt, moisture, and 

grease. Do not touch the surface with your hand.

10. After the primer has dried, apply 11 mm {0.43 in} in thickness, 5 mm {0.20 in} in width of sealant using a 

sealant gun. Where it is not applied properly, correctly apply it using a spatula.

11. Insert the positioning pins to the body and install the quarter window glass.
12. Install the following parts:

(1) D-pillar trim (See 09-17-18 D-PILLAR TRIM REMOVAL/INSTALLATION.)
(2) C-pillar trim (See 09-17-17 C-PILLAR TRIM REMOVAL/INSTALLATION.)
(3) Trunk side trim (See 09-17-24 TRUNK SIDE TRIM REMOVAL/INSTALLATION.)
(4) Trunk end trim (See 09-17-24 TRUNK END TRIM REMOVAL/INSTALLATION.)
(5) Trunk side trim (See 09-17-24 TRUNK SIDE TRIM REMOVAL/INSTALLATION.)
(6) Sub trunk box (See 09-17-25 SUB TRUNK BOX REMOVAL/INSTALLATION.)
(7) Rear seat (See 09-13-7 REAR SEAT REMOVAL/INSTALLATION.)
(8) Rear scuff plate inner (See 09-17-19 REAR SCUFF PLATE REMOVAL/INSTALLATION.)

13. Allow the sealant to harden completely.

Sealant hardening time: 24 h

End Of Sie

WM: REAR WINDOW DEFROSTER

*: POSSIBLE PRIMER APPLICATION AREA

mm [in}

SEC. A—A

SEC. B—B

SEC. D—D

SEC. C—C

SEC. E—E

3 {0.12 }*

14.5 {0.571 }

5.9 {0.23 }*

14.5 {0.571 }

*

A

A

C

C

D

D

E

E

B

B

PRIMER

14.5 {0.571 }

14.5 
{0.571 }

14.5 
{0.571 }

acxuuw00001625

5 {0.2}

11 {0.43}

B

B

E

C

D

D

C

E

A

A

SEC. A—A

SEC. B—B

SEC. D—D

SEC. C—C

SEC. E—E

4.75 {0.187 }

4.75 {0.187 }

4.75 {0.187 }

mm {in}

4.75 {0.187 }

4.75 {0.187 }

acxuuw00001626


Content   ..  383  384  385  386   ..