Mazda CX 7. Manual - part 198
ON-BOARD DIAGNOSTIC
04-02–7
04-02
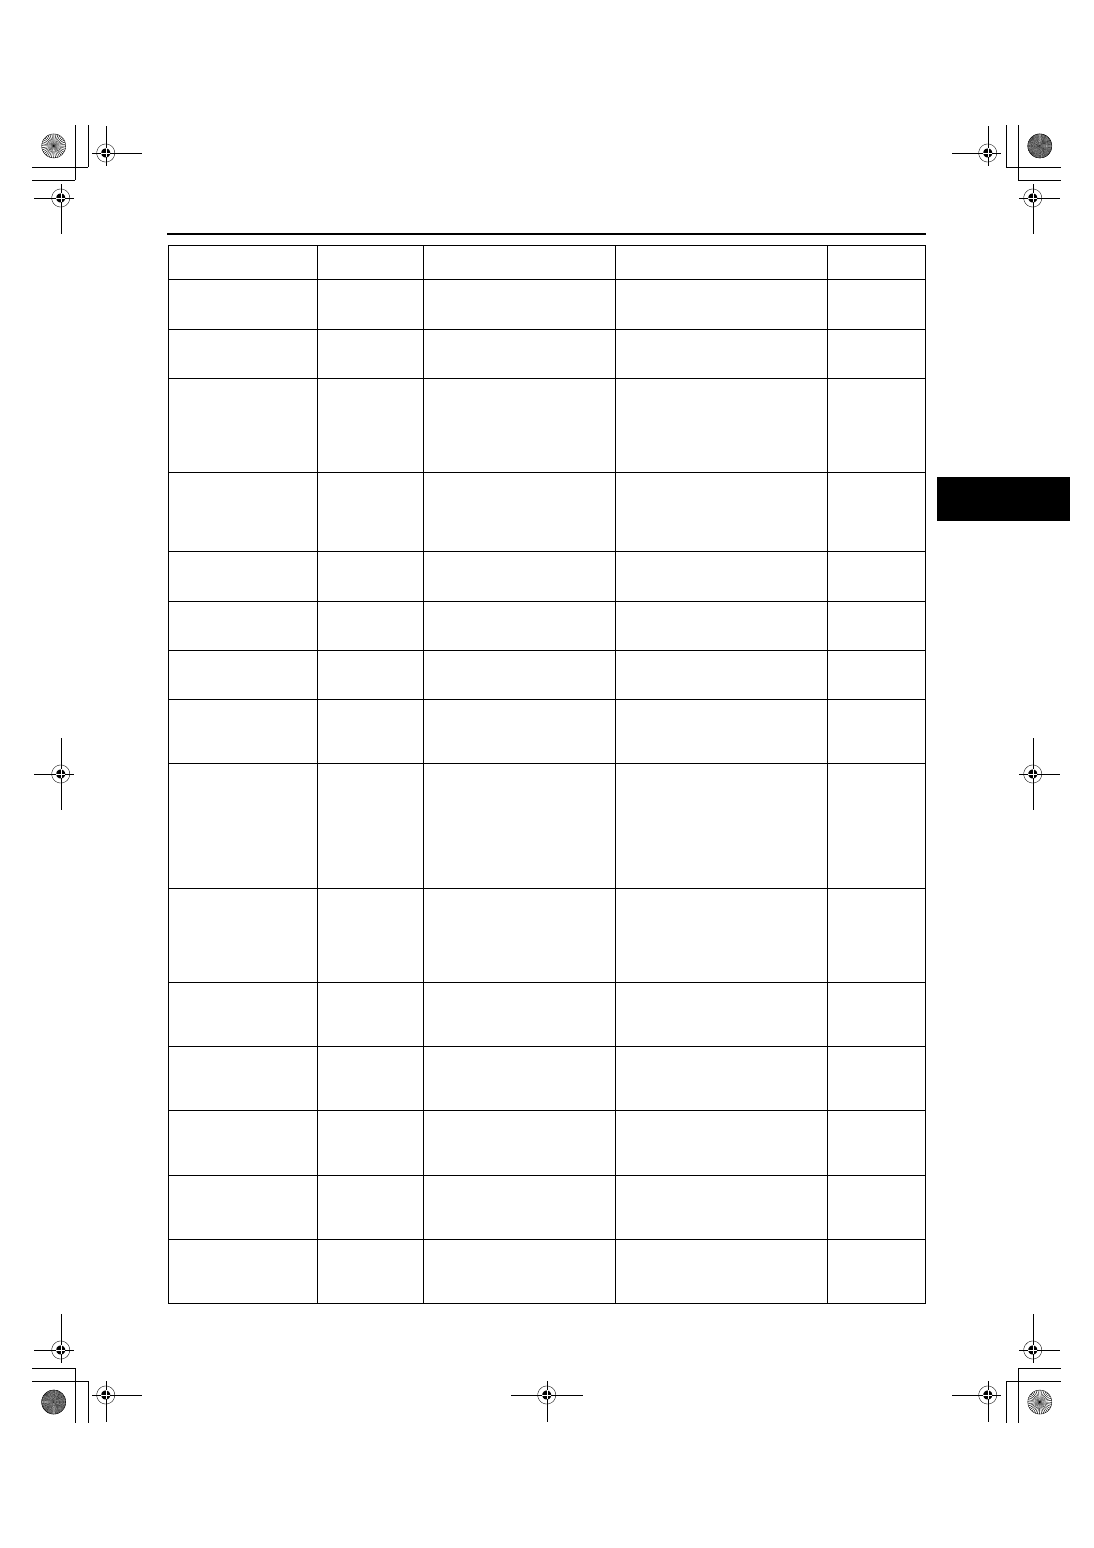
BOO_ABS
(Brake pedal switch
input)
On/Off
• Brake pedal depressed:
On
• Brake pedal released: Off
Inspect the brake switch.
(See 04-11-9 BRAKE SWITCH
INSPECTION.)
N
CCNTABS
(Number of continuous
codes)
—
Indicates number of DTC
Perform the DTC inspection.
(See 04-02-3 ON-BOARD
DIAGNOSIS.)
—
LAT_ACCL
G
• Vehicle stopped or driving
at constant speed: 0 G
• Cornering to right:
Changes 0 G— positive
• Cornering to left: Changes
0 G— negative
Inspect the combined sensor.
(See 04-15-16 COMBINED
SENSOR INSPECTION.)
AI
MCYLI P
Pa, psi
• Brake pedal released: 0
Pa, 0 psi
• Brake pedal depressed:
Changes according to the
brake fluid pressure
Inspect the brake fluid pressure
sensor.
(See 04-15-4 DSC SYSTEM
INSPECTION.)
—
PMP_MOTOR
(Pump motor output
state)
On/Off
• Pump motor activated: On
• Pump motor not activated:
Off
Inspect the DSC HU/CM.
(See 04-15-4 DSC SYSTEM
INSPECTION.)
—
RLY_PMP
(Motor relay output
state)
On/Off
• Relay activated: On
• Relay not activated: Off
Inspect the DSC HU/CM.
(See 04-15-4 DSC SYSTEM
INSPECTION.)
—
RLY_VLV
(Valve relay output
state)
On/Off
• Valve relay is activated: On
• Valve relay is deactivated:
Off
Inspect the DSC HU/CM.
(See 04-15-4 DSC SYSTEM
INSPECTION.)
—
RPM
(Engine speed signal
input)
RPM
• Engine stopped: 0 RPM
• Engine speed at 3,000
rpm: 3,000 RPM
Inspect the PCM.
(See 01-40-6 PCM
INSPECTION[L3 WITH TC].)
Inspect the instrument cluster.
—
SWA_POS
°
• Steering wheel in neutral
position (not turned): 0
°
• Steering wheel turned to
left: Changes 0
°—
negative
• Steering wheel turned to
right: Changes 0
°—
positive
Inspect the steering angle sensor.
(See 09-40-7 STEERING ANGLE
SENSOR INSPECTION.)
—
TPI
%
• Closed throttle position:
0%
• Wide open throttle:
Changes according to
throttle valve opening
angle
Inspect the throttle position
sensor.
—
V_LF_INL
(Left front inlet solenoid
valve output state)
On/Off
• Solenoid valve activated:
On
• Solenoid valve not
activated: Off
Inspect the DSC HU/CM.
(See 04-15-4 DSC SYSTEM
INSPECTION.)
—
V_LF_OTL
(Left front outlet
solenoid valve output
state)
On/Off
• Solenoid valve activated:
On
• Solenoid valve not
activated: Off
Inspect the DSC HU/CM.
(See 04-15-4 DSC SYSTEM
INSPECTION.)
—
V_LR_INL
(Left rear inlet solenoid
valve output state)
On/Off
• Solenoid valve activated:
On
• Solenoid valve not
activated: Off
Inspect the DSC HU/CM.
(See 04-15-4 DSC SYSTEM
INSPECTION.)
—
V_LR_OTL
(Left rear outlet
solenoid valve output
state)
On/Off
• Solenoid valve activated:
On
• Solenoid valve not
activated: Off
Inspect the DSC HU/CM.
(See 04-15-4 DSC SYSTEM
INSPECTION.)
—
V_RF_INL
(Right front inlet
solenoid valve output
state)
On/Off
• Solenoid valve activated:
On
• Solenoid valve not
activated: Off
Inspect the DSC HU/CM.
(See 04-15-4 DSC SYSTEM
INSPECTION.)
—
PID name
(definition)
Unit/Condition
Operation condition
(reference)
Action
DSC HU/CM
terminal
1871-1U-06B(04-02).fm 7 ページ 2006年3月15日 水曜日 午前11時12分