Mazda Protege 5. Manual - part 331
 

  Index      Mazda     Mazda Protege 5 - service repair manual 2002 year


Search            


Content   ..  329  330  331  332   ..


Mazda Protege 5. Manual - part 331


EXTERIOR TRIM 

09–16–3

09–16

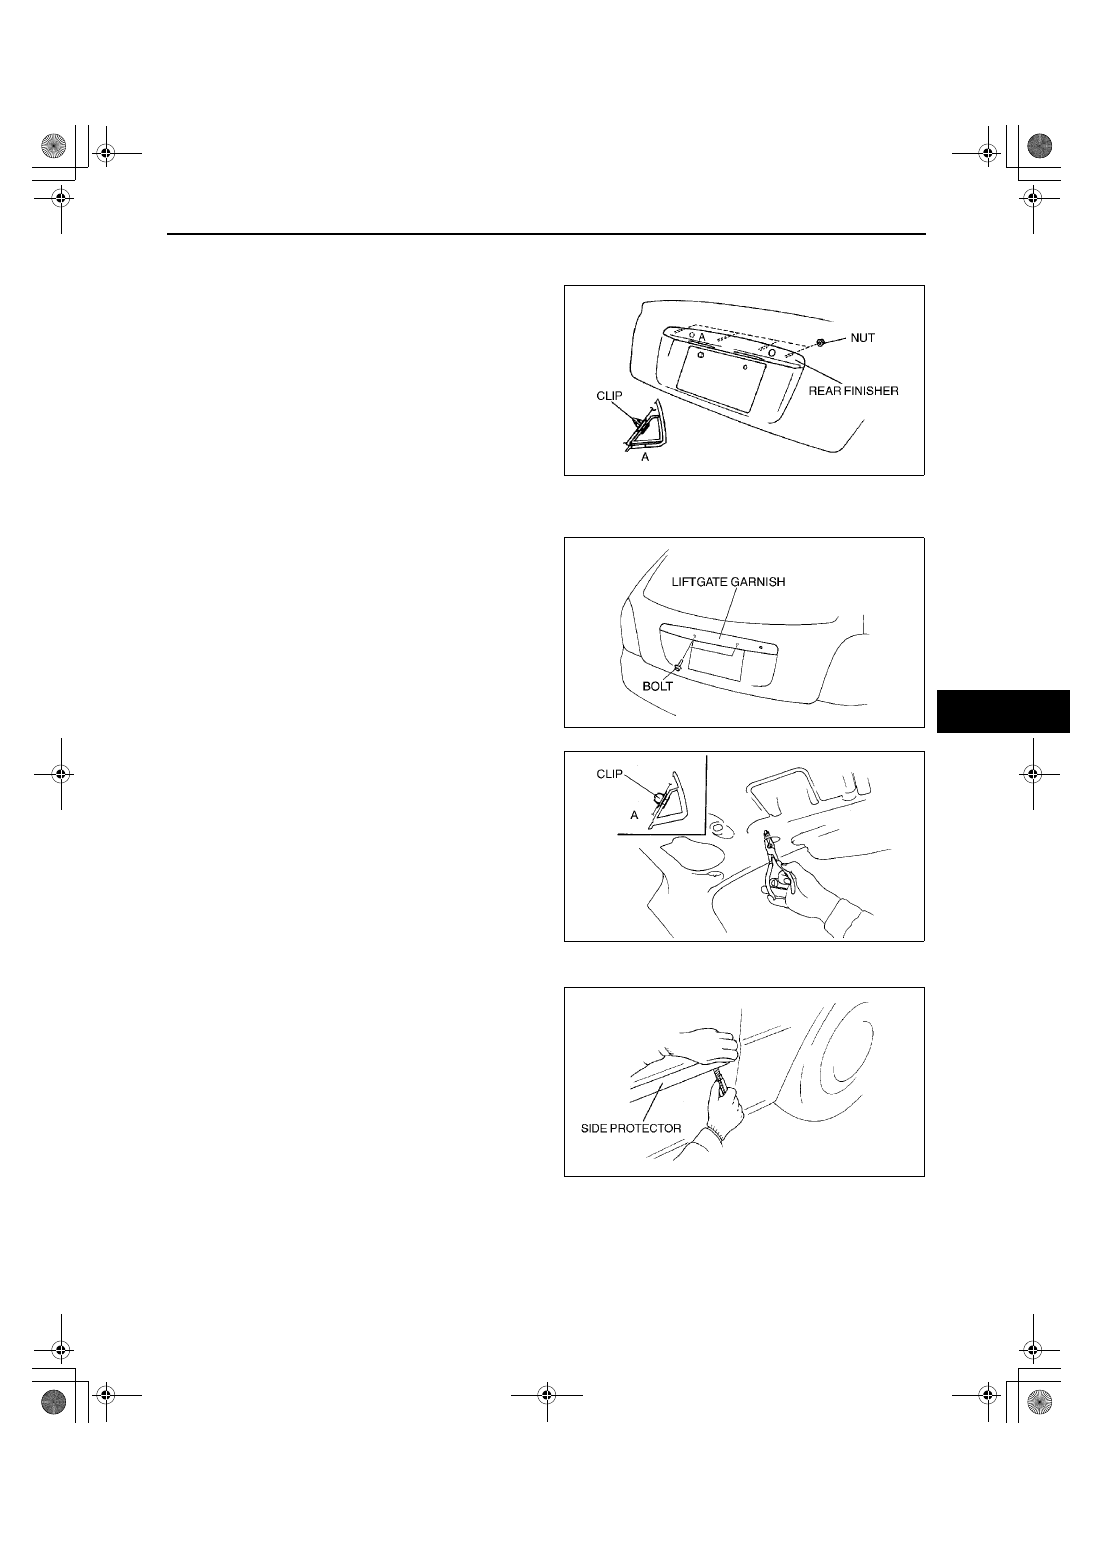
REAR FINISHER REMOVAL/INSTALLATION

A3U091650810W01

1. Remove the nuts.
2. Pull the rear finisher toward you, then disengage 

clip A from the body.

3. Install in the reverse order of removal.

End Of Sie

LIFTGATE GARNISH REMOVAL/INSTALLATION

A3U091650810W02

1. Remove the liftgate key cylinder. (See 09–11–7 LIFTGATE REMOVAL/INSTALLATION.)
2. Remove the bolts.

3. Disengage clip A using pliers.
4. Pull the liftgate garnish downward, then remove it.
5. Install in the reverse order of removal.

End Of Sie

SIDE PROTECTOR REMOVAL

A3U091650680W01

1. Pry the side protector end 20—30 mm {0.8—

1.1 in} using a flathead screwdriver or a razor.

Warning

••••

Using a razor with bare hands can cause 
injury. Always wear gloves when using a 
razor.

2. Pull the side protector toward you, then remove it.

Note

The side protector is installed with 
double-sided adhesive tape. If the side 
protector is difficult to remove, soften the 
double-sided adhesive tape using a hot air blower.

End Of Sie

X3U916WA5

A3U0916W004

A3U0916W005

Y3U916WA1

1712-1U-01G(09-16).fm  3 ページ  2001年6月29日 金曜日 午前10時34分

EXTERIOR TRIM 

09–16–4

SIDE PROTECTOR INSTALLATION

A3U091650680W02

1. Remove the adhesive remaining on the side protector (if it will be reused) and the body using a razor.
2. Remove any grease or dirt from the adhesion surface of the side protector (if it will be reused) and the body.
3. Attach double-sided adhesive tape to the side 

protector as shown (if it will be reused).

Clearance

a: 25.0 mm {0.98 in}
b: 7.0 mm {0.28 in}
c: 1.0—3.0 mm {0.04—0.11 in}
d: 9.0 mm {0.35 in}

4. Peel off the backing from the double-sided 

adhesive tape and attach the side protector onto 
the body as shown.

Clearance

a: 0.66—3.66 mm {0.03—0.14 in}
b: 7.74 mm {0.30 in}
c: 4.0—7.0 mm {0.16—0.27 in}
d: 0.5—3.5 mm {0.02—0.13 in}
e: 3.0—6.0 mm {0.12—0.23 in}

End Of Sie

SIDE STEP MOLDING REMOVAL/INSTALLATION

A3U091651100W01

1. Remove the fasteners and clips B.
2. Disengage clips A from the vehicle front to 

remove the side step molding.

3. Install in the reverse order of removal.

End Of Sie

ROOF RACK REMOVAL/INSTALLATION

A3U091651720W01

1. Remove the headliner.
2. Remove the nuts.
3. Pull the roof rack upward, then remove the roof 

rack from the roof.

4. Install in the reverse order of removal.

End Of Sie

A3U0916W002

A3U0916W003

A3U0916W008

Z4F7728W001

1712-1U-01G(09-16).fm  4 ページ  2001年6月29日 金曜日 午前10時34分

EXTERIOR TRIM 

09–16–5

09–16

ROOF RACK DISASSEMBLY/ASSEMBLY

A3U091651720W02

1. Disassemble in the order indicated in the table.

2. Assemble in the reverse order of disassembly.

End Of Sie

ROOF CARRIER REMOVAL/INSTALLATION

A3U091651720W03

Caution

••••

When installing the front carrier bar to the vehicle, use two or more people to do the work and do 
not scratch the vehicle body.

Front

1. Remove in the order indicated in the table.

2. Install in the reverse order of removal.

1

Front cap

2

Rear cap

3

Screw

4

Front stay

5

Rear stay

Z4F7728W002

1

Screw

2

Cover A

3

Cover B

4

Bolt

5

Front carrier bar
(See 09–16–6 Front Carrier Bar Installation Note.)

A3U0916W011

1712-1U-01G(09-16).fm  5 ページ  2001年6月29日 金曜日 午前10時34分

EXTERIOR TRIM 

09–16–6

Front Carrier Bar Installation Note

1. Loosen the bolt under the front carrier bar, and 

adjust the front carrier bar position.

Rear

1. Remove in the order indicated in the table.

2. Install in the reverse order of removal.

Rear Carrier Bar Removal Note

1. Loosen the bolt, slide the rear carrier bar and 

stay, and remove them from the rail.

A3U0916W014

1

Front cover

2

Screw A

3

Cover  A

4

Bolt

5

Rear carrier bar
(See 09–16–6 Rear Carrier Bar Removal Note.)
(See 09–16–7 Rear Carrier Bar Installation Note.)

6

Spacer 

7

Stay

8

Screw B

9

Cover  B

10

Rear cover

A3U0916W013

A3U0916W010

1712-1U-01G(09-16).fm  6 ページ  2001年6月29日 金曜日 午前10時34分


Content   ..  329  330  331  332   ..