Mazda Protege 5. Manual - part 3


  Index      Mazda     Mazda Protege 5 - service repair manual 2002 year


Search            


Content   ..  1  2  3  4  ..


Mazda Protege 5. Manual - part 3


GENERAL INFORMATION 

00–00–9

00–00

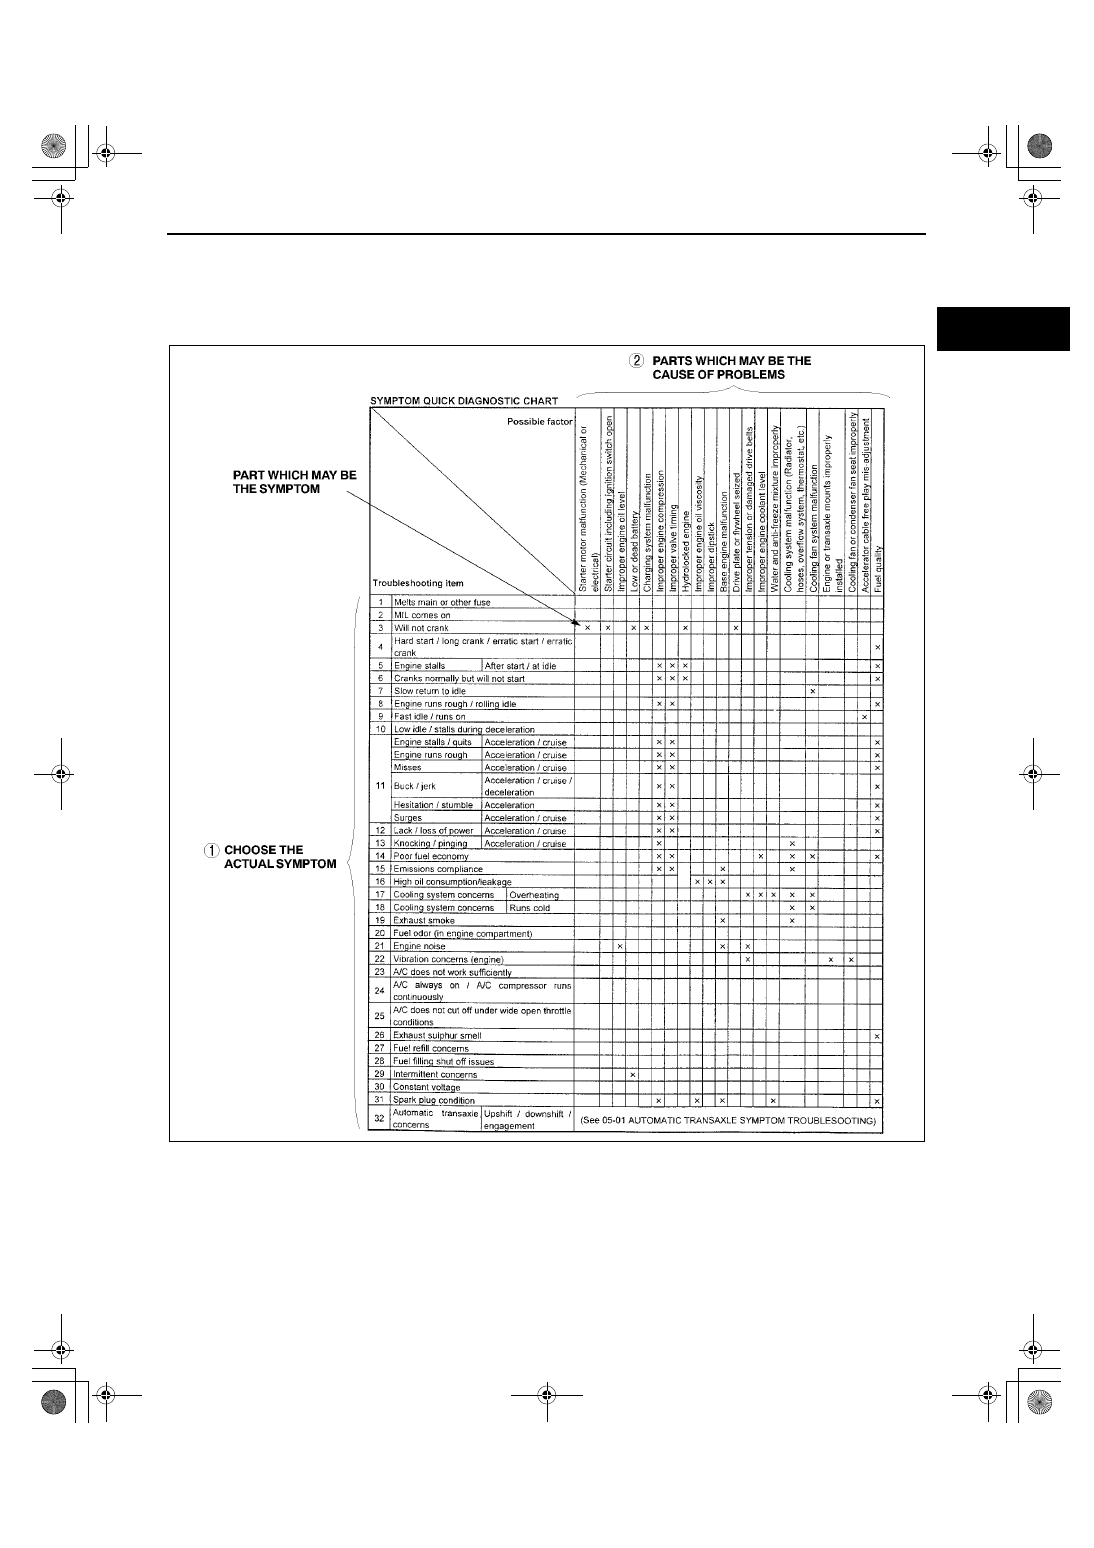
Using the quick diagnosis chart

The chart lists the relation between the symptom and the cause of the malfunction.

The chart is effective in quickly narrowing down the relation between symptom and cause of the malfunction. It 
also specifies the area of the common cause when multiple malfunction symptoms occur.

The appropriate diagnostic inspection relating to malfunction cause as specified by the symptoms can be 
selected by looking down the diagnostic inspection column of the chart.

YLU000WAA

GENERAL INFORMATION 

00–00–10

Using the symptom troubleshooting

Symptom troubleshooting shows diagnostic procedures, inspection methods, and proper action to take for 
each trouble symptom.

End Of Sie

YLU000WA2

GENERAL INFORMATION 

00–00–11

00–00

UNITS

A3U000000002W01

Conversion to SI Units (Système International d'Unités)

All numerical values in this manual are based on SI units. Numbers shown in conventional units are converted 
from these values.

Rounding Off

Converted values are rounded off to the same number of places as the SI unit value. For example, if the SI unit 
value is 17.2 and the value after conversion is 37.84, the converted value will be rounded off to 37.8.

Upper and Lower Limits

When the data indicates upper and lower limits, the converted values are rounded down if the SI unit value is 
an upper limit and rounded up if the SI unit value is a lower limit. Therefore, converted values for the same SI 
unit value may differ after conversion. For example, consider 2.7 kgf/cm

2

 in the following specifications:

210—260 kPa {2.1—2.7 kgf/cm

2

, 30—38 psi}

270—310 kPa {2.7—3.2 kgf/cm

2

, 39—45 psi}

The actual converted values for 2.7 kgf/cm

2

 are 264 kPa and 38.4 psi. In the first specification, 2.7 is used as 

an upper limit, so the converted values are rounded down to 260 and 38. In the second specification, 2.7 is 
used as a lower limit, so the converted values are rounded up to 270 and 39.

End Of Sie

FUNDAMENTAL PROCEDURES

A3U000000004W01

Protection of the Vehicle

Always be sure to cover fenders, seats and floor 
areas before starting work.

Electric current

A (ampere)

Electric power

W (watt)

Electric resistance

 (ohm)

Electric voltage

V (volt)

Length

mm (millimeter)

in (inch)

Negative pressure

kPa (kilo pascal)

mmHg (millimeters of mercury)

inHg (inches of mercury)

Positive pressure

kPa (kilo pascal)

kgf/cm

2

 (kilogram force per square 

centimeter)

psi (pounds per square inch)

Number of 
revolutions

rpm (revolutions per minute)

Torque

N·m (Newton meter)

kgf·m (kilogram force meter)

kgf·cm (kilogram force centimeter)

ft·lbf (foot pound force)

in·lbf (inch pound force)

Volume

L (liter)

US qt (U.S. quart)

Imp qt (Imperial quart)

ml (milliliter)

cc (cubic centimeter)

cu in (cubic inch)

fl oz (fluid ounce)

Weight

g (gram)

oz (ounce)

X3U000WAG

GENERAL INFORMATION 

00–00–12

Preparation of Tools and Measuring Equipment

Be sure that all necessary tools and measuring 
equipment are available before starting any work.

Special Service Tools

Use special service tools or equivalent when they 
are required.

Oil Leakage Inspection

Use either of the following procedures to identify the type of oil that is leaking:

Using UV light (black light)

1. Remove any oil on the engine or transaxle.

Note

Referring to the fluorescent dye instruction manual, mix the specified amount of dye into the engine oil or 
ATF (or transaxle oil).

2. Pour the fluorescent dye into the engine oil or ATF (or transaxle oil).
3. Allow the engine to run for 30 minutes.
4. Inspect for dye leakage by irradiating with UV light (black light), and identify the type of oil that is leaking.

If no dye leakage is found, allow the engine to run for another 30 minutes or drive the vehicle then 
reinspect.

5. Find where the oil is leaking from, then make necessary repairs.

Note

To determine whether it is necessary to replace the oil after adding the fluorescent dye, refer to the 
fluorescent dye instruction manual.

Not using UV light (black light)

1. Gather some of the leaking oil using an absorbent white tissue.
2. Take samples of engine oil and ATF (or transaxle oil), both from the dipstick, and place them next to the leaked 

oil already gathered on the tissue.

X3U000WAH

X3U000WAJ


Content   ..  1  2  3  4  ..