Mazda MX-5 Miata / Grand Touring. Manual - part 26


  Index      Mazda     Mazda MX-5 Miata / Grand Touring - service repair manual 2008-2009 year


Search            


Content   ..  24  25  26  27   ..


Mazda MX-5 Miata / Grand Touring. Manual - part 26


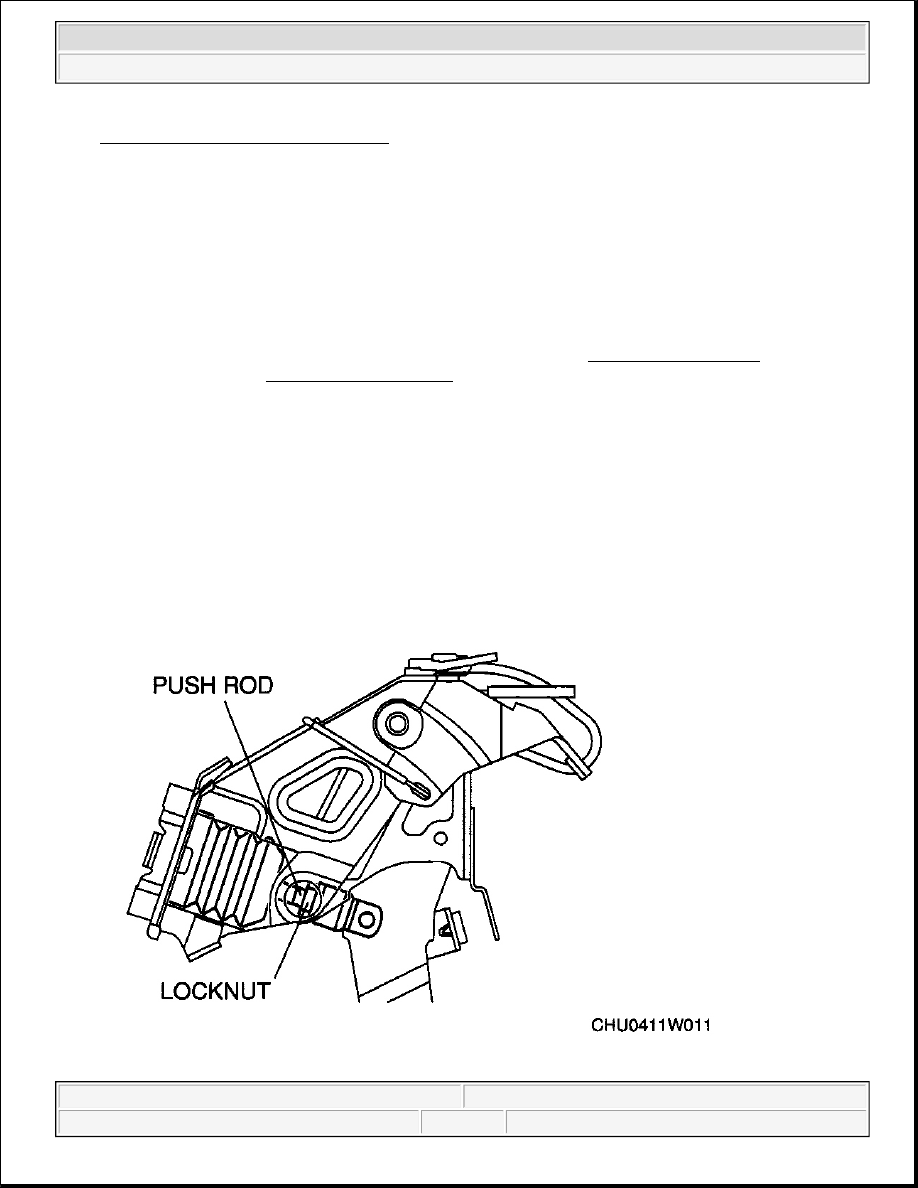
Fig. 4: Inspecting Brake Pedal Height
Courtesy of MAZDA MOTORS CORP.
 

BRAKE PEDAL HEIGHT ADJUSTMENT 

1. Loosen the locknut and turn the push rod to adjust the pedal height.  

2. Tighten the locknut. 

Tightening torque  

20.4-30.6 N.m {2.09-3.12 Kgf.m, 15.0-22.5 ft.lbf}  

3. After adjustment, inspect the pedal play. 

CAUTION:

The brake switch may not operate normally after adjusting the pedal 
height. Whenever adjusting the pedal height, replace the brake 
switch with a new one.  

The interlock cable may not operate normally after adjusting the 
pedal height. Whenever adjusting the pedal height, refer to the 
interlock cable installation note. (See INTERLOCK CABLE 
INSTALLATION NOTE .)  


2008 Mazda MX-5 Miata Grand Touring 

2008 BRAKES Conventional Brake System - MX-5 Miata


Fig. 5: Adjusting Brake Pedal Height
Courtesy of MAZDA MOTORS CORP.
 

BRAKE PEDAL PLAY INSPECTION 

1. Depress the pedal several times to release the vacuum in the power brake unit.  

2. Gently depress the pedal by hand, and measure the pedal play. 

If not within the specification, inspect the wear of the clevis pin and replace it if there is any 
malfunction.  

Brake pedal play  

2-5 mm {0.08-0.19 in}  

PEDAL-TO-FLOOR CLEARANCE INSPECTION 

1. Start the engine and depress the pedal with a pedal force of 147 N {15.0 kgf, 33.0 lbf} .  

2. Measure the distance between the pedal pad center and the insulator, and verify that it is as specified. 

If the pedal-to-floor clearance is less than the specification, check for air in the brake system.  

Brake pedal-to-floor clearance (Brake pedal when depressed at 147 N {15.0 kgf, 33.0 lbf}  

106.9 mm {4.209 in} or more  

NOTE:

If there is no malfunction in the clevis pin, there is a possibility that 
the power brake unit has some malfunction. Verify that there are no 
malfunctions, and replace it if necessary.  


2008 Mazda MX-5 Miata Grand Touring 

2008 BRAKES Conventional Brake System - MX-5 Miata


Fig. 6: Inspecting Pedal-To-Floor Clearance 
Courtesy of MAZDA MOTORS CORP. 

BRAKE PEDAL REMOVAL/INSTALLATION 

CAUTION:

The clearance between the brake switch and the brake pedal is 
automatically adjusted to the correct amount when the brake switch 
connector is connected after the brake switch has been properly 
installed. If the brake switch is not properly installed or the connector 
is connected before installation, the clearance may be incorrect, 
causing a brake light malfunction. Therefore, always verify that the 
brake switch is properly installed before connecting the connector.  

Once the brake switch clearance has automatically been adjusted, it 
cannot be adjusted again. Therefore, replace the switch with a new 


2008 Mazda MX-5 Miata Grand Touring 

2008 BRAKES Conventional Brake System - MX-5 Miata


1. Remove in the order indicated in Fig. 7.  

2. Install in the reverse order of removal. 

Fig. 7: Identifying Brake Pedal Components (With Torque Specifications) 
Courtesy of MAZDA MOTORS CORP. 

BRAKE PEDAL REMOVAL NOTE 

one when replacing the power brake unit or the pedal, or performing 
any procedure that changes the pedal stroke.  

When replacing the brake pedal (AT), it is possible that the 
installation of the interlock cable could become defective. Always 
refer to the interlock cable installation note when replacing the brake 
pedal. (See INTERLOCK CABLE INSTALLATION NOTE .)  

NOTE:

When the brake switch connector is connected to the brake switch, the 
clearance between the pedal and the brake switch is adjusted 
automatically. However, this mechanism will only function one time.  


2008 Mazda MX-5 Miata Grand Touring 

2008 BRAKES Conventional Brake System - MX-5 Miata


Content   ..  24  25  26  27   ..