Mazda MX-5 Miata (1997+). Manual - part 55


  Index      Mazda     Mazda MX-5 Miata - service repair manual 1997 year


Search            


Content   ..  53  54  55  56   ..


Mazda MX-5 Miata (1997+). Manual - part 55


specification. See CYLINDER HEAD and VALVES & VALVE SPRINGS tables under ENGINE 
SPECIFICATIONS
 . 

Installation 

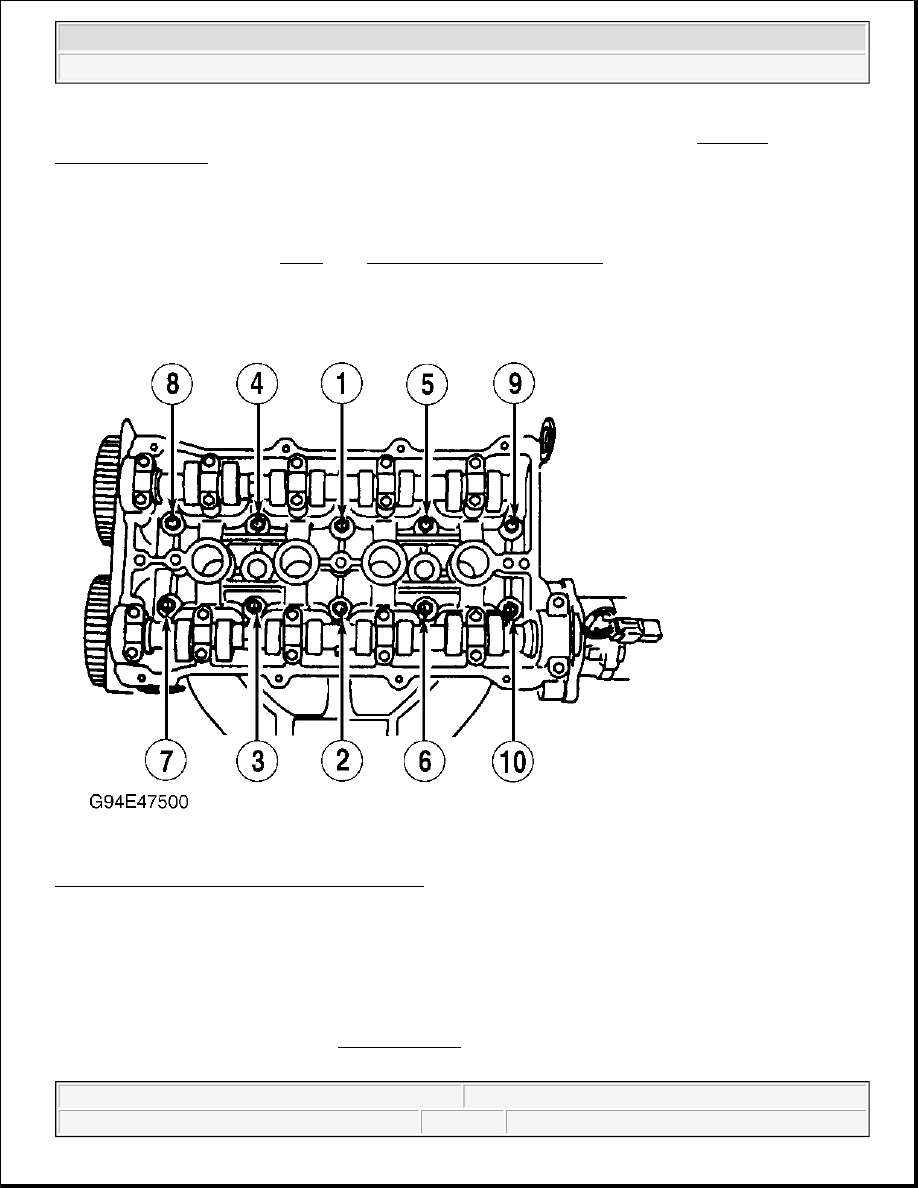
Install cylinder head gasket, cylinder head assembly and bolts. Tighten cylinder head bolts in 2 steps, and in 
sequence, to specification. See Fig. 7 . See TORQUE SPECIFICATIONS . To complete installation, reverse 
removal procedure. 

Fig. 7: Cylinder Head Bolt Tightening Sequence 
Courtesy of MAZDA MOTORS CORP. 

CRANKSHAFT FRONT SEAL 

Removal 

Disconnect negative battery cable. Remove drive belts and crankshaft pulley. Remove water pump pulley, 
timing belt covers and timing belt. See TIMING BELT . Use Crankshaft Lock Tool (49-D011-102) to lock 
crankshaft sprocket into position. Remove crankshaft sprocket bolt. Remove crankshaft sprocket using steering 


1997 Mazda MX-5 Miata 

1997-98 ENGINES 1.8L 4-Cylinder


wheel puller. Pry out seal. 

Installation 

1. Apply light oil coat to seal lip. Using a hammer and seal installer, tap seal into oil pump body until it is 

flush with edge of pump body. DO NOT bottom seal in pump body. Align keyway slots, and install 
crankshaft sprocket and Woodruff key with tapered side toward oil pump body. Install crankshaft 
sprocket bolt.  

2. Using Crankshaft Lock Tool (49-D011-102), lock crankshaft sprocket into position. Tighten lock bolt to 

specification. See TORQUE SPECIFICATIONS .  

3. Install timing belt. See TIMING BELT under REMOVAL & INSTALLATION. Install timing belt 

covers, pulleys and drive belts. Reconnect negative battery cable and ensure timing is correct.  

TIMING BELT 

Removal (Miata) 

1. Disconnect negative battery cable. Drain cooling system. Remove radiator hose and by-pass hoses from 

thermostat housing. Remove air cleaner intake duct assembly from between throttle body and air cleaner 
filter housing.  

2. Remove drive belts and water pump pulley. Align crankshaft pulley timing mark with cylinder No. 1 at 

TDC of compression stroke. Hold crankshaft pulley stationary. Remove crankshaft pulley bolts and 
pulley. Remove crankshaft pulley hub bolt and hub.  

3. Remove cylinder head cover. Remove upper, center and lower timing belt cover. If timing belt is to be 

reused, mark timing belt rotation direction. Ensure timing marks on camshaft sprockets are aligned. See 
Fig. 8 . Loosen timing belt tensioner lock bolt, and move tensioner away from belt with spring fully 
expanded. Remove timing belt.  

Removal (Protege) 

1. Disconnect negative battery cable. Raise and support vehicle. Remove right front wheel. Remove right 

side cover and undercover.  

2. Remove drive belts and water pump pulley. Align crankshaft pulley timing mark with cylinder No. 1 at 

TDC of compression stroke. Hold crankshaft stationary. Remove crankshaft pulley bolts and pulley. 
Remove crankshaft pulley hub bolt and hub.  

3. Remove cylinder head cover. Remove upper, center and lower timing belt cover. If timing belt is to be 

reused, mark timing belt rotation direction. Ensure timing marks on camshaft sprockets are aligned. See 
Fig. 8 . Loosen timing belt tensioner lock bolt, and move tensioner away from belt with spring fully 
expanded. Remove timing belt.  

NOTE:

For 1997-98 vehicles, the manufacturer recommends the belt be replaced at 
60,000 mile intervals for vehicles sold outside of California and Massachusetts. 
For vehicles sold in California and Massachusetts, inspect timing belt at 60,000 
and 90,000 miles, and replace timing belt at 105,000 miles.


1997 Mazda MX-5 Miata 

1997-98 ENGINES 1.8L 4-Cylinder


Inspection (All Models) 

Check timing belt for cracks, peeling, abrasion or other damage. Check tensioner bearing for looseness or 
roughness of rotation. Inspect tensioner spring for stretching. Replace parts as necessary. 

Installation (All Models) 

1. Position notch on crankshaft sprocket to 12 o'clock position (aligned with mark on oil pump). Align 

timing marks on camshaft sprockets. See Fig. 8 . Ensure crankshaft timing mark is at TDC. Install belt 
around crankshaft sprocket, then working in a counterclockwise direction, route belt around camshaft 
sprockets.  

2. Loosen timing belt tensioner lock bolt and allow spring to apply tension on belt. Snug tensioner lock bolt. 

Rotate crankshaft 2 complete turns in direction of normal engine rotation. Ensure timing marks align. If 
timing marks are not aligned, remove belt, realign all timing marks, and repeat installation procedure.  

3. Check timing belt deflection with 22 lbs. (10 kg) of pressure applied to belt. See Fig. 9 . Ensure timing 

belt deflection is within specification. See TIMING BELT DEFLECTION .  

TIMING BELT DEFLECTION 

Application

(1)

 Deflection In. (mm)

Miata & Protege

.35-.45 (9.0-11.5)

(1)

Deflection measurement is with 22 lbs. (10 kg) of pressure applied to timing belt. See Fig. 9 .


1997 Mazda MX-5 Miata 

1997-98 ENGINES 1.8L 4-Cylinder


Fig. 8: Aligning Camshaft Timing Marks 
Courtesy of MAZDA MOTORS CORP. 


1997 Mazda MX-5 Miata 

1997-98 ENGINES 1.8L 4-Cylinder


Content   ..  53  54  55  56   ..