Range Rover Classic. Manual - part 76


  Index      Land Rover     Range Rover Classic - service manual 1995 year


Search            


Content   ..  74  75  76  77   ..


Range Rover Classic. Manual - part 76


44

AUTOMATIC GEARBOX

6

REPAIR

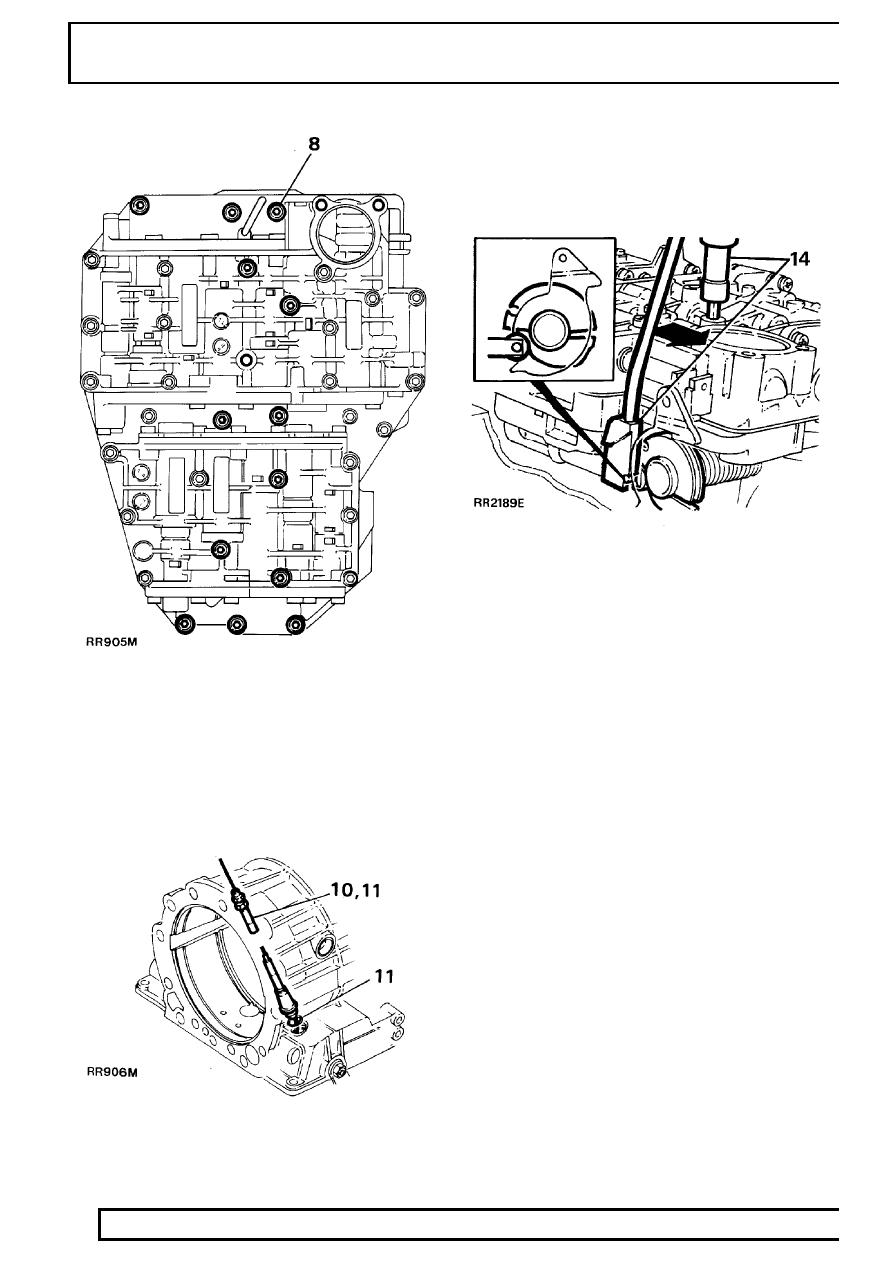
10. Using kickdown cable remover LST112, remove

cable and its housing from casing and discard.

Refit

11. Fit new cable and new ’O’ ring into casing.

12. Spring load cam by turning once before fitting.

Fit nipple into cam seat.

13. Fit control unit after cleaning face with a lint free

rag. Ensure selector shaft locates into gear shift
fork. Fit thirteen bolts loosely.

14. Place selector linkage setting gauge LST109 in

position, gently press control unit in direction
shown. Tighten all thirteen bolts to

8Nm.

15. Remove setting gauge. Fit oil screen, tighten

fixings to

8Nm.

16. Refit sump with new gasket.
17. Refit six retaining plates tighten screws to

8Nm.

18. Reconnect oil filler tube. Tighten to

70Nm. Fit

sump plug with new seal. Tighten to

10Nm.

19. Fit chassis cross member
20. Fit front exhaust assembly
21. Reconnect battery negative lead.
22. Add correct quantity and grade oil to gearbox.

See LUBRICANTS, FLUIDS AND
CAPACITIES, Information, Recommended
Lubricants and Fluids

23. Connect kickdown cable to engine.

Adjust

24. Adjust cable sheath to achieve a crimp gap of

0.25 to 1.25 mm.

25. Hold cable sheath while tightening locknuts.
26. Ensuring vehicle is on level ground with park

brake applied. Check oil level with engine at idle
with neutral selected, after selecting each gear.

ZF

7

REPAIR

EXTENSION HOUSING

Service repair no - 44.20.18

1. Remove transfer box.

See TRANSFER

GEARBOX, Repair, Borg Warner Transfer
Gearbox

2. Remove transfer gear selector.
3. Loosen nine bolts holding extension housing.
4. Remove extension housing, discard gasket.
5. Place extension housing on bench, remove oil

seal.

6. Ensure that all surfaces are clean and case is

free from damage.

7. If fitting new case, fit two dowels to case.
8. Fit a new gasket and oil seal using rear oil seal

replacer LST108.

9. Fit extension case to gearbox, ensure oil seal is

not damaged by extension shaft.

10. Fit and tighten nine bolts to

23 Nm.

11. Refit transfer gear selector.
12. Tighten three bolts to

25 Nm.

13. Refit transfer box.

OIL SCREEN

Service repair no - 44.24.07

1. Site vehicle on ramp. Disconnect battery

negative lead.

2. Drain gearbox oil.
3. Discard sump plug seal.
4. Remove level tube from sump.
5. Remove six retaining plates and bolts.
6. Remove sump, discard gasket.
7. Loosen three screws from oil screen.
8. Remove oil screen, discard ’O’ rings.
9. Separate oil screen from suction tube, discard

’O’ ring and oil screen.

10. Fit two new ’O’ rings to oil screen.
11. Fit suction tube to oil screen.
12. Fit oil screen to control unit, tighten three bolts to

8 Nm.

44

AUTOMATIC GEARBOX

8

REPAIR

13. Refit sump using a new gasket.
14. Secure using six retaining plates and bolts.

Tighten to

8Nm.

15. Reconnect oil level/filler tube. Tighten to

70 Nm.

16. Fit sump plug using a new seal. Tighten to

10

Nm.

17. Connect battery lead.
18. Add correct oil to gearbox.

See LUBRICANTS,

FLUIDS AND CAPACITIES, Information,
Recommended Lubricants and Fluids

19. Ensuring vehicle is on level ground with park

brake applied, check oil level with engine at idle,
neutral selected, after selecting each gear.

CONTROL UNIT

1. Site vehicle on ramp. Disconnect battery

negative lead.

2. Drain gearbox oil into a container.
3. Discard sump plug seal.
4. Remove oil level tube from sump.

5. Remove six retaining plates and bolts.
6. Remove sump, discard gasket.
7. Loosen three bolts and remove oil screen.
8. Loosen remaining thirteen bolts retaining control

unit.

ZF

9

REPAIR

9. Clean surfaces using a lint-free rag. Ensure no

damage has occurred to mounting face of case.

10. Fit control unit ensuring selector shaft locates

into gear shift fork. Loosely fit thirteen bolts.

11. Place selector linkage setting gauge LST109 in

position, gently press control unit against tool.
Tighten to

8Nm.

12. Remove setting gauge. Fit oil screen. Tighten to

8Nm.

13. Refit sump using a new gasket.
14. Secure with six retaining plates and bolts.

Tighten to

8 Nm.

15. Reconnect oil level tube. Tighten to

70 Nm.

16. Fit sump plug with new seal. Tighten to

10 Nm.

17. Reconnect battery negative lead.
18. Add correct quantity and grade of oil to gearbox.

See LUBRICANTS, FLUIDS AND
CAPACITIES, Information, Recommended
Lubricants and Fluids

19. Ensure vehicle is on level ground with park

brake applied. Check oil level with engine at idle,
neutral selected, after selecting each gear.


Content   ..  74  75  76  77   ..