Range Rover Classic. Manual - part 66


  Index      Land Rover     Range Rover Classic - service manual 1995 year


Search            


Content   ..  64  65  66  67   ..


Range Rover Classic. Manual - part 66


BORG WARNER

3

OVERHAUL

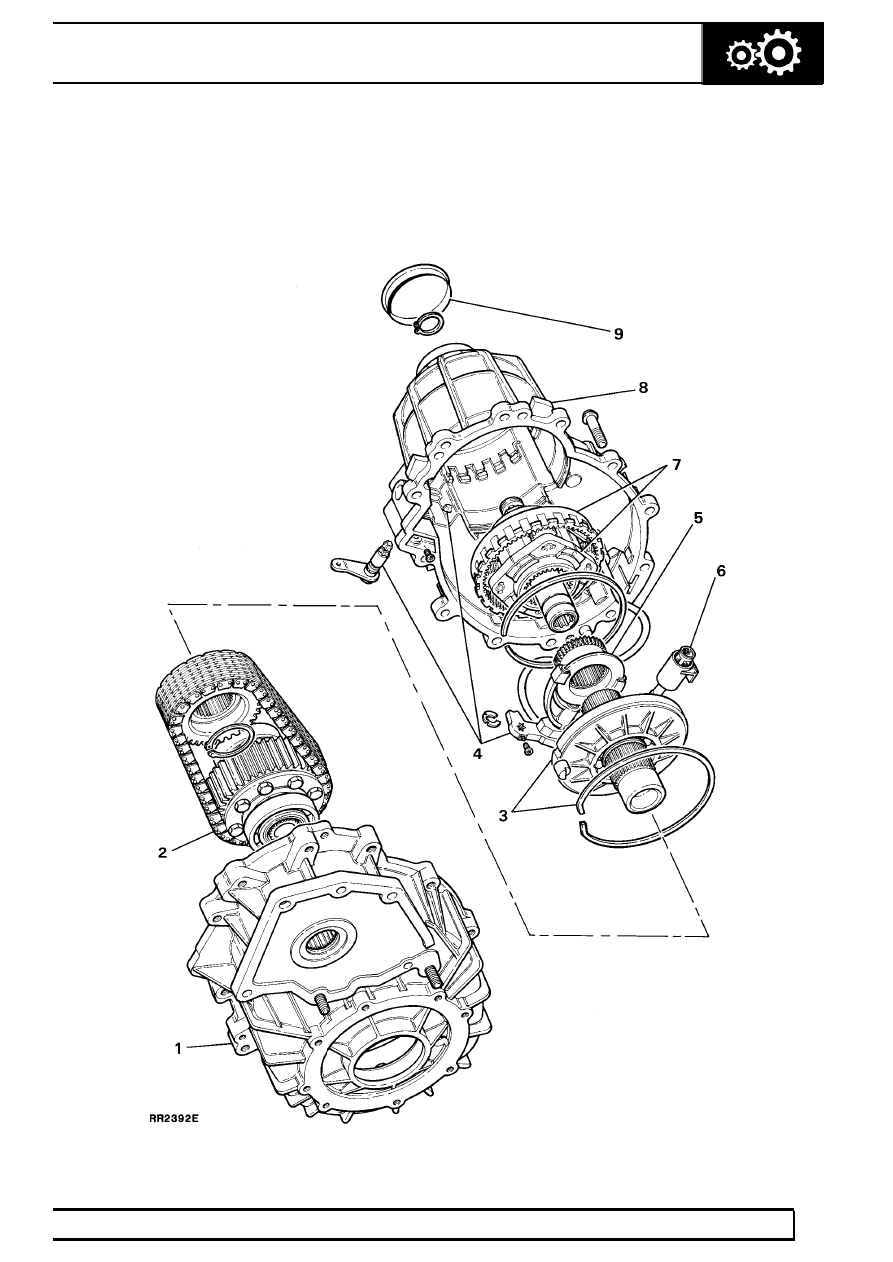
1. Front cover - main casing
2. Transfer sprocket, centre differential assembly,

driven sprocket and chain

3. Bearing carrier and transfer shaft
4. Selector fork and lever assembly
5. Selector sleeve

6. Oil pickup pipe and filter
7. Planetary set (epicyclic unit)
8. Rear cover - main case
9. End cap

41

TRANSFER GEARBOX

4

OVERHAUL

BORG WARNER TRANSFER GEARBOX

DISMANTLING, OVERHAUL AND REASSEMBLY

Service Tools.

See Service tools, Adapter Plate

Transfer Box

18G1422 - Oil seal replacer
18G1205 - Adjustable flange holding wrench
18G134 - Bearing and oil seal replacer
LST550 - 6 - Input shaft oil seal replacer

NOTE: Before commencing the overhaul
procedure thorougly clean the exterior of
the transfer gearbox. If the gearbox oil has

not previously been drained, drain the oil into a
suitable container.

DISMANTLING

NOTE: Before commencing the
dismantling procedure remove the brake
drum assembly.

Rear output housing

1. Remove the six bolts and withdraw the rear

output housing complete with output shaft.

Front output housing

NOTE: Invert the gearbox. Level up the
assembly by placing wooden blocks under
the transfer gearbox to main gearbox joint

face.

2. Remove the eight bolts and withdraw the front

output housing complete with viscous unit.

Front cover - main casing

3. Remove the eleven bolts securing the front and

rear cover (main case) together.

BORG WARNER

5

OVERHAUL

4. Clean any previous sealant from the threads of

the bolts.

5. Using two levers between the cast lugs on the

outer edges of the casing, to assist in separating
the gearbox, carefully prise the front cover from
the rear cover.

CAUTION: Do not lever between the
mating faces.

Transfer sprocket, centre differential, assembly
and chain

NOTE: Before dismantling, mark one chain
link and corresponding tooth on the
transfer sprocket with an identification

line. This is to ensure that the balance of the unit
is maintained when reassembled with original
components and that the chain is fitted the correct
way up.

6. Remove the circlip retaining the transfer

sprocket to the transfer shaft.

7. Place two thin pieces of wood on the joint face to

prevent damage and using two levers behind the
differential assembly carefully lever the
differential bearing from its bore while
simultaneously easing the transfer sprocket off
the transfer shaft to maintain alignment during
removal.

8. Remove the transfer sprocket from the chain.
9. Remove the differential assembly from the chain.

Bearing carrier and transfer shaft

10. Insert a screw driver between the anti - rotation

dowel and snap ring gently prise the snap ring
out of the groove.

11. Withdraw the carrier complete with transfer

shaft.

12. Withdraw the anti - rotation dowel.

41

TRANSFER GEARBOX

6

OVERHAUL

Selector fork assembly

13. Using Torx bit 25 remove the screw securing the

selector arm to the selector lever shaft.

14. Remove the retaining clip securing the selector

fork arm to the selector lever shaft.

15. Using Torx bit 25 remove the screw retaining the

selector lever.

16. Remove the selector lever shaft from the case

and fork assembly.

17. Withdraw the selector fork assembly and

selector sleeve.

18. Retrieve the selector plunger and spring from the

rear cover.

Planetary set (Epicyclic unit)

19. Turn the case over and prise the end cap off the

planetary set housing.

20. Remove the circlip retaining the sun gear shaft.

21. Turn the casing over and remove the large snap

ring retaining the planetary set.

22. Withdraw the annulus and planetary assembly

from the planetary set housing, complete with oil
pump, feed pipe and filter.


Content   ..  64  65  66  67   ..