Range Rover Body Repair Manual - part 21


  Index      Land Rover     Range Rover - Body Repair Manual 1996 year


Search            


Content   ..  19  20  21  22   ..


Range Rover Body Repair Manual - part 21


CHASSIS AND BODY

9

REPAIR

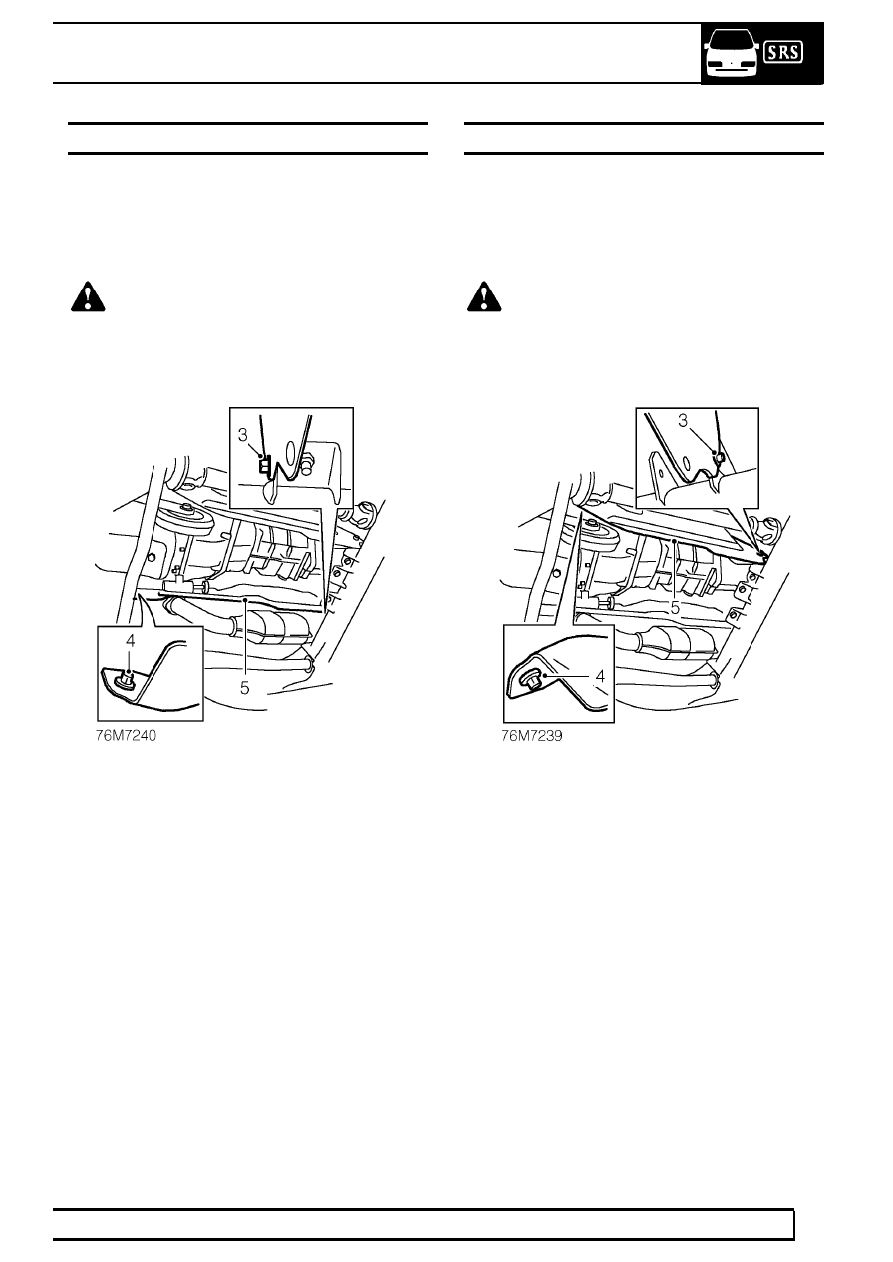
GEARBOX ACOUSTIC COVER - RH

Service repair no - 76.11.14

Remove

1. Raise front of vehicle.

WARNING: Support on safety stands.

2. Remove gearbox lower acoustic cover.

See this

section.

3. Remove bolt securing RH acoustic cover to

crossmember.

4. Remove bolt securing RH acoustic cover to

chassis member.

5. Remove gearbox RH acoustic cover.

Refit

6. Fit acoustic cover to chassis and secure with

bolts.

7. Fit gearbox lower acoustic cover.

See this

section.

GEARBOX ACOUSTIC COVER - LH

Service repair no - 76.11.15

Remove

1. Raise front of vehicle.

WARNING: Support on safety stands.

2. Remove gearbox lower acoustic cover.

See this

section.

3. Remove bolt securing LH acoustic cover to

crossmember.

4. Remove bolt securing LH acoustic cover to

chassis member.

5. Remove gearbox LH acoustic cover.

Refit

6. Fit acoustic cover to chassis and secure with

bolts.

7. Fit gearbox lower acoustic cover.

See this

section.

76

CHASSIS AND BODY

NEW RANGE ROVER

10

REPAIR

FRONT BUMPER VALANCE

Service repair no - 76.22.72

Remove

1. Raise the vehicle.

WARNING: Support on safety stands.

2. Remove battery cover for access to RH fog

lamp.

3. Disconnect fog lamp multiplugs and breather

hoses.

4. Release 2 clips securing bumper ends to

mounting brackets.

CAUTION: Loosen bolts securing bumper
end mounting brackets to chassis frame to
avoid damage to sealing rubber during

bumper remove and refit.

CHASSIS AND BODY

11

REPAIR

5. Remove 2 bumper bolt access plugs from

bumper valance. Remove bolts.

6. With assistance remove bumper assembly.

Do

not carry out further dismantling if
component is removed for access only.

7. Remove 8 studs and 6 clips securing extensions

spoiler. Remove extension.

8. Remove 8 screws securing fog lamps. Remove

lamps.

9. Remove 8 bolts securing bumper end brackets

to bumper. Remove brackets.

WARNING: If front bumper is damaged due
to impact, the impact cans must be
inspected. There must be no visible

deformation. The overall length must be 188.25
mm æ 0.5 mm. Replace the impact cans if
necessary.

Refit

10. Fit end brackets and secure with bolts. Fit fog

lamps and secure with screws.

11. Fit extension and secure with clips and studs.
12. With assistance fit bumper assembly, tighten

bolts to

70Nm. (52 lbf.ft)

13. Fit bolt access plugs.
14. Align end brackets, tighten bolts and secure

bumper end clips.

15. Connect fog lamp multiplugs and breather

hoses, fit battery cover.

16. Remove safety stands. Lower vehicle.

76

CHASSIS AND BODY

NEW RANGE ROVER

12

REPAIR

EXTENSION SPOILER FRONT BUMPER

Service repair no - 76.22.78

Remove

1. Raise the vehicle.

WARNING: Support on safety stands.

2. Remove 8 studs and 6 clips securing spoiler to

front bumper.

3. Remove spoiler halves.

Refit

4. Fit spoiler halves to bumper. Secure with clips

and studs.

5. Remove safety stands. Lower vehicle.

REAR BUMPER VALANCE

Service repair no - 76.22.74

Remove

1. Raise the vehicle.

WARNING: Support on safety stands.

2. Remove rear road wheels.
3. Remove 3 screws securing each mud flap.

Remove mud flaps.

4. Remove 2 screws securing each wheel arch

liner extension panel to rear bumper/chassis.

5. Remove 2 wheel arch liner extension panels.
6. Release 2 clips securing bumper ends to

mounting brackets.


Content   ..  19  20  21  22   ..