Range Rover. Manual - part 326


  Index      Land Rover     Range Rover P38 - service manual 1995 year


Search            


Content   ..  324  325  326  327   ..


Range Rover. Manual - part 326


ELECTRICAL

45

REPAIR

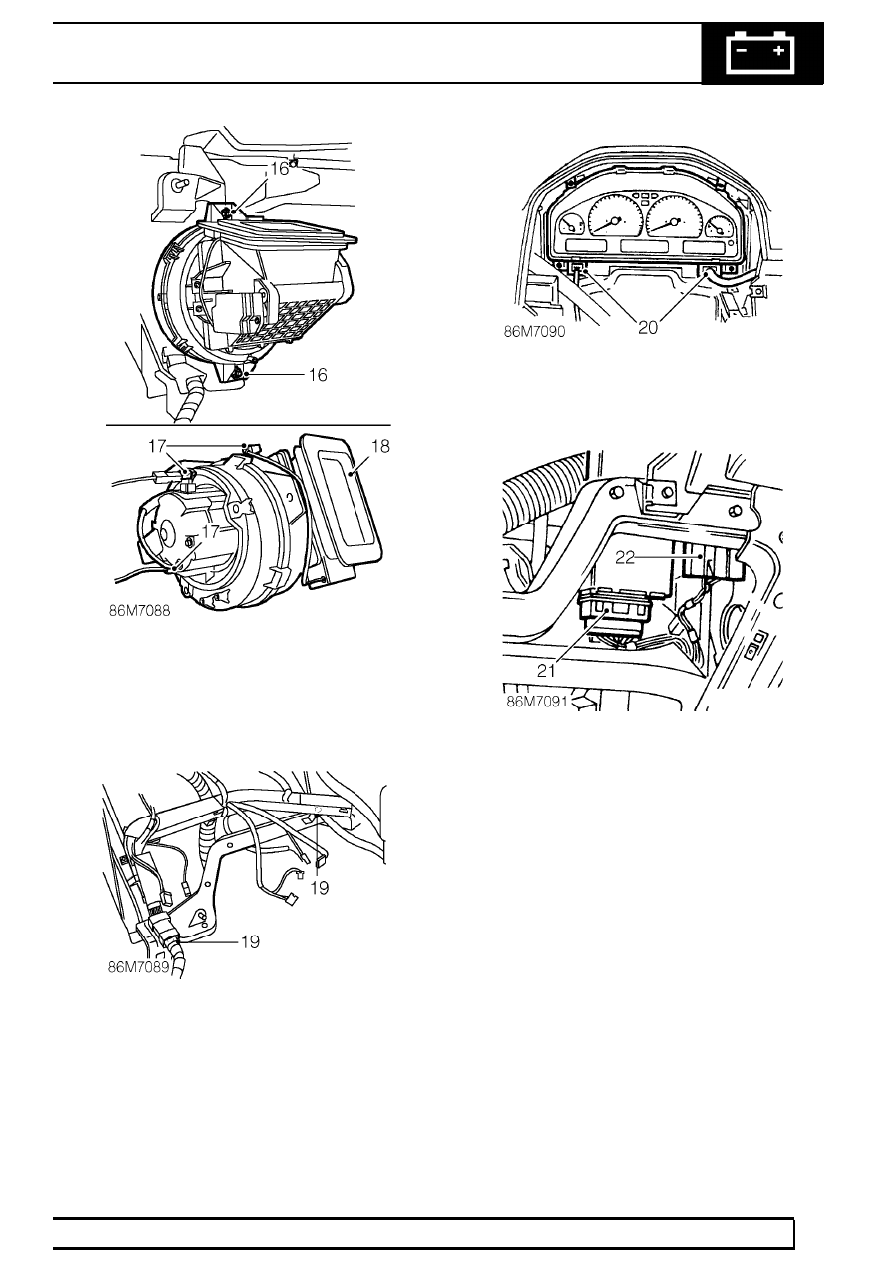
16. Remove 2 nuts securing driver side heater

blower to fascia.

17. Position blower and disconnect 2 multiplugs and

1 Lucar from unit.

18. Remove blower unit.

19. Release 2 clips securing harness duct to lower

RH fascia.

20. Disconnect 2 multiplugs from instrument pack.

21. Disconnect multiplug from cruise control ECU.
22. Release cruise control relay from fascia bracket

and remove relay.

86

ELECTRICAL

NEW RANGE ROVER

46

REPAIR

23. Remove 4 screws securing heater control unit to

fascia.

24. Position heater control unit and disconnect 4

multiplugs from unit.

25. Remove heater control unit.

26. Remove 5 screws securing fascia switch pack to

fascia.

27. Position fascia switch pack and disconnect 7

multiplugs and 2 Lucars from rear of switch
pack. Do not disconnect multiplug from high/low
switch.

28. Remove fascia switch pack.

29. Release 3 clips securing harness to fascia.
30. Remove fascia harness.

ELECTRICAL

47

REPAIR

Refit

31. Position fascia harness to fascia.
32. Position harness to fascia and secure with clips.
33. Position fascia switch pack and connect

multiplugs and Lucars.

34. Align switch pack to fascia and secure with

screws.

35. Position heater control unit and connect

multiplugs.

36. Align heater controls to fascia and secure with

screws.

37. Fit cruise control relay to harness and secure to

fascia bracket.

38. Connect cruise control ECU multiplug.
39. Connect multiplugs to instrument pack.
40. Position harness duct and secure with clips.
41. Position driver side blower unit and connect

multiplugs and Lucar.

42. Align blower unit to fascia and secure with nuts.
43. Connect multiplug to heater matrix pipe sensor.
44. Connect multiplug to evaporator sensor.
45. Position harness to evaporator and secure with

clips.

46. Position harness to sunlight sensor and connect

multiplugs.

47. Secure harness to fascia with clip.
48. Position sunlight sensor multiplug inside fascia.
49. Position passenger airbag harness to fascia and

secure with clips.

50. Position harness to LH lower fascia and secure

with clips.

51. Fit heater duct to heater.
52. Position passenger’s side heater blower and

connect multiplugs and Lucar.

53. Fit blower unit to heater duct and fascia and

secure with nuts.

54. Fit passenger airbag module.

See

SUPPLEMENTARY RESTRAINT SYSTEM,
Repair.

55. Fit fascia assembly.

See CHASSIS AND

BODY, Repair.

HORN - FROM 99MY

Service repair no - 86.30.10

Remove

1. Release fixings and remove battery cover.
2. Disconnect battery earth lead.
3. RH horn: Remove battery positive lead and

remove battery.

4. RH horn: Remove 2 screws securing harness

clamp to carrier and release harnesses from
carrier.

5. RH horn: Remove 4 bolts securing battery

carrier to body and remove carrier.

6. Release multiplug from horn.
7. Remove nut securing horn to bracket and

remove horn.

Refit

8. Fit new horn to bracket and tighten nut to

13 Nm

(10 lbf.ft).

9. Connect multiplug to horn.

10. RH horn: Fit battery carrier and secure with

bolts.

11. RH horn: Position harnesses and secure clamp

with screws.

12. RH horn: Fit battery and connect positive lead.
13. Connect battery earth lead.
14. Fit battery cover and secure with fixings.

86

ELECTRICAL

NEW RANGE ROVER

48

REPAIR

AUXILIARY POWER SOCKET - FROM 2000MY

Service repair no - 86.65.62

Remove

1. Remove screw securing power socket to

mounting bracket.

2. Release clip securing power socket to power

socket bracket and remove bracket.

3. Disconnect 1 multiplug and 1 lucar from power

socket and remove socket.

Refit

4. Position socket and bracket and connect lucar

and multiplug.

5. Secure socket to mounting bracket with clip and

screw.

HARNESS - ENGINE - V8 - FROM 99MY

Service repair no - 86.70.17

Remove

1. Remove alternator drive belt.

See this section.

2. Remove ignition coils.

See ENGINE

MANAGEMENT SYSTEM, Repair.

3. Remove ignition ECM.

See ENGINE

MANAGEMENT SYSTEM, Repair.

4. Disconnect MAF sensor multiplug.

5. Disconnect A/C compressor multiplug.
6. Remove 4 bolts securing A/C compressor,

release compressor and tie aside.


Content   ..  324  325  326  327   ..