Range Rover. Manual - part 320


  Index      Land Rover     Range Rover P38 - service manual 1995 year


Search            


Content   ..  318  319  320  321   ..


Range Rover. Manual - part 320


ELECTRICAL

21

REPAIR

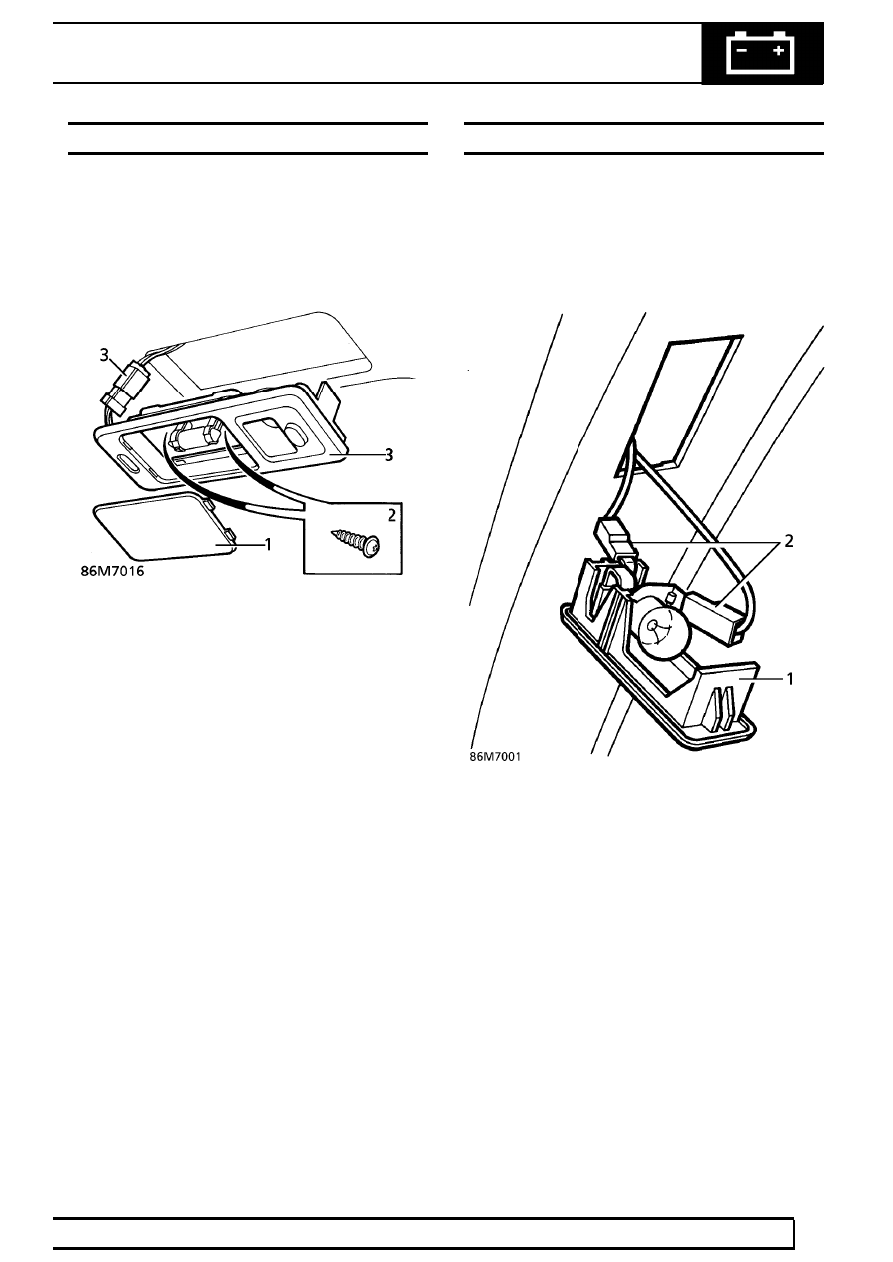
INTERIOR LAMP ASSEMBLY

Service repair no - 86.45.13

Remove

1. Remove lamp lens.
2. Remove 2 screws securing lamp to roof.

3. Release lamp assembly. Disconnect multiplug.

Remove lamp.

Refit

4. Reverse removal procedure.

LOAD SPACE LAMP

Service repair no - 86.45.16

Remove

1. Release lamp from tailgate.
2. Disconnect leads. Remove lamp.

Refit

3. Reverse removal procedure.

86

ELECTRICAL

NEW RANGE ROVER

22

REPAIR

AERIAL AMPLIFIER

Service repair no - 86.50.29

Remove

1. Remove parcel tray support panel.

See

CHASSIS AND BODY, Repair.

2. Disconnect 2 multiplugs from amplifier.

3. Release co-axial lead from amplifier.
4. Remove 2 screws securing aerial amplifier to

body.

5. Remove aerial amplifier.

Refit

6. Reverse removal procedure.

AMPLIFIER - DIGITAL SOUND PROCESSING
(DSP) - FROM 2000MY

Service repair no - 86.50.36

Remove

1. Remove LH parcel tray support trim.

See

CHASSIS AND BODY, Repair.

2. Remove sound insulation panel from body.

3. Remove 1 bolt and 2 Allen bolts securing DSP

amplifier to bracket.

ELECTRICAL

23

REPAIR

4. Disconnect multiplug from DSP amplifier and

remove amplifier.

Refit

5. Position amplifier to body and connect multiplug.
6. Secure amplifier to bracket with bolts.
7. Fit sound insulation to body.
8. Fit LH parcel tray support trim.

See CHASSIS

AND BODY, Repair.

SPEAKER AMPLIFIER - FRONT

Service repair no - 86.50.92

Remove

1. Remove door trim casing.

See CHASSIS AND

BODY, Repair.

2. Disconnect multiplug from speaker amplifier.
3. Remove 2 screws securing amplifier. Remove

amplifier.

Refit

4. Reverse removal procedure.

86

ELECTRICAL

NEW RANGE ROVER

24

REPAIR

SPEAKER AMPLIFIER - REAR

Service repair no - 86.50.92

Remove

1. Remove door trim casing.

See CHASSIS AND

BODY, Repair.

2. Disconnect multiplug from speaker amplifier.
3. Remove 2 screws securing amplifier. Remove

amplifier.

Refit

4. Reverse removal procedure.

COMPACT DISC AUTOCHANGER

Remove

1. Release 4 turnbuckles securing access panel.

Remove panel.

2. Disconnect autochanger multiplug.

3. Remove 4 screws securing autochanger to

bracket.

4. Remove compact disc autochanger.

Refit

5. Reverse removal procedure.


Content   ..  318  319  320  321   ..