Range Rover. Manual - part 230


  Index      Land Rover     Range Rover P38 - service manual 1995 year


Search            


Content   ..  228  229  230  231   ..


Range Rover. Manual - part 230


CHASSIS AND BODY

15

REPAIR

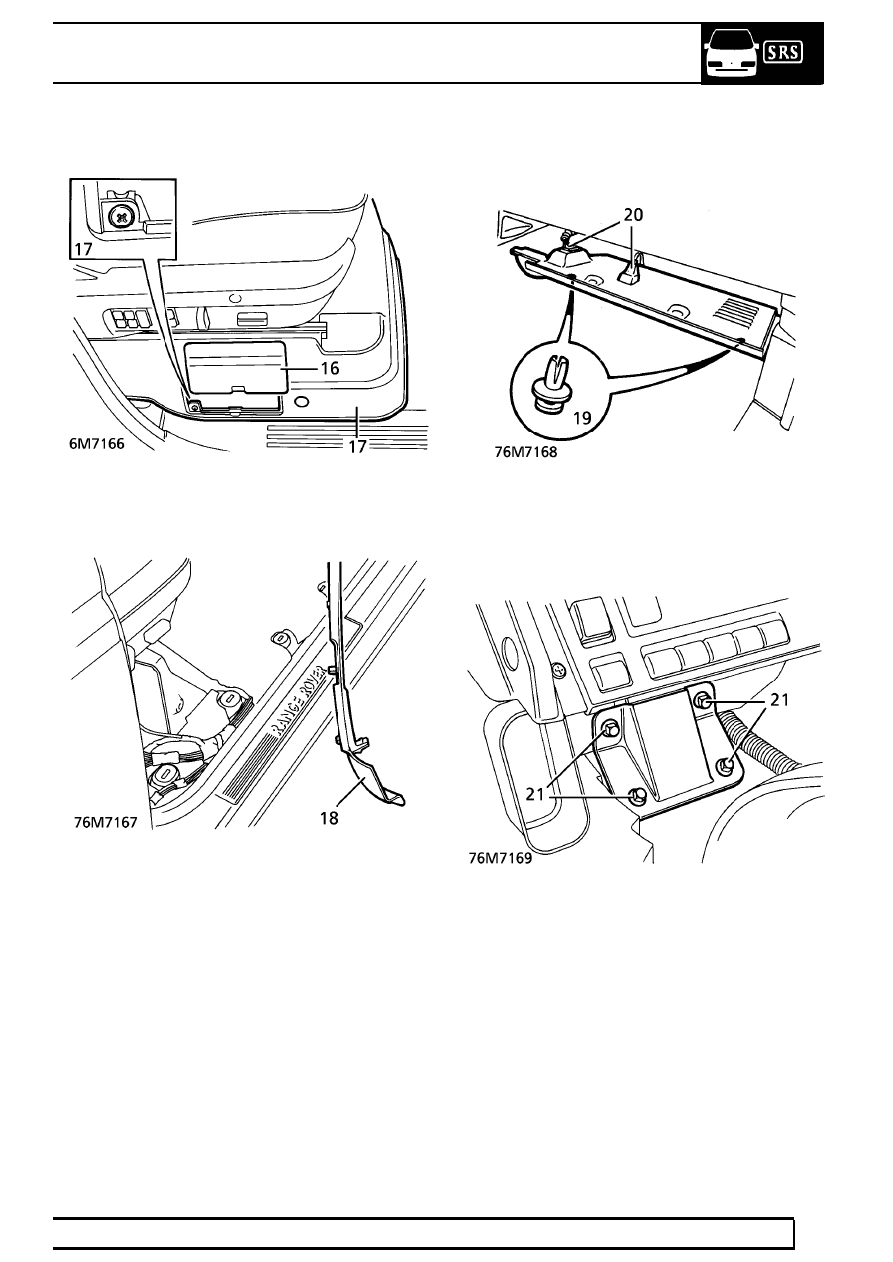
16. Remove fuse cover from driver’s seat base trim.

17. Remove screw and 2 trim studs, remove seat

base trim.

18. Release 4 sprag clips, remove driver’s side

carpet retainer.

19. Remove 2 scrivet fasteners securing lower

closing panel to passenger side of fascia.

20. Release closing panel, disconnect footwell lamp,

release diagnostic multiplug. Remove closing
panel.

21. Remove 4 bolts, remove fascia centre bracket.

76

CHASSIS AND BODY

NEW RANGE ROVER

16

REPAIR

22. Disconnect 4 multiplugs from Body Electrical

Control Module (BeCM)

23. Remove captive nut, remove earth wires from

stud at base of driver’s side ’A’ post.

24. Disconnect multiplugs at base of each ’A’ post.

25. Release BeCM harness from sill, route into

fascia to prevent fouling as fascia is removed.

26. Disconnect multiplugs and release vacuum hose

from brake and clutch switches.

27. Models with SRS only: Disconnect SRS

multiplug from main harness.

CHASSIS AND BODY

17

REPAIR

28. Disconnect multiplug from SRS control module,

route harness into fascia to prevent fouling as
fascia is removed.

29. Remove both front wheel arch liners.

See this

section.

30. Remove 2 scrivet fasteners securing air cleaner

baffle beneath LH wheel arch. Remove baffle.

31. Disconnect both SRS crash sensor multiplugs.

32. Remove 4 bolts securing battery tray and 2 bolts

securing air cleaner to valance.

76

CHASSIS AND BODY

NEW RANGE ROVER

18

REPAIR

33. Raise air cleaner and battery tray for access to

crash sensor harness clips.

34. Release clips securing each crash sensor

harness to valance. Release harness grommets
and feed both harnesses through valance into
wheel arches.

35. Release 3 clips securing each crash sensor

harness to underside of wheel arches.

36. Release harness grommets, feed harnesses

through bulkhead and route into fascia to
prevent fouling as fascia is removed.

37. Vehicles with air conditioning only: Discharge

air conditioning system.

See AIR

CONDITIONING, Adjustment.

38. Remove bolt securing pipe clamp to

Thermostatic Expansion Valve (TXV).

39. Release pipes from TXV and remove ’O’ rings.

Seal pipes and ports of TXV.

40. All models: Remove 4 tube bolts securing

fascia to scuttle panel.


Content   ..  228  229  230  231   ..