Range Rover. Manual - part 32


  Index      Land Rover     Range Rover P38 - service manual 1995 year


Search            


Content   ..  30  31  32  33   ..


Range Rover. Manual - part 32


BMW DIESEL

19

REPAIR

Refit

10. Ensure mating faces, dowel and dowel locations

are clean.

11. Position flywheel/drive plate to crankshaft, locate

dowel.

12. Secure flywheel/drive plate with new bolts.

Tighten bolts to:
Flywheel -

105 Nm (77 lbf.ft)

Drive plate -

120 Nm (88 lbf.ft)

13. Manual gearbox: Fit clutch assembly.

See

CLUTCH, Repair.

14.

Automatic gearbox: Fit gearbox. See
AUTOMATIC GEARBOX, Repair.

15. Reconnect battery negative lead.

FRONT COVER GASKET

Service repair no - 12.65.04

Remove

1. Disconnect battery negative lead.
2. Remove cylinder head gasket.

See this

section.

3. Remove sump.

See this section.

4. Remove alternator.

See ELECTRICAL, Repair.

5. Remove crankshaft pulley.

See this section.

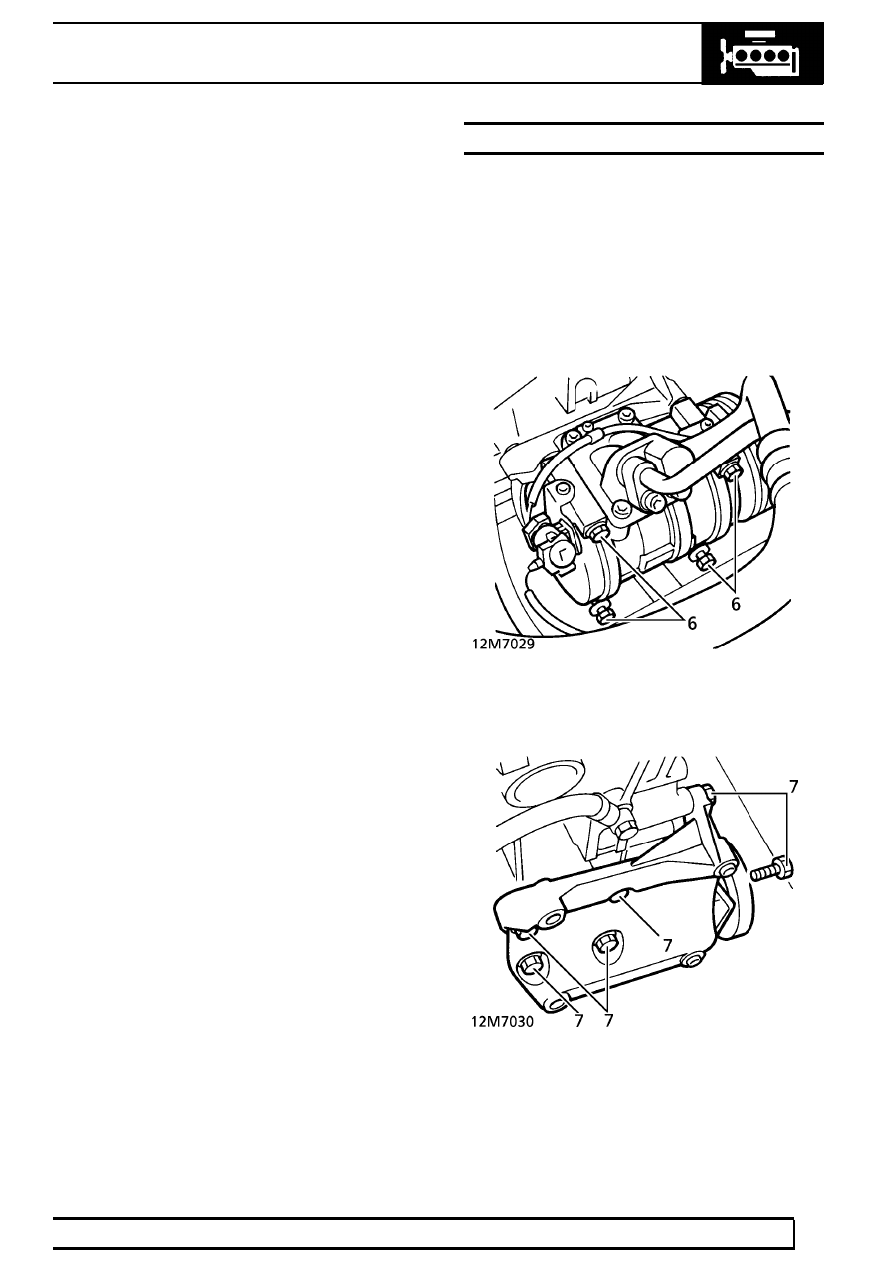
6. Remove 4 bolts securing air conditioning

compressor to bracket. Tie compressor aside.

7. Remove 6 bolts securing compressor bracket to

cylinder block and front cover. Remove
compressor bracket.

12

ENGINE

NEW RANGE ROVER

20

REPAIR

8. Remove 2 bolts securing power steering pump

bracket to front cover and cylinder block.

9. Release bracket/pump assembly. Tie aside.

10. Remove 15 bolts securing front cover to cylinder

block.

11. Remove front cover from 2 cylinder block ring

dowels.

12. Remove and discard gasket.

NOTE: Front cover gasket is integral with
oil pump gasket. When removing front
cover only, separate gaskets by cutting at

points shown.

Refit

13. Ensure mating faces are clean.
14. Position new gasket on cylinder block.
15. Align front cover to cylinder block dowels.

Secure with bolts. Tighten to

10 Nm (7 lbf.ft)

16. Position power steering pump on cylinder block

dowel.

17. Secure steering pump bracket to front cover and

cylinder block with bolts. Tighten to

22 Nm (16

lbf.ft)

18. Position air conditioning compressor bracket to

cylinder block. Secure with bolts.

19. Position compressor on mounting bracket ring

dowels. Secure with bolts.

20. Fit crankshaft pulley.

See this section.

21. Fit alternator.

See ELECTRICAL, Repair.

22. Fit sump.

See this section.

23. Fit cylinder head gasket.

See this section.

24. Reconnect battery negative lead.

BMW DIESEL

21

REPAIR

CAMSHAFT

Service repair no - 12.13.02

Remove

1. Remove camshaft cover.

See this section.

Vehicles with EGR: Remove EGR vacuum
pump.

See EMISSION CONTROL, Repair.

2. Remove bolt securing harness trunking, recover

nut plate.

3.

Vehicles without EGR: Remove 2 bolts securing
camshaft front cover plate, remove cover plate;
remove and discard ’O’ ring. Lay harness
trunking aside.

4. Remove plastic plug from flywheel/drive plate

timing pin access hole.

5. Rotate crankshaft clockwise until No.1 piston is

at top dead centre (TDC) on its compression
stroke. Insert timing pin LRT-12-108 into hole in
flywheel/drive plate.

NOTE: TDC No. 1 is indicated when
camshaft lobes of No. 1 cylinder are
positioned as shown.

12

ENGINE

NEW RANGE ROVER

22

REPAIR

6. Fit camshaft holding tool LRT-12-112.
7. Remove timing chain tensioner access plug,

remove and discard sealing washer.

8. Using tool LRT-12-115, retract timing chain

tensioner and insert tensioner pin LRT-12-114 to
retain tensioner plunger.

CAUTION: Ensure eye of tensioner pin
LRT-12-114 is vertical not horizontal.

9. Remove bolt securing camshaft sprocket,

remove sprocket.

NOTE: Do not discard bolt at this stage.

10. Remove camshaft holding tool LRT-12-112.

11. Locate tool LRT-12-113 on cylinder head,

secure with tool with camshaft cover bolts.

12. Rotate shaft of tool LRT-12-113 to load camshaft

bearing caps.

13. Ensure camshaft bearing caps are suitably

identified to their fitted positions.

NOTE: Caps should be numbered from 1
to 7 and are read from the front of the
engine.

14. Remove nuts securing camshaft bearing caps.
15. Rotate shaft of tool LRT-12-113 until loading is

removed from camshaft bearing caps, remove
tool.

16. Remove camshaft bearing caps.
17. Remove camshaft.

Inspection

18. Clean camshaft, bearing caps and journals in

cylinder head.

19. Check cam lobes for signs of wear, pitting or

scoring.

20. Check journals on camshaft, bearing caps and

cylinder head for signs of wear, overheating and
scoring.

21. Lubricate cam followers, camshaft bearing caps

and journals with engine oil.

22. Clean sealant from threads of front cover plate

bolt and bolt hole.

CAUTION: Do not use a tap.


Content   ..  30  31  32  33   ..