Range Rover. Manual - part 28


  Index      Land Rover     Range Rover P38 - service manual 1995 year


Search            


Content   ..  26  27  28  29   ..


Range Rover. Manual - part 28


BMW DIESEL

3

REPAIR

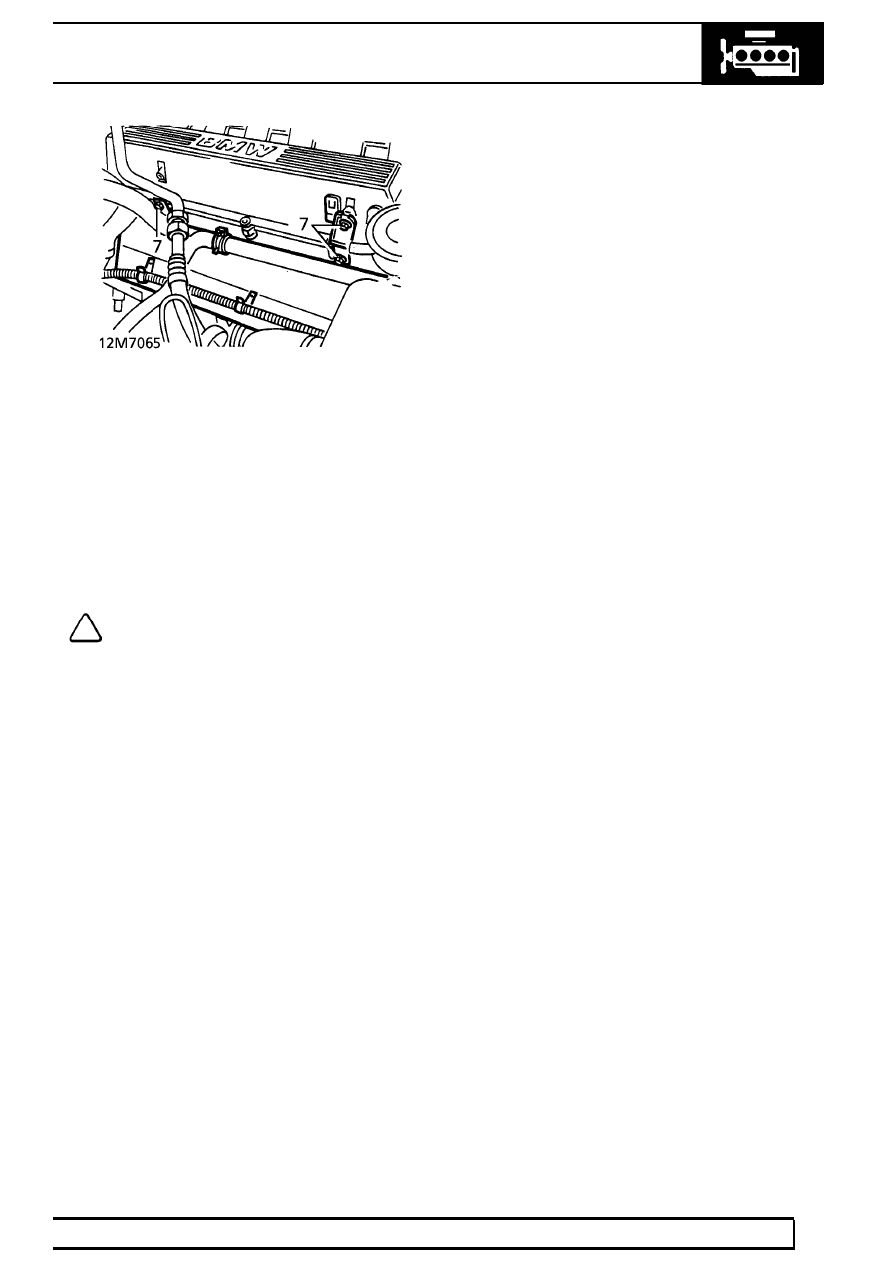
8. Remove 10 bolts securing camshaft cover to

cylinder head.

9. Remove camshaft cover. Collect gasket and

discard.

Refit

10. Ensure mating faces are clean.
11. Fit gasket to camshaft cover.
12. Position camshaft cover on cylinder head.

Ensure gasket is correctly seated.

NOTE: Protrusion on rear of gasket can
snag on bearing cap during positioning of
cover.

13. Fit camshaft cover bolts. Tighten in diagonal

sequence, working from centre outwards to

15

Nm (11 lbf.ft)

14. Align exhaust manifold heat shield. Position

intake ducting bracket.

15. Secure ducting bracket and heat shield with

bolts.

16. Position intake ducting. Engage clips.
17. Engage breather valve into ducting grommet.
18. Connect ducting to turbocharger intake hose.

Secure clip.

19. Connect intake hose to ducting. Secure clip.
20. Fit injector covers. Secure with screws.
21. Reconnect battery negative lead.

12

ENGINE

NEW RANGE ROVER

4

REPAIR

CAMSHAFT COVER GASKET - WITH EGR

Service repair no - 12.29.40

Remove

1. Disconnect battery negative terminal.
2. Remove air intake ducting.

See FUEL

SYSTEM, Repair.

3. Remove 2 bolts securing harness trunking and

position trunking aside.

4. Remove 3 bolts securing intake ducting bracket

and exhaust manifold heat shield to camshaft
cover. Collect bracket.

5. Remove 10 bolts securing camshaft cover to

cylinder head.

6. Collect sealing washers.
7. Remove camshaft cover. Collect gasket and

discard.

Refit

8. Inspect sealing washers, renew as necessary.
9. Ensure mating faces are clean.

10. Fit gasket to camshaft cover.
11. Position camshaft cover on cylinder head.

Ensure gasket is correctly seated.

NOTE: Protrusion on rear of gasket can
snag on bearing cap during positioning of
cover.

12. Fit camshaft cover bolts. Tighten in diagonal

sequence, working from centre outwards to

15

Nm (11 lbf.ft).

13. Align exhaust manifold heat shield. Position

intake ducting bracket.

14. Secure ducting bracket and heat shield with

bolts.

15. Fit air intake ducting.

See FUEL SYSTEM,

Repair.

16. Connect battery negative terminal.

BMW DIESEL

5

REPAIR

CRANKSHAFT PULLEY AND FRONT COVER OIL
SEAL

Service repair no - 12.21.01 - Crankshaft Pulley
Service repair no - 12.65.05 - Timing Gear Cover
Oil Seal

Remove

1. Disconnect battery negative lead.
2. Remove radiator.

See COOLING SYSTEM,

Repair.

3. Remove cover from air conditioning drive belt

tensioner.

4. Release drive belt tension. Remove drive belt.
5. Slacken 4 water pump pulley bolts.

6. Release auxiliary drive belt tension. Remove

belt.

7. Remove water pump pulley bolts. Remove

pulley.

8. Remove bolt from auxiliary drive belt tensioner

pulley. Remove pulley.

9. Remove 6 bolts securing vibration damper and

air conditioning pulley to vibration damper hub.
Remove damper and pulley.

10. Secure LRT-12-105 to hub with 3 bolts. Remove

and discard hub retaining bolt.

11. Note orientation of shouldered washer. Remove

hub and tool.

12. Remove seal from front cover.

Refit

13. Ensure mating faces are clean.
14. Lubricate outer face of seal.
15. Locate seal in timing cover.
16. Using LRT-12-111, push seal home until flush

with face of timing cover.

17. Lubricate lip of oil seal. Fit crankshaft pulley hub.
18. Hold hub using LRT-12-105. Secure with new

bolt and tighten to

100 Nm (74 lbf.ft) plus 150

°

torque angle.

19. Fit damper and pulley to hub. Secure with bolts.

Tighten to

23 Nm (17 lbf.ft)

20. Fit auxiliary belt tensioner pulley. Secure with

bolt.

21. Fit pulley to water pump. Secure with bolts.

Tighten to

10 Nm (7 lbf.ft)

22. Rotate auxiliary drive belt tensioner. Fit drive

belt.

23. Fit and tension air conditioning drive belt.

See

AIR CONDITIONING, Repair.

24. Fit radiator.

See COOLING SYSTEM, Repair.

25. Reconnect battery negative lead.

12

ENGINE

NEW RANGE ROVER

6

REPAIR

CRANKSHAFT REAR OIL SEAL

Service repair no - 12.21.20

NOTE: Seal and carrier are supplied as an
assembly.

Remove

1. Disconnect battery negative lead.
2. Remove flywheel.

See this section.

3. Remove sump.

See this section.

4. Remove 6 bolts securing seal carrier to cylinder

block.

5. Remove seal carrier from location dowels.
6. Collect gasket and discard.

Refit

7. Ensure mating faces are clean.
8. Position new gasket.
9. Lubricate seal guide LRT-12-107 with engine oil.

Position over crankshaft boss.

10. Lubricate oil seal lip. Position seal carrier

squarely over guide. Locate carrier onto dowels.

11. Remove guide.
12. Secure carrier with bolts.

M6, Tighten to

10 Nm (7 lbf.ft)

M8, Tighten to

22 Nm (16 lbf.ft)

13. Fit sump.

See this section.

14. Fit flywheel.

See this section.

15. Reconnect battery negative lead.

ENGINE AND GEARBOX

Service repair no - 12.37.01.99

Remove

1. Position vehicle on four post lift.
2. Remove battery.

See ELECTRICAL, Repair.

3. With assistance, release bonnet struts from body

locations. Retain bonnet in vertical position using
stay clips.

WARNING: Only open the bonnet to the
vertical position with the vehicle on a
horizontal surface in the workshop. This

position is not intended to be used outdoors
where the bonnet could be affected by winds.

4. Remove inlet manifold.

See MANIFOLD AND

EXHAUST SYSTEM, Repair.

5. Remove ECM.

See FUEL SYSTEM, Repair.

6. Remove 2 screws securing engine harness

clamp to battery tray. Collect harness clamp.


Content   ..  26  27  28  29   ..