Frelander 2. Manual - part 706


  Index      Land Rover     Land Rover Frelander 2 - service repair manual 2006-2010 year


Search            


Content   ..  704  705  706  707   ..


Frelander 2. Manual - part 706


Climate control

102

L

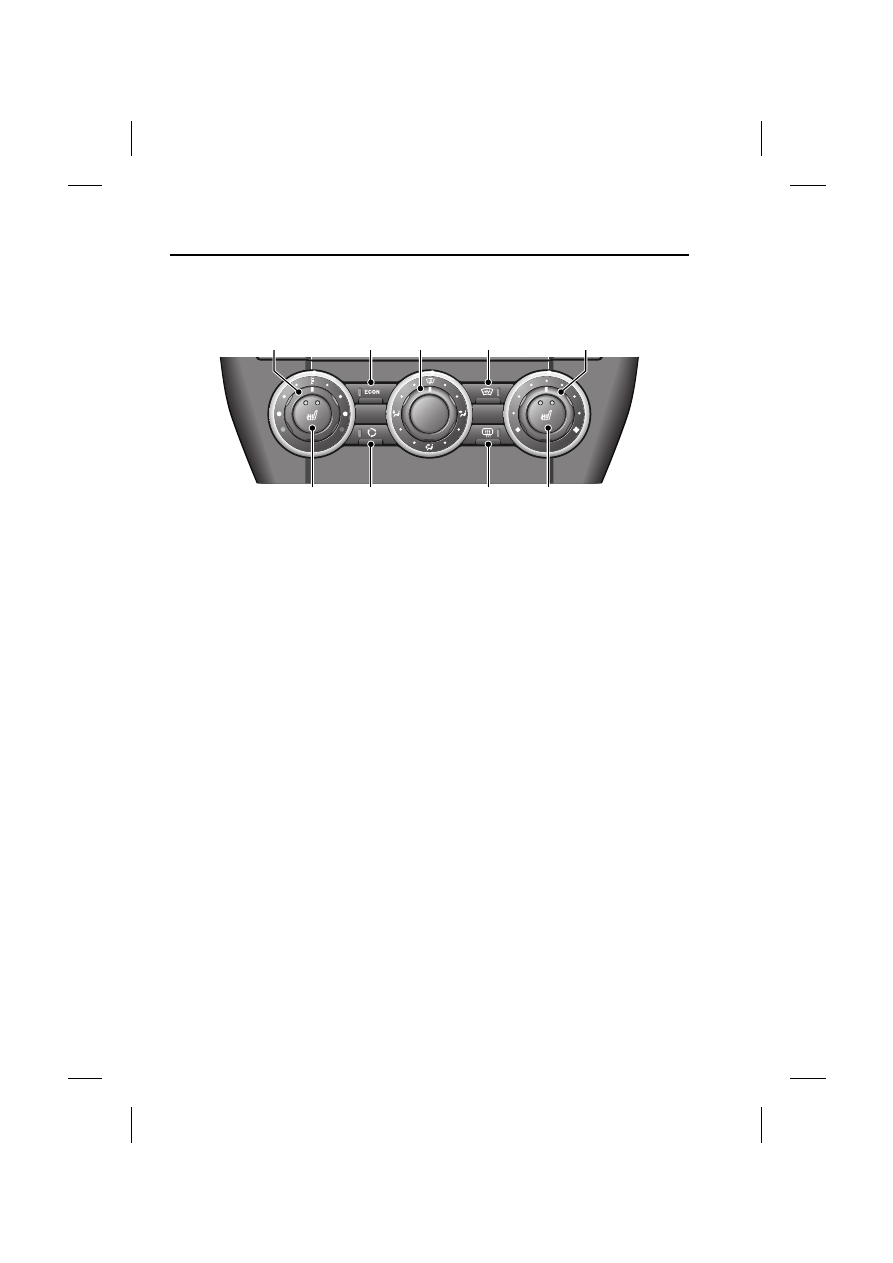
MANUAL CLIMATE CONTROL

Controls

1. Temperature control, rotate to adjust.

2. Economy mode, press to switch on/off.

3. Air distribution, rotate to direct air flow.

4. Heated front screen, press to switch 

on/off.

5. Blower speed, rotate to change blower 

speed.

6. Heated rear screen, press to switch on/off.

7. Recirculation, press to switch on/off.

8. Seat heaters, press to switch on/off. Press 

once to turn on high, twice to turn on low, 
and a third time to turn off.

Note: The amber tell-tale indicators in the 
switches will illuminate when the function is 
selected.

Economy mode (2)

When selected economy mode will achieve the 
lowest possible temperature without using the 
air conditioning system. This reduces power 
consumption and improves fuel economy.

Air distribution (3)

Rotate the control to set the air distribution to 
the required points.

Note: In low temperatures it is advisable to 
close the centre face level vent, and direct air 
flow from the outer face level vents towards the 
side windows. This will help to keep the 
windows clear of ice.

Note: It is possible to distribute air to two areas 
simultaneously. For example; to distribute air 
to both the windscreen and the foot vents set 
the rotary control (5) to a point between the 
windscreen and foot vent symbols.

Recirculation (7)

When selected, the air is recirculated inside the 
vehicle. This helps to maintain a high or low 
temperature, and is useful for preventing 
fumes from entering the vehicle.

Note: Prolonged use at low temperatures may 
cause the windows to mist.

E81418

1

2

3

4

5

8

6

7

8

103

Climate control

R

AUTOMATIC CLIMATE CONTROL

Controls

1. Left and right temperature controls, rotate 

to adjust.

2. Air distribution, press to select direction of 

air flow. More than one direction may be 
selected if required.

3. Defrost program, press to switch on/off.

4. Heated front screen, press to switch 

on/off.

5. Heated rear screen, press to switch on/off.

6. Economy mode, press to switch on/off.

7. AUTO mode, press to select fully 

automatic operation.

8. Blower speed, rotate to change blower 

speed.

9. Recirculation, press to switch on/off.

10. Seat heaters, press to switch on/off. Press 

once to turn on high, twice to turn on low, 
and a third time to turn off.

Note: The amber tell-tale lights in the switches 
will illuminate when the function is selected.

Air distribution (2)

Press the relevant button to set the air 
distribution to the required points. Screen, 
face, or floor. It is possible to select more than 
one option by pressing the required 
combination of buttons.

Note: In low temperatures it is advisable to 
close the centre face level vent, and direct air 
flow from the outer face level vents towards the 
side windows. This will help to keep the 
windows clear of ice.

Economy mode (6)

When selected economy mode will achieve the 
lowest possible temperature without using the 
air conditioning system. This reduces power 
consumption and improves fuel economy.

E81419

1

3

1

6

9

10

2

5

4

10

7

8

Climate control

104

L

Auto mode (7)

When the Auto function is selected, you have 
the opportunity to select a fully automatic 
operation, or manually adjust the fan speed and 
the direction of air flow. All other adjustments 
which are necessary to maintain the 
temperature that you have selected are made 
automatically by the climate control system.

There are two tell-tale indicators on the Auto 
button. The round indicator represents the 
blower control, and the rectangular indicator 
the air distribution control. In fully automatic 
mode both indicators illuminate, the round 
indicator will extinguish if the blower speed is 
changed manually, and the rectangular 
indicator extinguishes if the air distribution is 
changed manually.

To resume fully automatic operation at any 
time, press the Auto button.

Recirculation (9)

When selected, the air is recirculated inside the 
vehicle. This helps to maintain a high or low 
temperature, and is useful for preventing 
fumes from entering the vehicle.

A single brief press will select recirculation for 
four minutes. The system will then revert to 
fresh air intake to prevent misting.

Pressing and holding the button will select 
recirculation until it is switched off. This state 
is indicated by three flashes of the tell-tale lamp 
in the switch.

Note: Prolonged use at low temperatures may 
cause the windows to mist.

HEATED WINDOWS AND MIRRORS

The heated windscreen is switched on by 
briefly pressing the switch (4).

Note: The operation of the heated mirrors is 
fully automatic, and requires no driver 
intervention.

AUXILIARY HEATER

Your vehicle may be fitted with an auxiliary 
heater which is powered by fuel drawn from the 
vehicle's tank. The heater only operates at low 
ambient temperatures, and is fully automatic.

When the heater is operating exhaust fumes 
from the heater may be visible exiting from the 
front underside. This is normal, and not a 
cause for concern.

E81170

105

Climate control

R

ELECTRIC SUNROOF

Operation

1. Front switch, closes or tilts the sunroof.

2. Rear switch, fully opens or closes the 

sunroof.

The panoramic sunroof can only be operated 
with the ignition on.

Tilt

With the roof closed, press and release the 
front of the switch. The sunroof will move to 
the tilted position automatically. It can be 
stopped at any point by pressing the button 
again.

Fully open

With the sunroof closed, press and release the 
rear of the switch. The sunroof will move to the 
fully open position automatically. It can be 
stopped at any point by pressing the button 
again.

Close
• From the fully open position, press and 

release the front of the switch. The roof will 
return to the closed position automatically.

• From the tilted position, press and hold the 

rear of the switch. Keep the switch pressed 
until the roof is fully closed.

Anti-trap mechanism

If the sunroof encounters resistance when 
closing it will stop, and then open slightly. This 
is to prevent serious injury or damage to the 
mechanism.

Override

The anti-trap mechanism can be overridden to 
allow the roof to be closed when movement is 
restricted by dirt or ice. To override the 
anti-trap mechanism, press and hold the front 
of the switch until the roof reaches the closed 
position.

WARNING

Extreme care must be taken to ensure 
that none of the occupants have any 
part of their body in a position where it 

could be trapped by the panoramic sunroof 
when closing. Although an anti-trap 
mechanism is fitted, serious injuries can 
occur.

2

1

E81262

WARNING

The anti-trap mechanism does not 
operate when closing the roof from the 
tilted position. The sunroof can cause 

serious injury should a body part become 
trapped. Always ensure that the sunroof is free 
from obstructions before closing.

CAUTION

Wherever possible remove any snow, 
ice, dirt, leaves etc. from the sunroof 
mechanism before closing. Failure to do 

so may damage the sunroof mechanism.


Content   ..  704  705  706  707   ..