Freelander Body Repair Manual - part 67


  Index      Land Rover     Freelander Body Repair Manual 1998 year


Search            


Content   ..  65  66  67  68   ..


Freelander Body Repair Manual - part 67


PANEL REPAIRS

REPAIRS

3

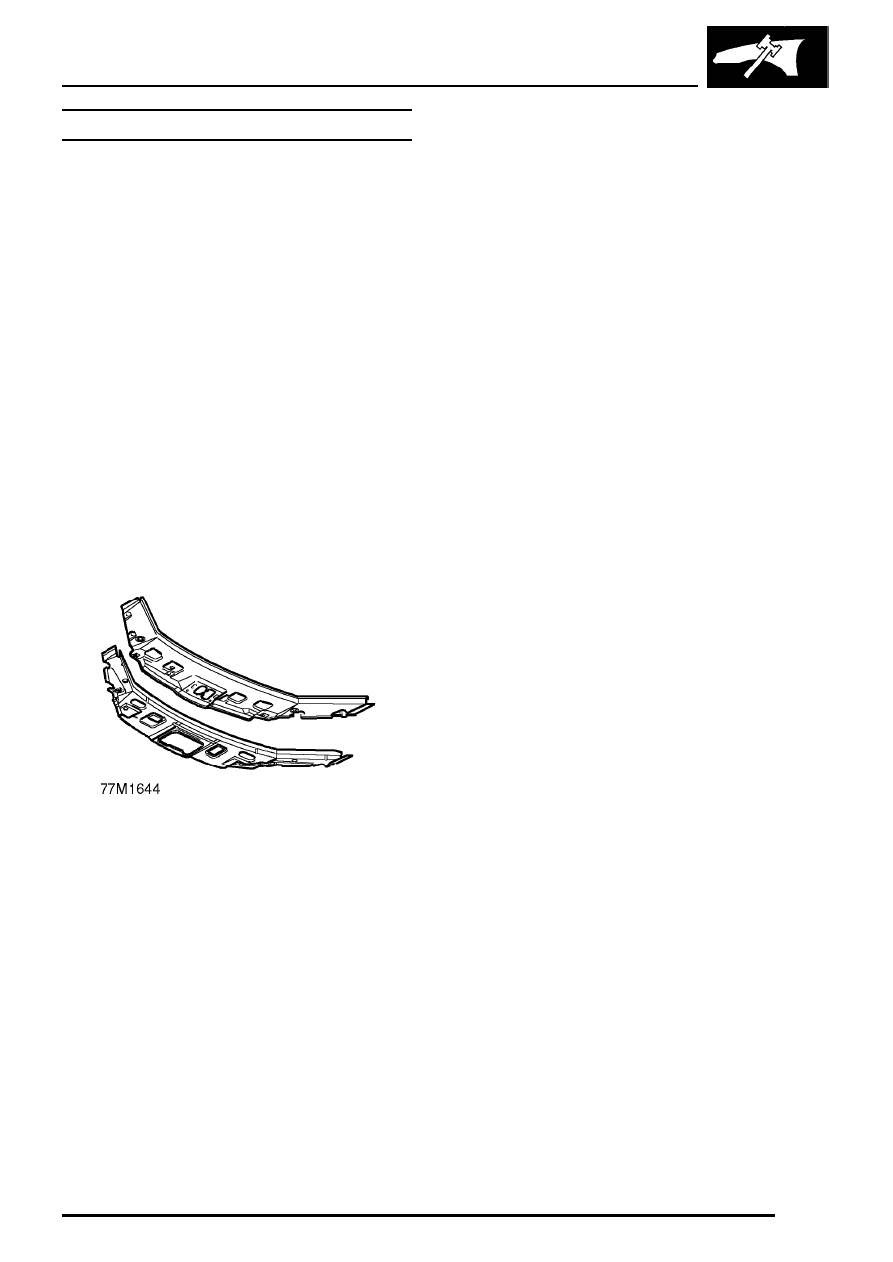
BONNET LOCKING PLATFORM

Remove

1. Disconnect battery earth lead.
2. Disconnect alternator.

See ELECTRICAL,

Repairs.

3. Disconnect all ECUs.
4. Remove front bumper valance.

See BODY,

Exterior fittings.

5. Remove radiator.

See COOLING SYSTEM,

Repairs.

6. Remove both headlamp assemblies.

See

ELECTRICAL, Repairs.

7. Remove horn.

See ELECTRICAL, Repairs.

8. Remove battery.

See ELECTRICAL, Repairs.

9. Remove air intake hose.

10. Remove bonnet lock.
11. Support bonnet in open position.
12. Remove bonnet stay.

Repair

1. Remove existing panel(s), prepare panel joint

faces and install new panel(s) in accordance
with Panel Replacement Procedure.

Refit

1. Fit bonnet stay.
2. Fit bonnet lock.
3. Fit air intake hose.
4. Fit battery. Do not connect earth lead.

See

ELECTRICAL, Repairs.

5. Fit horn.

See ELECTRICAL, Repairs.

6. Fit both headlamp assemblies.

See

ELECTRICAL, Repairs.

7. Fit radiator.

See COOLING SYSTEM,

Repairs.

8. Fit front bumper valance.

See BODY, Exterior

fittings.

9. Connect all ECUs.

10. Connect alternator.

See ELECTRICAL,

Repairs.

11. Connect battery earth lead.

PANEL REPAIRS

4

REPAIRS

HEADLAMP MOUNTING PANEL

Remove

1. Disconnect battery earth lead.
2. Disconnect alternator.

See ELECTRICAL,

Repairs.

3. Disconnect all ECUs.
4. Remove front bumper valance.

See BODY,

Exterior fittings.

5. Remove front bumper armature.
6. Remove radiator.

See COOLING SYSTEM,

Repairs.

7. Remove headlamp assembly.

See

ELECTRICAL, Repairs.

8. Release wiring to headlamp and position aside.

For LH side

9. Remove front bumper LH support bracket.

10. Remove battery.

See ELECTRICAL, Repairs.

11. Remove horn.

See ELECTRICAL, Repairs.

12. Remove air intake hose.

For RH side

13. Remove front bumper RH support bracket.
14. Remove windscreen washer reservoir.

See

WIPERS & WASHERS, Repairs.

15. Remove PAS fluid cooler.

See STEERING,

Repairs.

Repair

1. Remove existing panel(s), prepare panel joint

faces and install new panel(s) in accordance
with Panel Replacement Procedure. Punch or
drill holes in new panel for plug welding as
shown.

Refit

For LH side

1. Fit air intake hose.
2. Fit horn.

See ELECTRICAL, Repairs.

3. Fit battery. Do not connect earth lead.

See

ELECTRICAL, Repairs.

4. Fit front bumper LH support bracket.

For RH side

5. Fit PAS fluid cooler.

See STEERING,

Repairs.

6. Fit windscreen washer reservoir.

See WIPERS

& WASHERS, Repairs.

7. Fit front bumper LH support bracket.

For both sides

8. Fit headlamp assembly.

See ELECTRICAL,

Repairs. Secure headlamp wiring.

9. Fit radiator.

See COOLING SYSTEM,

Repairs.

10. Fit front bumper armature.
11. Fit front bumper valance.

See BODY, Exterior

fittings.

12. Connect all ECUs.
13. Connect alternator.

See ELECTRICAL,

Repairs.

14. Connect battery earth lead.

PANEL REPAIRS

REPAIRS

5

FRONT LOWER CROSSMEMBER

NOTE: In this procedure, the
crossmember to sidemember gusset
plates are replaced in conjunction with the

front lower crossmember.
If required, the lower closing panel can be
replaced separately.

Remove

1. Disconnect battery earth lead.
2. Disconnect alternator.

See ELECTRICAL,

Repairs.

3. Disconnect all ECUs.
4. Remove LH and RH engine bay shields.
5. Remove front bumper valance.

See BODY,

Exterior fittings.

6. Remove front bumper armature.
7. Remove radiator.

See COOLING SYSTEM,

Repairs.

8. Remove PAS fluid cooler.

See STEERING,

Repairs.

9. Release wiring for LH and RH headlamps and

position aside.

Repair

1. Remove existing panel(s), prepare panel joint

faces and install new panel(s) in accordance
with Panel Replacement Procedure. Punch or
drill holes in new panel for plug welding as
shown.

Refit

1. Secure wiring to LH and RH headlamps.
2. Fit PAS fluid cooler.

See STEERING,

Repairs.

3. Fit radiator.

See COOLING SYSTEM,

Repairs.

4. Fit front bumper armature.
5. Fit front bumper valance.

See BODY, Exterior

fittings.

6. Fit LH and RH engine bay shields.
7. Connect all ECUs.
8. Connect alternator.

See ELECTRICAL,

Repairs.

9. Connect battery earth lead.

PANEL REPAIRS

6

REPAIRS

FRONT SIDEMEMBER (COMPLETE)

NOTE: In this procedure, the front
sidemember closing panel and the related
crossmember to sidemember gusset plate

are replaced in conjunction with the front
sidemember.

Remove

1. Disconnect battery earth lead.
2. Disconnect all ECUs.
3. Remove road wheel(s).
4. Remove underbelly panel.

See BODY,

Exterior fittings.

5. Remove front bumper valance.

See BODY,

Exterior fittings.

6. Remove front bumper armature.
7. Remove radiator.

See COOLING SYSTEM,

Repairs.

8. Remove PAS fluid cooler.

See STEERING,

Repairs.

9. Remove headlamp.

See ELECTRICAL,

Repairs.

10. Release wiring to headlamp and position aside.
11. Remove engine bay shield.
12. Remove front wheel arch liner.

See BODY,

Exterior fittings.

13. Remove front suspension rear beam.
14. Remove engine and gearbox.

See ENGINE,

Repairs.

15. Remove PAS rack.

See STEERING, Repairs.

16. Remove fascia.

See BODY, Interior trim

components.

For LH side

17. Remove front bumper LH support bracket.
18. Remove LH engine mounting from body.
19. Remove battery.

See ELECTRICAL, Repairs.

20. Remove air intake hose.
21. Remove horn.

See ELECTRICAL, Repairs.

For RH side

22. Remove front bumper RH support bracket.
23. Remove RH engine mounting from body.
24. Remove windscreen washer reservoir.

See

WIPERS & WASHERS, Repairs.

For driver’s side

25. Remove passenger compartment fuse box.
26. Remove brake pedal box and brake servo.

See

BRAKES, Repairs.

27. Remove clutch pedal box.

See CLUTCH,

Repairs.

For both sides

28. Remove treadplate from front door aperture.

Release front carpet and position aside.

29. Remove insulation pads from engine bulkhead.

Repair

1. Remove existing panel(s), prepare panel joint

faces and install new panel(s) in accordance
with Panel Replacement Procedure. Punch or
drill holes in new panel for plug welding as
shown.


Content   ..  65  66  67  68   ..