Freelander 1. Manual - part 228


  Index      Land Rover     Freelander 1 - service manual 2002 year


Search            


Content   ..  226  227  228  229   ..


Freelander 1. Manual - part 228


HOOD

REPAIRS

76-7-5

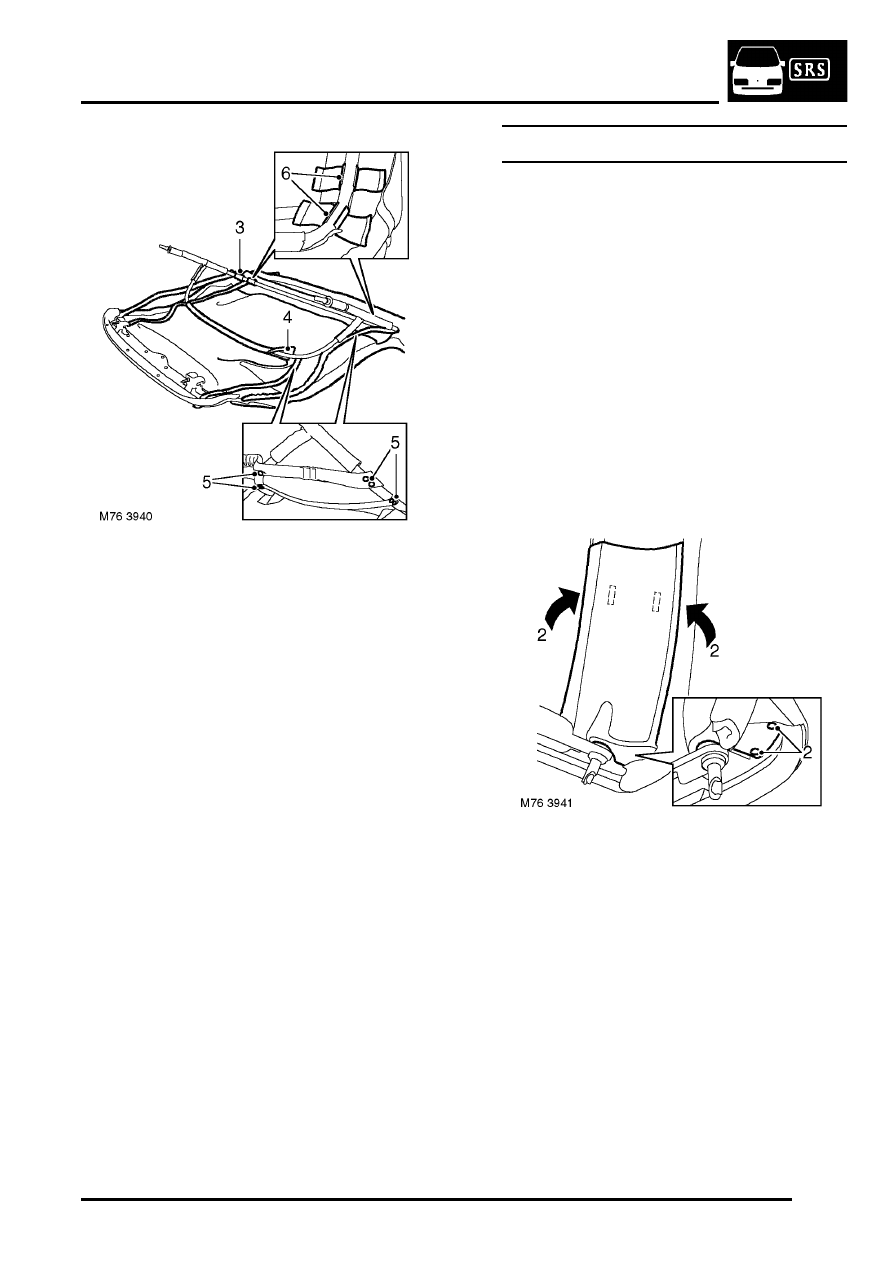
3. Release fabric flaps from rear of frame.
4. Release fabric flap from front of frame.
5. Remove 14 screws securing tension straps
6. Release frame from outer cover retainers.
7. Remove frame from outer cover.

Refit

1. Clean excess adhesive from frame using a 

suitable solvent.

2. Position frame to hood outer cover and locate 

in retainers.

3. Position tension straps and secure with screws. 
4. Apply adhesive to fabric flap and secure to front 

of frame.

5. Apply adhesive to fabric flaps and secure to 

rear of frame.

Ensure adhesive does not contact frame.

The fabric flaps should be free to move on the 
frame.

6. Fit hood catches and secure with special key.
7. Fit soft back assembly


 + 

 HOOD, REPAIRS, Hard top - remove 

for access & refit.

Glass - body side - hard back

$% 76.61.29 

Always position trim components on a soft 
covered, clean work surface. 

Wear protective gloves when handling glass, 
solvents and primers.

Wear suitable eye protection when removing and 
refitting glass.

The following equipment is required: ```Cutting wire 
and handles ```Sharp knife ```Windscreen repair kit 
```Sealer applicator gun ```Suction cups

Remove

1. Remove hard-back


 + 

 HOOD, REPAIRS, Frame & hood 

cover - assembly - remove for access & refit.

2. Remove 2 screws securing 'E' post finisher, 

release finisher from clips and remove finisher.

HOOD

76-7-6

REPAIRS

3. Remove 4 Torx screws securing hard-back 

catches, slide catches from position and 
remove catches.

4. Remove 3 Torx screws securing headlining 

release headlining from hard-back seal and 
remove headlining.

5. Cover interior of hard-back with protective 

sheet.

6. Apply masking tape to protect paintwork.

7. Make knife cut in sealant at bottom of 'E' post.
8. Insert cutting wire through previously made 

knife cut and fit handles as shown, with 
approximately 200 mm of wire between 
handles.

9. With assistance, wedge tube of handle  

between glass and body, ahead of cutting 
position, and carefully cut sealer using a 
continuous pull on handle    from the outside. 
Ensure that glass is retained as last sealant is 
cut.

If multi-strand cutting wire is used, a sawing 
action can be used to cut through heavy 
sealant deposits around corners.

Use of a sawing action may overheat and 
break single strand wire.

10. Attach suction cup and remove glass body.

Lay glass on felt covered supports. Do not 
stand on edge. Any chipping of glass edge 
may develop into cracks. 

HOOD

REPAIRS

76-7-7

Refit

1. Carefully remove excess sealer from body 

leaving a smooth surface.

2. Use a vacuum cleaner to clear away any waste.
3. Original glass: Carefully cut back old sealant to 

obtain a smooth surface without damaging 
obscuration band on glass.

4. With assistance, locate glass to body.
5. Apply masking tape reference marks to aid 

fitment.

6. Remove glass and place aside.
7. Clean frame and edge of glass with solvent.

Do not touch cleaned or primed surfaces 
with fingers. 

8. Repair any damaged paintwork as necessary.
9. Apply bonding agent to glass and allow to cure.

10. Apply activator over old sealer on frame.
11. Allow activator to cure.
12. Apply primer to frame.
13. Fit pre-cut nozzle to sealer cartridge, remove lid 

and shake out crystals, and install in applicator 
gun.

Nozzle will need modification to achieve 
required bead section.

14. Apply a continuous bead of sealer around edge 

of frame as shown. Make bead slightly thicker 
at each corner. 

15. Check for breaks and air bubbles in sealer.
16. Position glass to body and align to reference 

tape.

17. Lightly press glass to fully seat sealer.
18. Secure glass with tape until sealer has cured.
19. Remove protective covers and tape.
20. Test seal for leaks, apply additional sealer if 

necessary. If water is used, allow sealer to dry 
before testing. Spray water around glass and 
check for leaks. Dry affected area and  apply 
additional sealer if necessary.

21. Position headlining and locate hardback seal.
22. Secure headlining with Torx screws.
23. Position catches, fit Torx screws and tighten to 

10 Nm (7.5 lbf.ft).

24. Fit 'E post finishers, engage in clips and secure 

with screws.

25. Fit Hard-back. 


 + 

 HOOD, REPAIRS, Frame & hood 

cover - assembly - remove for access & refit.

HOOD

76-7-8

REPAIRS

Seal - hard back - primary

$% 76.61.34 

Always position trim components on a soft 
covered, clean work surface.

Remove

1. Remove hard back. 


 + 

 HOOD, REPAIRS, Frame & hood 

cover - assembly - remove for access & refit.

2. Release seal from flange around hard back 

frame and remove seal.

Refit

1. Clean seal flange.
2. Position seal and secure to flange.
3. Secure ends of seal to hard-back frame using 

Butyl Rubber adhesive if necessary.

4. Fit hard back. 


 + 

 HOOD, REPAIRS, Frame & hood 

cover - assembly - remove for access & refit.

Catch and retainer - hard-back - front

$% 76.61.94

Remove

1. Remove hard-back


 + 

 HOOD, REPAIRS, Frame & hood 

cover - assembly - remove for access & refit.

2. Remove 2 Torx screws securing catch, slide 

catch from position and remove catch. 


Content   ..  226  227  228  229   ..