Freelander 1. Manual - part 163


  Index      Land Rover     Freelander 1 - service manual 2002 year


Search            


Content   ..  161  162  163  164   ..


Freelander 1. Manual - part 163


AUTOMATIC GEARBOX - JATCO

REPAIRS

44-13

26. Fit IRD support bracket and tighten bolts 

sufficiently only to pull mating faces together.

27. Final tighten bolts securing IRD to gearbox to 

80 Nm (59 lbf.ft).

28. Final tighten bolts securing  IRD support 

bracket in following sequence:5 bolts securing 
support bracket to IRD 50 Nm (37 lbf.ft), 2 bolts 
securing support bracket to engine front 
mounting bracket 50 Nm (37 lbf.ft), 3 bolts 
securing support bracket to sump 45 Nm (33 
lbf.ft). 

29. Position lower engine steady, 'TOP' mark 

uppermost. Fit bolt but do not tighten at this 
stage.

30. Connect coolant hoses and secure with clips.
31. Connect breather hose to IRD housing.
32. Fit manifold heat shield and fit nut securing 

heat shield to pinion housing finger tight.

33. Fit bolts securing manifold heat shield to IRD 

support bracket and tighten to 9 Nm (7 lbf.ft).

34. Fit nut securing heat shield to IRD and tighten 

to 45 Nm (33 lbf.ft).

35. Final tighten nut securing manifold heat shield 

to IRD pinion housing to 25 Nm (18 lbf.ft).

36. Clean exhaust manifold and mating face on 

cylinder head.

37. Fit exhaust manifold gasket.
38. Position exhaust manifold, fit nuts and 

progressively tighten, from centre outwards to 
45 Nm (33 lbf.ft).

39. Connect HO2S multiplug and secure to support 

bracket.

Gearbox - KV6

$% 44.20.02.99

Remove

1. Tie bonnet back in upright position.
2. Disconnect battery earth lead.
3. Remove engine acoustic cover.


 + 

 ENGINE - K SERIES KV6, REPAIRS, 

Cover - engine acoustic.

4. Remove IRD.


 + 

 INTERMEDIATE REDUCTION 

DRIVE, REPAIRS, Intermediate reduction 
drive (IRD) unit - KV6.
 

 + 

 INTERMEDIATE REDUCTION 

DRIVE, REPAIRS, Intermediate reduction 
drive (IRD) unit - KV6.

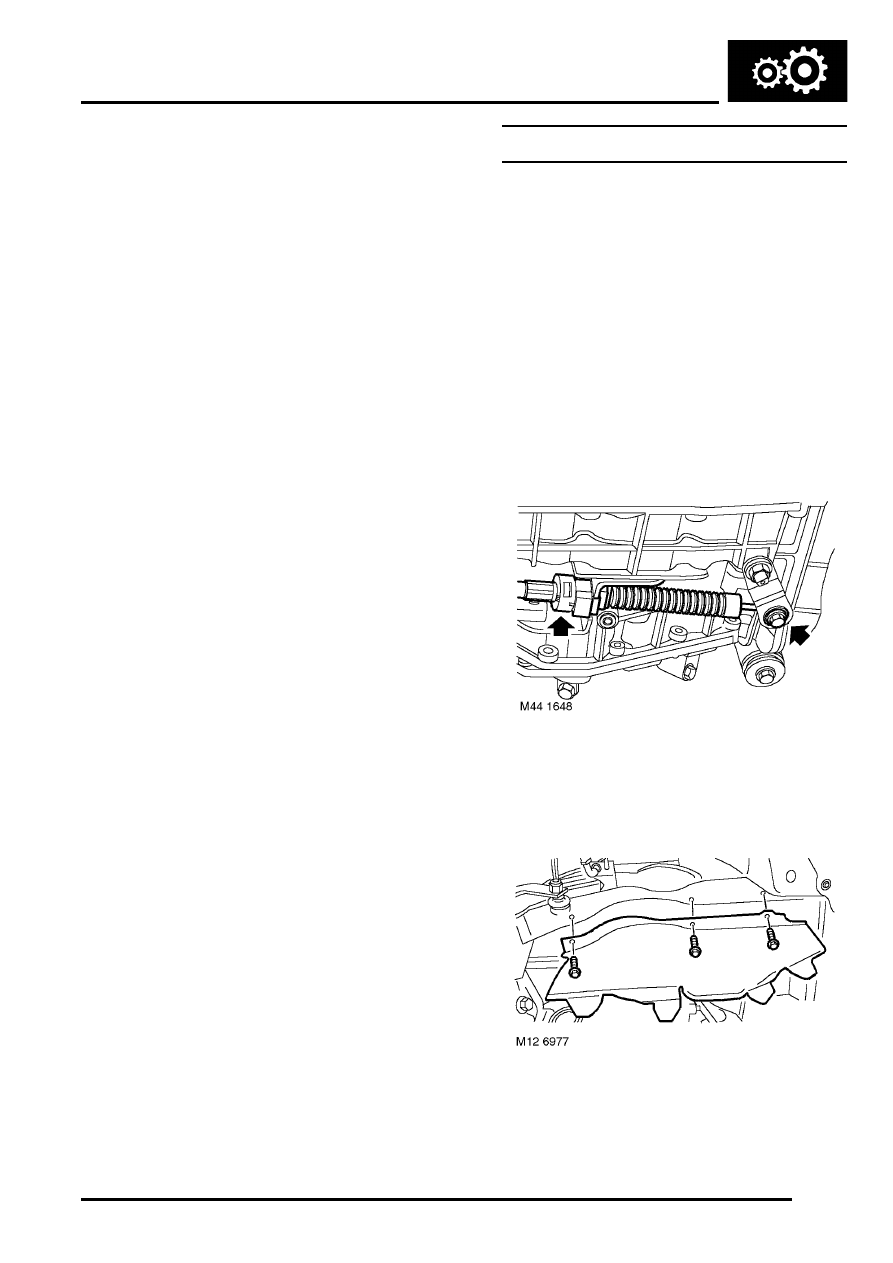
5. Loosen selector cable trunnion nut.
6. Release clip securing selector cable to gearbox 

bracket, remove selector cable and collect 
trunnion from selector lever.

7. Remove 3 screws securing LH splash shield 

and remove shield.

AUTOMATIC GEARBOX - JATCO

44-14

REPAIRS

8. Secure LRT-54-026 to drive shaft inboard joint. 

Using a suitable lever, release inboard joint 
from gearbox.

9. With assistance pull hub outwards and release 

drive shaft from gearbox.

CAUTION: Care must be taken not to 
damage oil seal when removing drive shaft 
from gearbox

10. Remove and discard circlip from  drive shaft.

11. Remove 2 bolts securing torque converter 

access plate.

12. Remove access plate.
13. Mark drive plate to torque converter, for refit 

purposes.

14. Remove 4 bolts securing drive plate to 

converter. 

15. Remove bolt securing IRD cooling hose 

retainer. Remove retainer.

M44 1661

M44 1649

AUTOMATIC GEARBOX - JATCO

REPAIRS

44-15

16. Remove 2 bolts securing gearbox to engine.

17. Release HO2S multiplug from support bracket 

on LH camshaft cover, disconnect multiplug.

18. Remove 4 nuts securing LH exhaust manifold 

to cylinder head.

19. Remove exhaust manifold, remove and discard 

gasket.

20. Position container to collect fluid spillage.

21. Disconnect 2 fluid cooler hose unions and 

discard 'O' rings.

CAUTION: Always fit plugs to open 
connections to prevent contamination.

22. Remove 3 bolts securing fluid cooler bracket.
23. Move fluid cooler aside.

M44 1651

M44 1639

M44 1665

AUTOMATIC GEARBOX - JATCO

44-16

REPAIRS

24. Remove bolt securing CKP sensor to gearbox, 

release sensor and position aside.

25. Remove nut and bolt, adjacent to CKP sensor, 

securing gearbox to engine.

26. Release throttle cable from abutment bracket 

and disconnect cable from throttle body cam, if 
fitted.

27. Depress collars and release 2 breather pipes 

from throttle housing, if fitted.

28. Vehicles with cruise control: Disconnect 

vacuum hose from cruise control actuator.

29. Remove 4 Torx screws securing throttle 

housing, release throttle housing and position 
aside. 

Non NAS throttle housing shown.

M19 3198


Content   ..  161  162  163  164   ..