Freelander 1. Manual - part 139


  Index      Land Rover     Freelander 1 - service manual 2002 year


Search            


Content   ..  137  138  139  140   ..


Freelander 1. Manual - part 139


MANIFOLDS & EXHAUST SYSTEMS - K SERIES 1.8

REPAIRS

30-2-7

Heat shield - exhaust manifold - with A/C

$% 30.15.09

Remove

1. Disconnect battery earth lead.
2. Turn steering on RH lock.

3. Remove 3 bolts securing RH splash shield to 

body and remove shield.

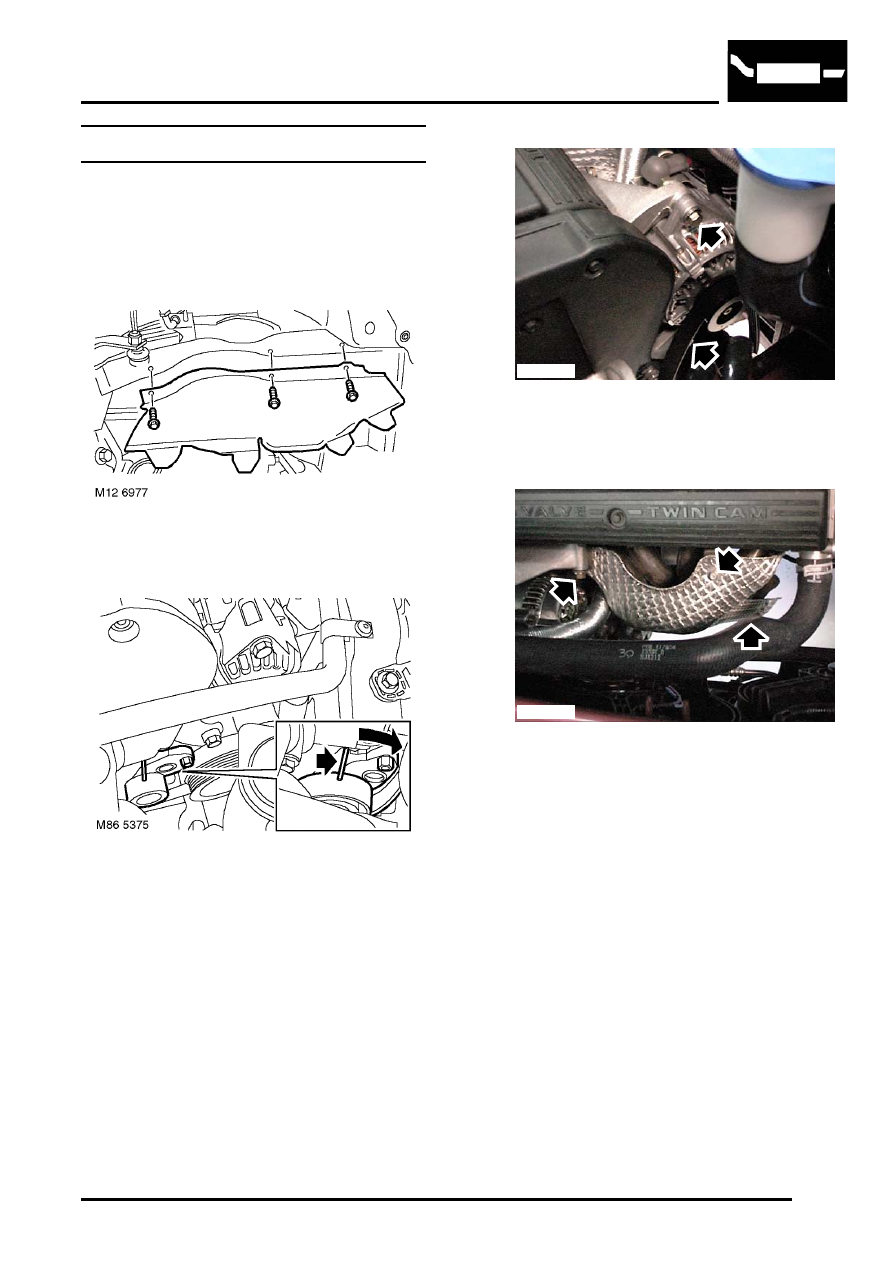
4. Fit a 13 mm spanner to hexagon on belt 

tensioner and rotate fully clockwise to release 
tension from drive belt.

5. To hold tensioner in this position, fit a suitable 

pin, not exceeding 3 mm diameter, through 
centre of hexagon into tensioner backplate.

6. Release auxiliary drive belt from alternator 

pulley.

7. Remove top bolt securing alternator and loosen 

lower bolt.

8. Position alternator forward to clear heat shield.

9. Remove nut and 2 bolts securing heat shield.

10. Remove heat shield.

Refit

1. Fit heat shield.
2. Locate heat shield to alternator bracket stud, fit 

nut and bolts. Tighten nut to 25 Nm (18 lbf.ft) 
and bolts to 10 Nm (7.5 lbf.ft).

3. Align alternator to bracket and fit bolt.
4. Tighten both alternator bolts to 45 Nm (33 

lbf.ft).

5. Locate drive belt to pulleys, remove locking pin 

and release drive belt tensioner.

6. Ensure auxiliary drive belt is correctly located 

on all pulleys.

7. Fit splash shield and secure with bolts.
8. Straighten steering.
9. Connect battery earth lead.

M30 1048

M30 1049

MANIFOLDS & EXHAUST SYSTEMS - K SERIES 1.8

30-2-8

REPAIRS

Gasket(s) - exhaust manifold

$% 30.15.12

Remove

1. Remove underbelly panel.


 + 

 EXTERIOR FITTINGS, REPAIRS, 

Panel - underbelly.

2. Remove exhaust manifold heat shield.


 + 

 MANIFOLDS & EXHAUST SYSTEMS 

- K SERIES 1.8, REPAIRS, Heat shield - 
exhaust manifold - with A/C.

3. Remove 2 nuts securing downpipe flange to 

exhaust manifold, release downpipe.

4. Remove and discard exhaust flange gasket.

5. Release HO2S harness from clip on cylinder 

block.

6. Release and disconnect HO2S multiplug.

7. Remove bolt securing alternator mounting 

bracket. Rotate bracket clear of alternator and 
remove bracket.

8. Remove alternator bracket stud.

9. Remove 5 nuts securing exhaust manifold to 

head.

10. Remove exhaust manifold, remove and discard 

gasket.

Refit

1. Clean exhaust manifold and mating face on 

cylinder head.

2. Fit new exhaust manifold gasket to cylinder 

head.

3. Position exhaust manifold, fit nuts and 

progressively tighten, from centre outwards to 
45 Nm (33 lbf.ft).

4. Fit alternator  bracket stud.
5. Fit alternator mounting bracket.
6. Fit bolt securing alternator mounting bracket 

and tighten to 25 Nm (18 lbf.ft).

M30 1043

M30 1045

MANIFOLDS & EXHAUST SYSTEMS - K SERIES 1.8

REPAIRS

30-2-9

7. Secure HO2S harness to cylinder block clip.
8. Connect HO2S multiplug to harness and fit 

harness to bracket.

9. Clean exhaust pipe and exhaust manifold down 

pipe flanges.

10. Using new gasket, connect front pipe to 

manifold, fit nuts and tighten to 60 Nm (44 
lbf.ft). 

11. Fit exhaust manifold heat shield.


 + 

 MANIFOLDS & EXHAUST SYSTEMS 

- K SERIES 1.8, REPAIRS, Heat shield - 
exhaust manifold - with A/C.

12. Fit underbelly panel.


 + 

 EXTERIOR FITTINGS, REPAIRS, 

Panel - underbelly.

MANIFOLDS & EXHAUST SYSTEMS - K SERIES 1.8

30-2-10 REPAIRS


Content   ..  137  138  139  140   ..