Freelander 1. Manual - part 116


  Index      Land Rover     Freelander 1 - service manual 2002 year


Search            


Content   ..  114  115  116  117   ..


Freelander 1. Manual - part 116


FUEL DELIVERY SYSTEM - DIESEL

REPAIRS 19-1-15

Refit

1. Fit mounting rubbers to bracket.
2. Fit solenoid valve to mounting bracket rubbers 

and tighten to 5 Nm (4 lbf.ft).

3. Fit solenoid valve mounting bracket to 

turbocharger and tighten bolts to 10 Nm ( 7 
lbf.ft). 

4. Connect vacuum hoses.
5. Connect multiplug.
6. Fit engine breather connector.
7. Fit upper seal to turbocharger duct and ensure 

lower seal to turbocharger is in good condition.

8. Fit duct to turbocharger, connect to engine 

breather and MAF/IAT sensor.

9. Secure duct with clips.

10. Fit vacuum hose and harness to clips.
11. Fit air cleaner element.


 + 

 FUEL DELIVERY SYSTEM - DIESEL, 

REPAIRS, Element - air cleaner.

12. Fit underbelly panel.


 + 

 EXTERIOR FITTINGS, REPAIRS, 

Panel - underbelly.

13. Connect battery earth lead.

Sensor - turbo charger boost pressure 

$% 19.42.38

Remove

1. Disconnect battery earth lead.
2. Remove engine acoustic cover.


 + 

 ENGINE - Td4, REPAIRS, Cover - 

engine acoustic.

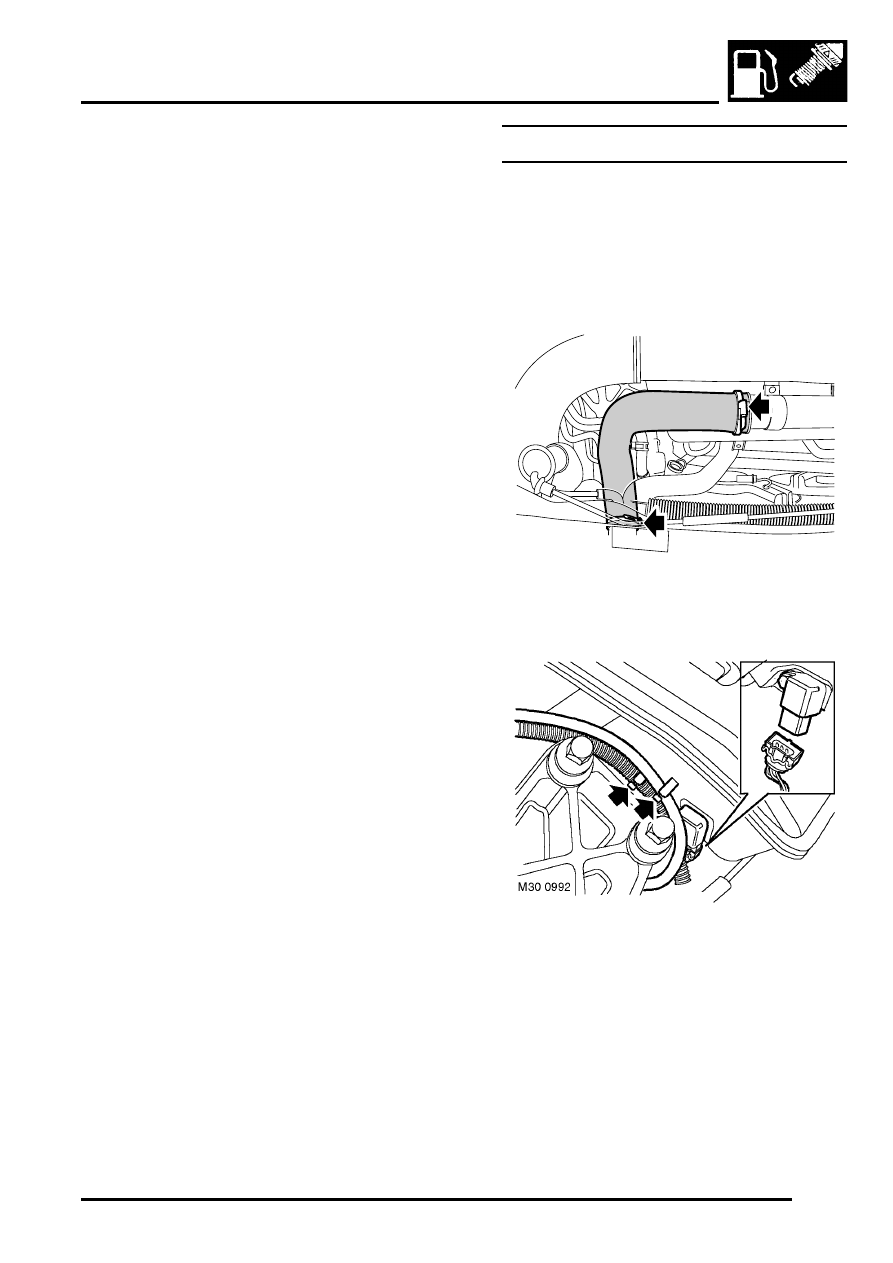
3. Loosen 2 clips and remove intercooler outlet 

hose.

4. Release harness and fuel return hose from 

clips on inlet manifold.

5. Disconnect multiplug from turbocharger boost 

pressure sensor.

M19 3193

FUEL DELIVERY SYSTEM - DIESEL

19-1-16 REPAIRS

6. Remove bolt and turbocharger boost pressure 

sensor. Discard seal.

Refit

1. Clean turbocharger boost pressure sensor and 

mating face.

2. Fit new seal to turbocharger boost pressure 

sensor, fit sensor to inlet manifold and tighten 
bolt to 8 Nm (6 lbf.ft).

3. Connect multiplug to turbocharger boost 

pressure sensor.

4. Fit fuel return hose and harness to clips on inlet 

manifold.

5. Fit intercooler outlet hose and tighten clips.
6. Fit engine acoustic cover.


 + 

 ENGINE - Td4, REPAIRS, Cover - 

engine acoustic.

7. Connect battery earth lead.

Ducting - intake assembly 

$% 19.42.51

Remove

1. Remove engine acoustic cover.


 + 

 ENGINE - Td4, REPAIRS, Cover - 

engine acoustic.

2. Release 3 clips securing intake ducting 

assembly and release hoses.

3. Release injector harness from clip on ducting 

assembly.

4. Remove 2 screws securing intake duct 

assembly to cam cover and engine support 
bracket.

5. Release intake duct assembly from air cleaner 

housing.

CAUTION: Always fit plugs to open 
connections to prevent contamination.

6. Remove intake duct assembly from vehicle.

Refit

1. Clean intake duct assembly and connections.
2. Fit duct assembly to air cleaner housing, align 

with mounting fit and tighten screws.

3. Fit injector harness to support clip.
4. Connect hoses and tighten clips.
5. Fit engine acoustic cover.


 + 

 ENGINE - Td4, REPAIRS, Cover - 

engine acoustic.

M19 3163

FUEL DELIVERY SYSTEM - DIESEL

REPAIRS 19-1-17

Pump - integral - fuel tank - rear

$% 19.45.03

Remove

1. Disconnect battery earth lead.
2. Open RH rear and tail doors.
3. Fold RH rear seat forward.
4. Remove 3 fasteners securing front and rear 

carpets.

5. Pull back loadspace carpet from fuel pump 

access panel.

6. Remove 6 screws securing access panel.
7. Remove access panel.
8. Disconnect multiplug from fuel pump tank unit.
9. Identify hoses for refit, release and disconnect 

fuel feed and return hoses from fuel pump tank 
unit.

WARNING: The spilling of fuel is 
unavoidable during this operation. Ensure 
that all necessary precautions are taken to 
prevent fire and explosion.

10. Models with FBH: Release clip and 

disconnect FBH fuel feed hose.

CAUTION: Always fit plugs to open 
connections to prevent contamination.

11. Use LRT-19-009 to remove locking ring from 

fuel pump housing.

12. Remove fuel pump tank unit and sealing ring.

Refit

1. Clean fuel pump housing and mating face on 

fuel tank.

2. Fit seal to fuel pump tank unit.
3. Fit fuel pump housing to fuel tank and use LRT-

19-009 to fit locking ring.

4. Models with FBH: Connect FBH fuel feed 

hose to tank unit and secure with clip.

5. Connect fuel feed and return hoses as 

identified on removal.

6. Connect multiplug to fuel pump tank unit.
7. Fit access panel and secure with screws.
8. Position carpet and secure with fasteners.
9. Reposition rear seat.

10. Close rear and tail doors.
11. Connect battery earth lead.

FUEL DELIVERY SYSTEM - DIESEL

19-1-18 REPAIRS

Regulator - fuel pressure 

$% 19.45.06

Remove

1. Disconnect battery earth lead.

WARNING: Fuel vapour is highly flammable 
and in confined spaces is also explosive 
and toxic. Always have a fire extinguisher 
containing foam, CO

2

, gas or powder close 

at hand when handling or draining fuel.

2. Remove inlet manifold gaskets.


 + 

 MANIFOLDS & EXHAUST SYSTEMS 

- Td4, REPAIRS, Gaskets - induction 
manifold.

3. Remove starter motor.


 + 

 CHARGING AND STARTING, 

REPAIRS, Starter motor - Td4.

4. Position absorbent cloth to collect fuel spillage.

CAUTION: Before disconnecting or 
removing components, ensure the 
immediate area around joint faces and 
connections are clean. Plug open 
connections to prevent contamination.

5. Disconnect multiplug from fuel pressure 

regulator.

6. Remove 2 Torx screws and carefully remove 

fuel pressure regulator. Discard 2 seals.

Refit

1. Clean fuel pressure regulator and mating face.
2. Fit new seals to fuel pressure regulator.
3. Fit regulator and tighten Torx screws to 9 Nm (7 

lbf.ft).

4. Fit starter motor.


 + 

 CHARGING AND STARTING, 

REPAIRS, Starter motor - Td4.

5. Fit inlet manifold gaskets.


 + 

 MANIFOLDS & EXHAUST SYSTEMS 

- Td4, REPAIRS, Gaskets - induction 
manifold.

6. Connect battery earth lead.


Content   ..  114  115  116  117   ..