Freelander 1. Manual - part 104
 

  Index      Land Rover     Freelander 1 - service manual 2002 year


Search            


Content   ..  102  103  104  105   ..


Freelander 1. Manual - part 104


EMISSION CONTROL

REPAIRS

17-1-3

REPAIRS

Valve - depression limiter - Td4 

$% 17.10.25

Remove

1. Disconnect battery earth lead.
2. Remove air cleaner element


 + 

 FUEL DELIVERY SYSTEM - DIESEL, 

REPAIRS, Element - air cleaner.

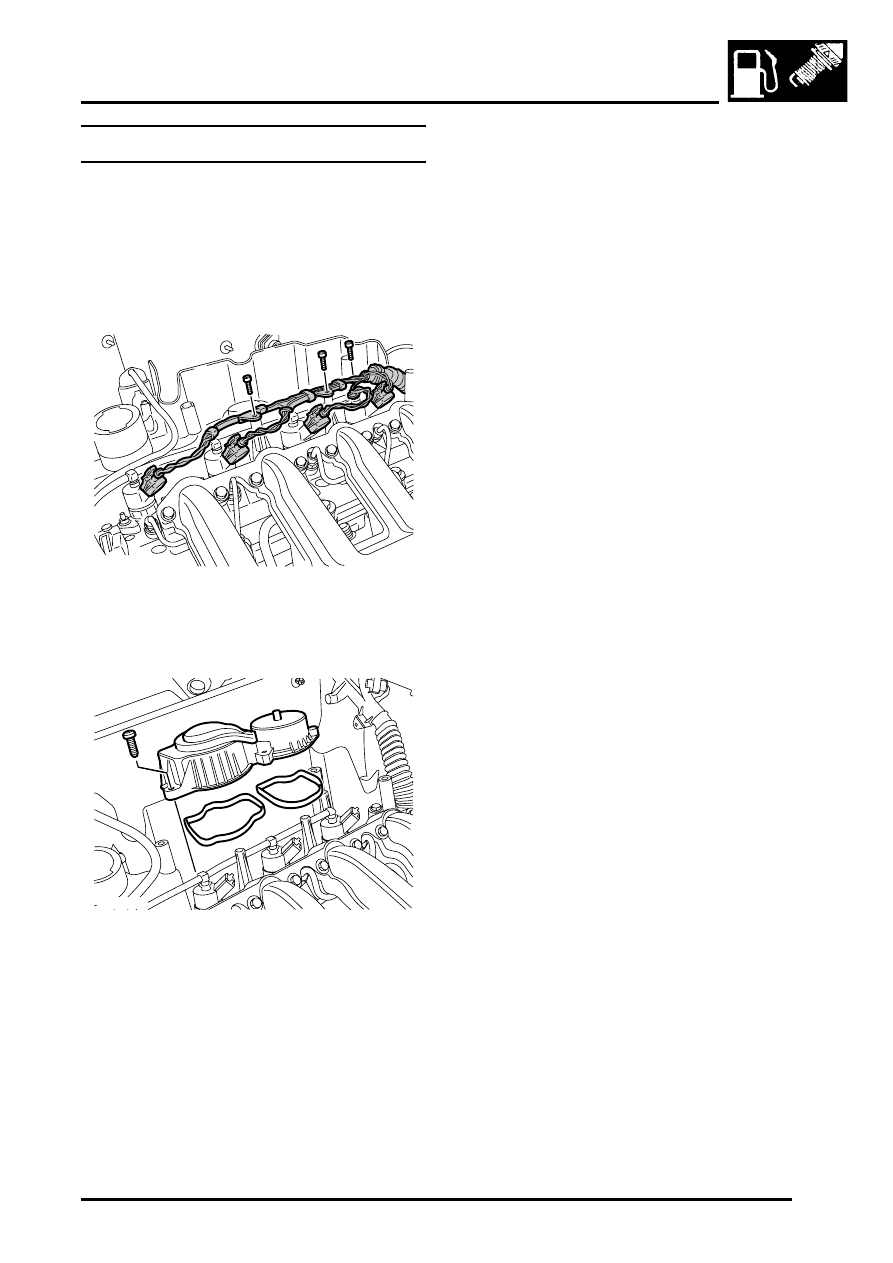
3. Disconnect multiplugs from injectors.
4. Remove 3 screws and move injector harness 

aside.

5. Remove 4 Allen screws and remove valve with 

filter assembly. Discard seals.

Refit

1. Clean filter with valve housing and mating 

faces.

2. Use new seals, fit filter and valve assembly, 

tighten Allen screws to 8 Nm (6 lbf.ft).

3. Position injector harness and secure with 

screws.

4. Connect multiplugs to injectors.
5. Fit air cleaner element.


 + 

 FUEL DELIVERY SYSTEM - DIESEL, 

REPAIRS, Element - air cleaner.

6. Connect battery earth lead.

M17 0280

M17 0281

EMISSION CONTROL

17-1-4

REPAIRS

Solenoid - canister purge - KV6

$% 17.15.06

Remove

1. Disconnect battery earth lead.

2. Disconnect multiplug from purge control valve.
3. Disconnect hose from purge control valve.
4. Remove screw and plain washer securing 

purge control valve to manifold chamber.

5. Remove purge control valve, remove and 

discard seal.

Refit

1. Clean purge control valve and mating face on 

manifold chamber.

2. Fit new seal to purge control valve.
3. Position purge control valve to manifold 

chamber, secure with plain washer and screw.

4. Connect multiplug and secure hose to purge 

control valve.

5. Connect battery earth lead.

Charcoal canister - petrol - Non NAS

$% 17.15.13

Remove

1. Raise rear of vehicle, one side.

WARNING: Do not work on or under a 
vehicle supported only by a jack. Always 
support the vehicle on safety stands.

2. Remove nut securing charcoal canister to 

bracket.

3. Remove charcoal canister from bracket.
4. Disconnect tank, air and purge pipes from 

charcoal canister.

CAUTION: Always fit plugs to open 
connections to prevent contamination.

5. Remove charcoal canister.

Refit

1. Connect tank, air and purge pipes to charcoal 

canister.

2. Fit charcoal canister to bracket and secure with 

nut.

3. Lower vehicle.

EMISSION CONTROL

REPAIRS

17-1-5

Charcoal canister - NAS

$% 17.15.13

Remove

1. Disconnect battery earth lead.
2. Remove RH rear wheel arch liner.


 + 

 EXTERIOR FITTINGS, REPAIRS, 

Liner - rear wheel arch.

3. Release and disconnect pipes from charcoal 

canister and DMTL.

CAUTION: Before disconnecting or 
removing components, ensure the 
immediate area around joint faces and 
connections are clean. Plug open 
connections to prevent contamination.

4. Remove 2 bolts securing canister support 

bracket and release assembly from mounting.

5. Disconnect multiplug from DMTL and remove 

canister and valve assembly.

6. Release clip and disconnect hose from 

charcoal canister.

CAUTION: Before disconnecting or 
removing components, ensure the 
immediate area around joint faces and 
connections are clean. Plug open 
connections to prevent contamination.

7. Remove nut and bolt securing charcoal 

canister and remove canister from bracket.

Refit

1. Fit charcoal canister to bracket and tighten nut 

and bolt to 4 Nm (3 lbf.ft).

2. Connect hose and secure with clip.
3. Position canister assembly and connect 

multiplug.

4. Fit canister assembly to mounting and tighten 

bolts to 4 Nm (3 lbf.ft).

5. Connect pipes to DMTL and canister.
6. Fit wheel arch liner.


 + 

 EXTERIOR FITTINGS, REPAIRS, 

Liner - rear wheel arch.

7. Connect battery earth lead.

EMISSION CONTROL

17-1-6

REPAIRS

Valve - canister purge - K1.8

$% 17.15.39

Remove

1. Disconnect battery earth lead.

2. Disconnect multiplug from purge control valve.
3. Disconnect quick release hose connector on 

purge control valve.

CAUTION: Always fit plugs to open 
connections to prevent contamination.

4. Release clip and disconnect purge hose from 

inlet manifold.

5. Release clip and slide purge control valve off 

from bracket.

Refit

1. Position purge control valve onto bracket.
2. Connect purge hose to inlet manifold and 

secure with clip. 

3. Connect quick release hose connector to purge 

control valve.

4. Connect multiplug to purge control valve .
5. Connect battery earth lead.


Content   ..  102  103  104  105   ..