Freelander 1. Manual - part 88


  Index      Land Rover     Freelander 1 - service manual 2002 year


Search            


Content   ..  86  87  88  89   ..


Freelander 1. Manual - part 88


ENGINE - K SERIES KV6

REPAIRS 12-3-43

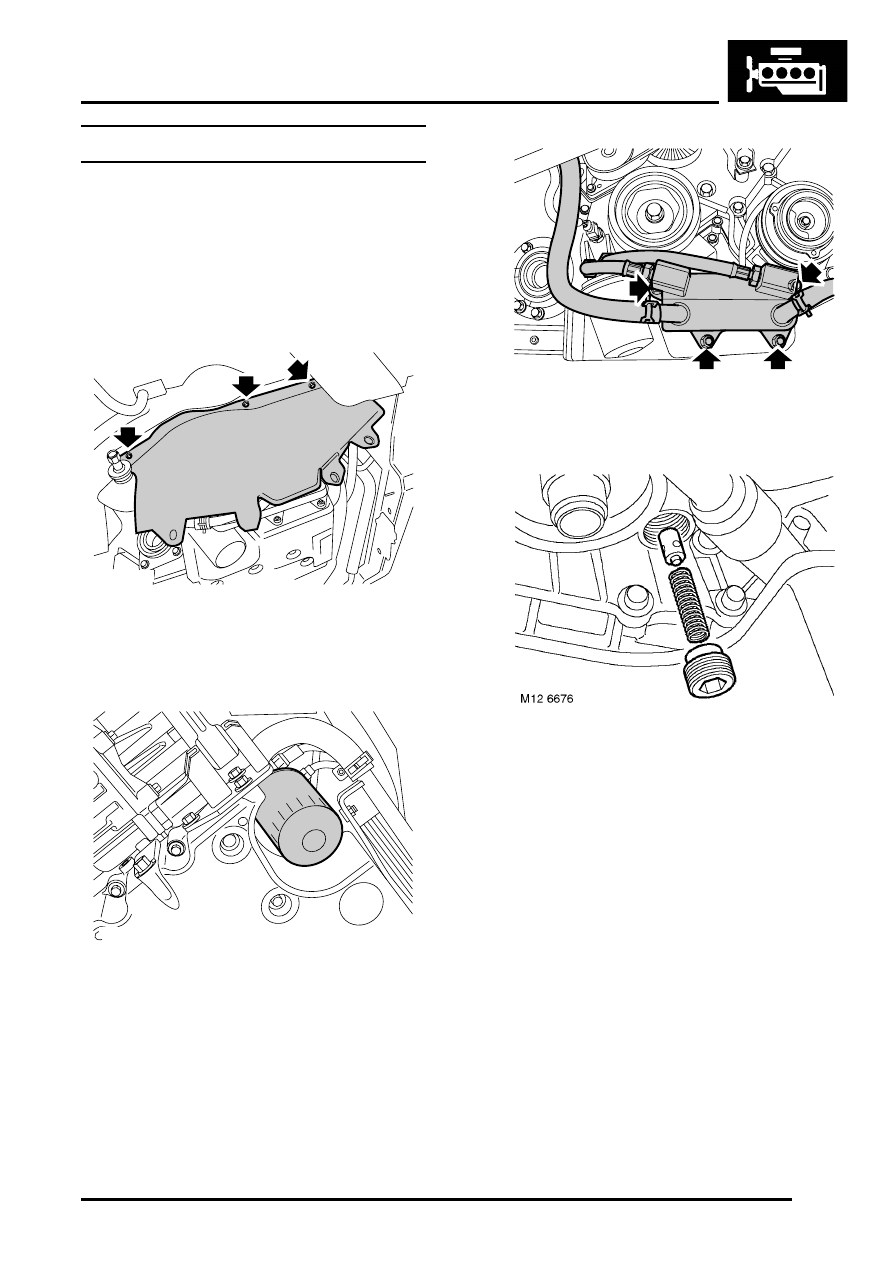
Oil pressure relief valve

$% 12.60.56

Remove

1. Disconnect battery earth lead.
2. Remove underbelly panel.


 + 

 EXTERIOR FITTINGS, REPAIRS, 

Panel - underbelly.

3. Remove RH front road wheel.

4. Remove 3 bolts securing RH splash shield to 

body and remove shield.

5. Place suitable container under oil filter to collect 

spillage.

6. Using strap wrench, remove and discard oil 

filter.

7. Remove 4 nuts securing engine oil cooler to 

mounting bracket and position oil cooler aside.

8. Remove oil pressure relief valve plug nut.

Note: If a hexagonal head plug and sealing 
washer are fitted, discard sealing washer.

9. Remove spring and valve.

Refit

1. Clean valve, spring and plug.
2. Clean valve seating inside oil pump  housing.
3. Check that valve slides freely in bore and that 

valve and bore are free from scoring and 
corrosion.

Note: Light corrosion may be removed using 
grade 600 emery cloth soaked in oil.

4. Check free length of spring.


 + 

 GENERAL DATA, Engine – KV6 

Petrol.

5. Apply Loctite 577 sealant to plug thread.

Note: If a hexagonal head plug and sealing 
washer were fitted, fit new sealing washer to 
plug.

M12 6614

M12 6660

M12 7916

ENGINE - K SERIES KV6

12-3-44 REPAIRS

6. Fit valve, spring and plug to oil pump housing. 

Tighten plug to 25 Nm (18 lbf.ft).

7. Fill canister of replacement oil filter with clean 

engine oil.

8. Lubricate new oil filter seal with clean engine oil 

and fit filter.

9. Position engine oil cooler to mounting bracket, 

fit and tighten nuts to 25 Nm (18 lbf.ft).

10. Remove oil container from underneath of 

engine.

11. Fit splash shield and secure with bolts.
12. Fit RH road wheel and tighten nuts to 115 Nm 

(85 lbf.ft).

13. Fit underbelly panel.


 + 

 EXTERIOR FITTINGS, REPAIRS, 

Panel - underbelly.

14. Connect battery earth lead.
15. Check engine oil level, top-up if  necessary.

Oil cooler - engine

$% 12.60.68

Remove

1. Disconnect battery earth lead.
2. Drain cooling system.


 + 

 COOLING SYSTEM - K SERIES KV6, 

ADJUSTMENTS, Coolant - drain and refill.

3. Remove RH front road wheel.

4. Remove 3 bolts securing RH splash shield to 

body and remove shield.

5. Position container to collect spillage under oil 

filter.

6. Loosen and remove oil cooler pipe unions from 

oil filter housing, remove and discard 2 'O' 
rings.

CAUTION: Always fit plugs to open 
connections to prevent contamination.

7. Position container to collect coolant spillage.
8. Release clips and disconnect coolant hoses 

from engine oil cooler.

CAUTION: Always fit plugs to open 
connections to prevent contamination.

M12 6614

M12 7917

ENGINE - K SERIES KV6

REPAIRS 12-3-45

9. Remove 4 nuts securing engine oil cooler to 

mounting bracket and remove oil cooler.

10. Restrain oil cooler pipe bosses on oil cooler 

housing, loosen and remove oil cooler pipes 
from oil cooler; remove and discard 2 'O' rings.

CAUTION: Always fit plugs to open 
connections to prevent contamination.

Refit

1. Clean oil cooler pipe unions and mating faces.
2. Lubricate new 'O' rings with clean engine oil 

and fit to oil cooler pipes.

3. Fit pipes to engine oil cooler, restrain bosses on 

oil cooler body and tighten unions to 26 Nm (19 
lbf.ft). 

CAUTION: To prevent damage to 
components, use two spanners when 
loosening or tightening unions.

4. Position engine oil cooler to mounting bracket, 

fit and tighten nuts to 25 Nm (18 lbf.ft).

5. Position oil cooler pipes to oil filter housing and 

tighten unions to 26 Nm.

6. Connect coolant hoses to oil cooler and secure 

with clips.

7. Fit splash shield and secure with bolts.
8. Fit RH road wheel and tighten nuts to 115 Nm 

(85 lbf.ft).

9. Fill cooling system.


 + 

 COOLING SYSTEM - K SERIES KV6, 

ADJUSTMENTS, Coolant - drain and refill.

10. Connect battery earth lead.
11. Check engine oil level and top-up if necessary. 


 + 

 MAINTENANCE, MAINTENANCE, 

Engine Oil and Filter – KV6.

Camshaft timing belt

$% 12.65.18

Remove

1. Disconnect battery earth lead.
2. Remove ancillary drive belt.


 + 

 CHARGING AND STARTING, 

REPAIRS, Ancillary drive belt - KV6.

3. Remove RH front road wheel.

4. Remove 3 bolts securing RH splash shield to 

body and remove shield.

5. Remove 3 bolts securing camshaft timing belt 

LH rear cover and remove cover.

6. Remove inlet manifold chamber.


 + 

 MANIFOLDS & EXHAUST SYSTEMS 

- K SERIES KV6, REPAIRS, Seals - inlet 
manifold chamber.

M12 6614

ENGINE - K SERIES KV6

12-3-46 REPAIRS

7. Remove 2 bolts securing RH rear timing belt 

cover heat shield; remove heat shield.

8. Remove 3 bolts securing RH rear timing belt 

cover; remove cover.

9. Using a socket on crankshaft pulley bolt, rotate 

crankshaft in a clockwise direction. Align the 
engine "SAFE" position, notch on crankshaft 
pulley with the "ARROW" on front mounting 
plate and the timing marks aligned on the rear 
camshaft gears as illustrated.

CAUTION: Do not use camshaft gear bolts 
or timing belt to rotate crankshaft.

10. Insert timing pin LRT-12-232 through hole in 

lower crankcase, ensuring pin is located in hole 
in drive plate.

CAUTION: Hole immediately adjacent to 
side of lower crankcase must be used.

11. Remove bolt securing PAS pipe to engine front 

mounting plate.

M12 6694

LRT-12-232

M12 7927


Content   ..  86  87  88  89   ..