Freelander 1. Manual - part 78


  Index      Land Rover     Freelander 1 - service manual 2002 year


Search            


Content   ..  76  77  78  79   ..


Freelander 1. Manual - part 78


ENGINE - K SERIES KV6

REPAIRS

12-3-3

REPAIRS

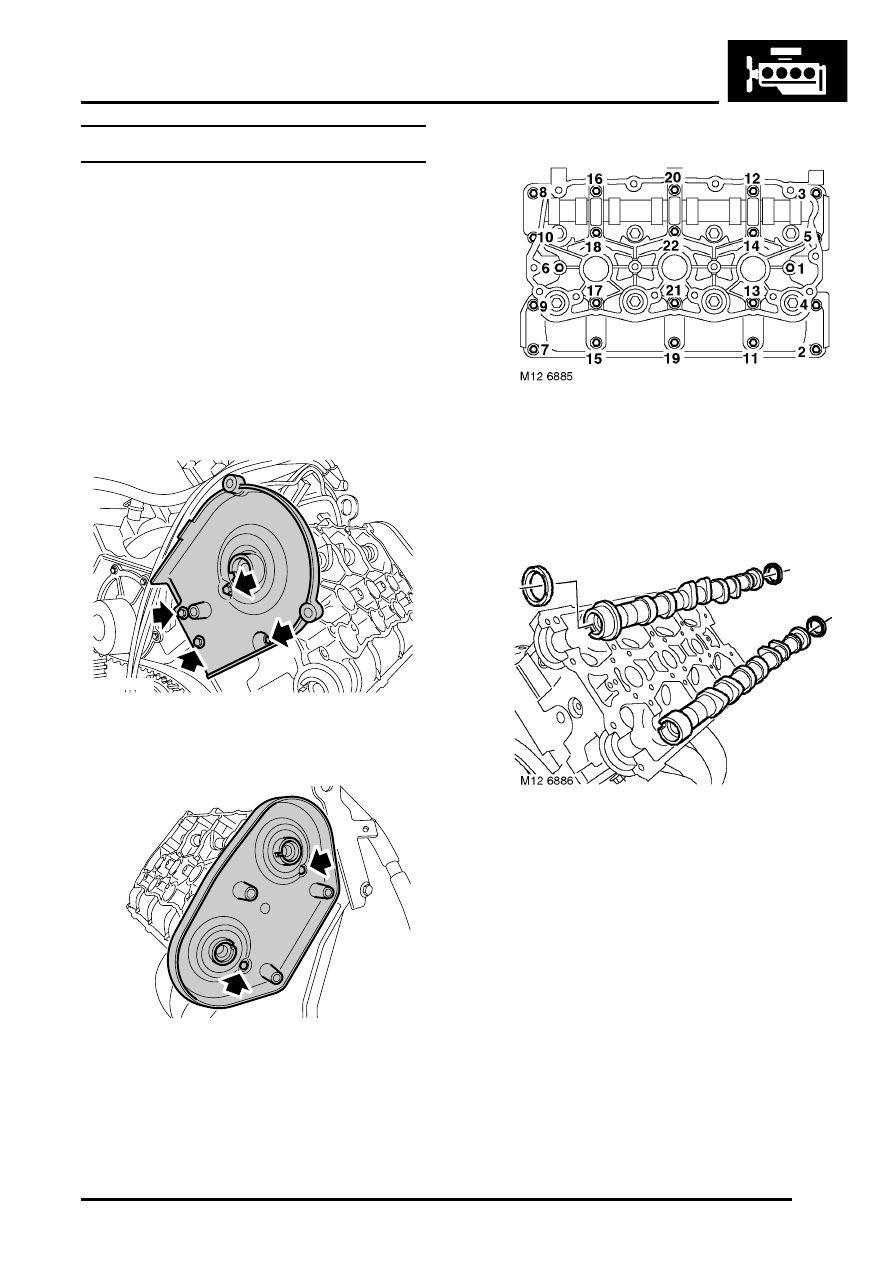
Camshafts - LH cylinder head

$% 12.13.02

Remove

1. Disconnect battery earth lead.
2. Remove camshaft timing belt.


 + 

 ENGINE - K SERIES KV6, REPAIRS, 

Camshaft timing belt.

3. Remove LH camshaft rear timing belt.


 + 

 ENGINE - K SERIES KV6, REPAIRS, 

Camshaft rear timing belt - LH cylinder 
head.

4. Remove LH camshaft cover gasket.


 + 

 ENGINE - K SERIES KV6, REPAIRS, 

Camshaft cover gasket - LH.

5. Remove 4 bolts and remove front camshaft 

drive belt cover backplate from cylinder head.

6. Remove 2 bolts securing LH rear camshaft 

drive belt cover backplate to cylinder head and 
remove backplate.

7. Using sequence shown, progressively loosen 

22 bolts securing camshaft carrier to cylinder 
head until valve spring pressure is released, 
remove bolts.

8. Release camshaft carrier from dowels and 

remove carrier.

9. Remove camshafts and discard oil seals.

10. Using a stick magnet, remove 12 hydraulic 

tappets from cylinder head.

CAUTION: Store hydraulic tappets in their 
fitted order and store upright. Maintain 
absolute cleanliness when handling 
hydraulic tappets. Failure to observe these 
precautions can result in engine failure.

11. Clean camshafts and bearing running surfaces 

in camshaft carrier and cylinder head.

12. Inspect camshafts and replace camshafts if 

scored, pitted or excessively worn.

Note: Camshafts are colour coded - Inlet - 
ORANGE; Exhaust - BLUE.

M12 6905

M12 6906

ENGINE - K SERIES KV6

12-3-4

REPAIRS

Refit

1. Thoroughly clean and lubricate hydraulic 

tappets with clean engine oil. Fit hydraulic 
tappets to original bores in cylinder head.

2. Ensure that mating faces of camshaft carrier 

and cylinder head are clean and dry.

3. Lubricate camshafts and bearing journals with 

clean engine oil.

4. Position camshafts in cylinder head with rear 

timing gear drive slots in each camshaft facing 
towards the centre as shown.

CAUTION: Ensure camshafts are in their 
correct fitted locations, camshafts are 
colour coded - Inlet - ORANGE; Exhaust - 
BLUE.

5. Apply continuous thin beads of sealant, Part 

No. STC 4600, to paths on camshaft carrier as 
shown. Spread sealant to an even film using a 
roller.

CAUTION: Ensure sealant does not enter oil 
feed holes or grooves and that assembly is 
completed within 20 minutes.

6. Position camshaft carrier, fit and progressively 

tighten bolts in the sequence shown to 10 Nm 
(7.5 lbf.ft).

7. Noting that the front camshaft oil seals are 

black in colour and the rear oil seals are red, fit 
new camshaft oil seals using LRT-12-203 and 
LRT-12-148A 

CAUTION: Oil seals must be fitted dry. Do 
not use tool LRT-12-148 for fitting seals. 

8. Clean camshaft timing belt cover backplate 

bolts and apply Loctite 242 to the first 3 threads.

9. Position camshaft timing belt rear cover 

backplates to cylinder head, fit and tighten bolts 
to 9 Nm (7 lbf.ft). 

10. Fit LH camshaft cover gasket.


 + 

 ENGINE - K SERIES KV6, REPAIRS, 

Camshaft cover gasket - LH.

11. Fit camshaft timing belt.


 + 

 ENGINE - K SERIES KV6, REPAIRS, 

Camshaft timing belt.

12. Fit LH camshaft rear timing belt.


 + 

 ENGINE - K SERIES KV6, REPAIRS, 

Camshaft rear timing belt - LH cylinder 
head.

ENGINE - K SERIES KV6

REPAIRS

12-3-5

13. Top-up engine oil.


 + 

 MAINTENANCE, MAINTENANCE, 

Engine Oil and Filter – KV6.

14. Connect battery earth lead.

Camshafts - RH cylinder head

$% 12.13.03

Remove

1. Disconnect battery earth lead.
2. Remove camshaft timing belt.


 + 

 ENGINE - K SERIES KV6, REPAIRS, 

Camshaft timing belt.

3. Remove RH rear camshaft timing belt.


 + 

 ENGINE - K SERIES KV6, REPAIRS, 

Camshaft rear timing belt - RH cylinder 
head.

4. Remove RH camshaft cover gasket.


 + 

 ENGINE - K SERIES KV6, REPAIRS, 

Camshaft cover gasket - RH.

5. Remove 4 bolts securing RH front timing belt 

cover backplate to cylinder head and remove 
backplate.

6. Remove 2 bolts securing RH rear timing belt 

cover backplate and remove backplate.

M12 6903

M12 6904

ENGINE - K SERIES KV6

12-3-6

REPAIRS

7. Using sequence shown, progressively loosen 

22 bolts securing camshaft carrier to cylinder 
head until valve spring pressure is released 
and remove bolts.

8. Release camshaft carrier from dowels and 

remove carrier.

9. Remove both camshafts and discard oil seals.

10. Using a stick magnet, remove 12 hydraulic 

tappets from cylinder head.

CAUTION: Store hydraulic tappets in their 
fitted order and store upright. Maintain 
absolute cleanliness when handling 
hydraulic tappets. Failure to observe these 
precautions can result in engine failure.

11. Clean camshafts and bearing running surfaces 

in camshaft carrier and cylinder head.

12. Inspect camshafts and replace camshafts if 

scored, pitted or excessively worn.

Note: Camshafts are colour coded - Inlet - 
ORANGE; Exhaust - BLUE.

Refit

1. Thoroughly clean and lubricate hydraulic 

tappets with clean engine oil. Fit hydraulic 
tappets to original bores in cylinder head.

2. Ensure that mating faces of camshaft carrier 

and cylinder head are clean and dry.

3. Lubricate camshafts and bearing journals with 

clean engine oil.

4. Position camshafts in cylinder head with rear 

timing gear drive slots in each camshaft facing 
towards the centre as shown.

CAUTION: Ensure camshafts are in their 
correct fitted locations, camshafts are 
colour coded - Inlet - ORANGE, Exhaust - 
BLUE.

5. Apply continuous thin beads of sealant, Part 

No. STC 4600, to paths on camshaft carrier as 
shown. Spread sealant to an even film using a 
roller.

Ensure sealant does not enter oil feed holes 
or grooves and that assembly is completed 
within 20 minutes.


Content   ..  76  77  78  79   ..