Freelander 1. Manual - part 70


  Index      Land Rover     Freelander 1 - service manual 2002 year


Search            


Content   ..  68  69  70  71   ..


Freelander 1. Manual - part 70


ENGINE - K SERIES 1.8

OVERHAUL 12-2-53

12. Note fitted position of plain washer and remove 

M6 nut and bolt securing front cover plate to 
gearbox.

13. Remove front upper nut and bolt securing 

gearbox to engine.

14. Remove 2 front nuts and bolts securing 

gearbox to engine, collect front cover plate.

15. Note fitted position of engine earth lead and 

remove 2 top bolts securing gearbox to engine.

16. With assistance remove gearbox from engine.

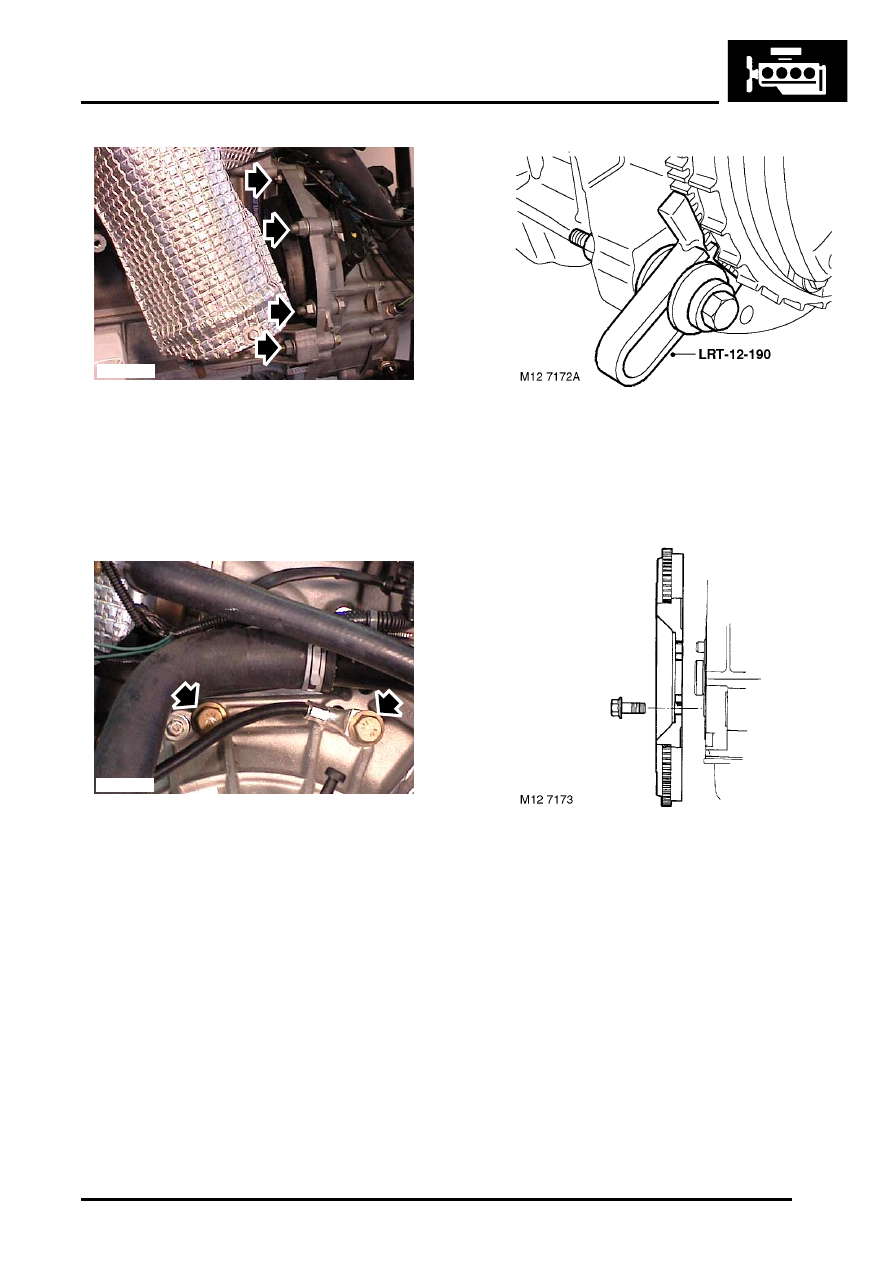
17. Position flywheel locking tool, LRT-12-190 to 

engine and secure with bolt.

18. Progressively loosen and then remove 6 bolts 

securing clutch cover assembly to flywheel.

19. Remove clutch cover and drive plate.

20. Remove and discard 6 bolts securing flywheel 

to crankshaft.

21. Remove flywheel locking tool, LRT-12-190.

M12 7170

M12 7171

ENGINE - K SERIES 1.8

12-2-54 OVERHAUL

22. Using a burr free flat ended screwdriver, ease 

crankshaft rear oil seal from cylinder block and 
discard seal. Take care to not mark sealing 
surface on crankshaft.

Refit

1. Remove all traces of oil and sealant from 

cylinder block, oil seal recess and running 
surface of crankshaft.

2. Apply a 1.5 mm (0.06 in) bead of sealant, Part 

Number STC 50550 to new oil seal as shown.

3. Immediately position oil seal to cylinder block. 

CAUTION: Oil seal must be fitted dry.

4. Fit oil seal replacer LRT-12-136 to crankshaft, 

retain using 3 bolts.

5. Tighten oil seal replacer bolts progressively to 

press oil seal into cylinder block, leave tool 
LRT-12-136 in position for 1 minute.

6. Remove tool LRT-12-136.

CAUTION: Allow sealant to cure for 30 
minutes before rotating crankshaft or 
topping-up engine oil.

7. Clean bolt holes in crankshaft using an old 

drive plate bolt with two saw cuts at an angle of 
45 

°

 to the bolt shank.

8. Clean flywheel and mating face of crankshaft.
9. Fit flywheel to crankshaft.

10. Position flywheel locking tool, LRT-12-190 to 

engine and secure with bolt.

11. Fit new Patchlok bolts securing flywheel to 

crankshaft and working in a diagonal 
sequence, tighten bolts to 80 Nm (59 lbf.ft).

12. Position drive plate to flywheel with 

'FLYWHEEL SIDE' marking towards flywheel.

13. Fit pressure plate to flywheel and position 

clutch alignment tool, LRT-12-151.

14. Fit 6 bolts securing pressure plate to flywheel, 

tighten bolts sufficiently until drive plate is held 
in its central position. Remove LRT-12-151 
from pressure plate.

15. Working in a diagonal sequence, progressively 

tighten pressure plate bolts to 25 Nm (18 lbf.ft).

16. Remove flywheel locking tool, LRT-12-190
17. 
Clean mating faces of engine and gearbox, 

dowel and dowel holes.

18. With assistance, position gearbox to engine, 

align to clutch assembly then locate on dowels.

19. Correctly position engine earth lead, fit top 2 

bolts securing gearbox to engine.

20. Position front cover plate and fit nuts and bolts.
21. Tighten top bolts and front nuts and bolts to 80 

Nm (59 lbf.ft) and gearbox to sump to 45 Nm 
(33 lbf.ft).

22. Position plain washer to M6 bolt, fit bolt and nut 

and tighten to 9 Nm (7 lbf.ft).

23. With assistance position IRD unit to gearbox, fit 

and tighten bolts to 90 Nm (66 lbf.ft).

24. Position support bracket to IRD unit and engine 

sump, fit and tighten bolts securing support 
bracket to IRD to 50 Nm (37 lbf.ft) and bolts 
securing support bracket to engine sump to 45 
Nm.

25. Fit and tighten upper bolt securing IRD support 

bracket to cylinder block to 45 Nm (33 lbf.ft).

26. Position engine lower steady bracket to sump, 

fit and tighten bolts to 100 Nm (74 lbf.ft).

27. Connect coolant hoses to IRD unit and secure 

with clips.

28. Secure IRD unit breather hose in clip on 

dipstick tube.

29. Clean starter motor and mating face on 

gearbox.

30. Position rear cover plate to cylinder block.
31. Fit starter motor and lower nut and bolt but do 

not tighten at this stage.

32. Fit engine steady bar, fit bolt securing steady 

bar to LH engine mounting but do not tighten at 
this stage.

33. Fit starter motor upper nut and bolt.

ENGINE - K SERIES 1.8

OVERHAUL 12-2-55

34. Tighten starter motor upper and lower nuts and 

bolts to 80 Nm (59 lbf.ft).

35. Connect Lucar to starter solenoid.
36. Top-up engine oil.


 + 

 MAINTENANCE, MAINTENANCE, 

Engine Oil and Filter – K1.8.

Crankshaft and main bearings

$% 12.21.33.01

Remove

1. Remove cylinder head.


 + 

 ENGINE - K SERIES 1.8, 

OVERHAUL, Gasket - cylinder head - unit 
removed.

2. Remove crankshaft rear oil seal.


 + 

 ENGINE - K SERIES 1.8, 

OVERHAUL, Crankshaft rear oil seal.

3. Remove timing belt drive gear from crankshaft.
4. Remove oil filter and discard.


 + 

 MAINTENANCE, MAINTENANCE, 

Engine Oil and Filter – K1.8.

5. Remove oil pump.


 + 

 ENGINE - K SERIES 1.8, 

OVERHAUL, Oil pump.

6. Remove 2 bolts securing PAS pump mounting 

bracket to cylinder block and remove bracket.

M12 7184

ENGINE - K SERIES 1.8

12-2-56 OVERHAUL

7. Remove dipstick.
8. Remove bolt securing thermostat housing and 

dipstick tube to cylinder block.

9. Remove 2 bolts securing dipstick tube to 

cylinder block.

10. Remove dipstick tube and discard gasket.
11. Remove sump.


 + 

 ENGINE - K SERIES 1.8, 

OVERHAUL, Sump.

12. Remove bolts securing cylinder liner clamps 

LRT-12-144 and remove clamps.

CAUTION: Retain bolts in their original 
fitted order. Do not rotate crankshaft with 
clamps removed.

13. Remove 2 bolts securing oil pick-up strainer to 

oil rail.

14. Remove oil pick-up strainer.
15. Remove and discard 'O' ring from oil pick-up 

strainer.

16. Remove 2 nuts securing oil rail to bearing 

ladder and remove oil rail.

M12 7125


Content   ..  68  69  70  71   ..