Freelander 1. Manual - part 66


  Index      Land Rover     Freelander 1 - service manual 2002 year


Search            


Content   ..  64  65  66  67   ..


Freelander 1. Manual - part 66


ENGINE - K SERIES 1.8

REPAIRS 12-2-37

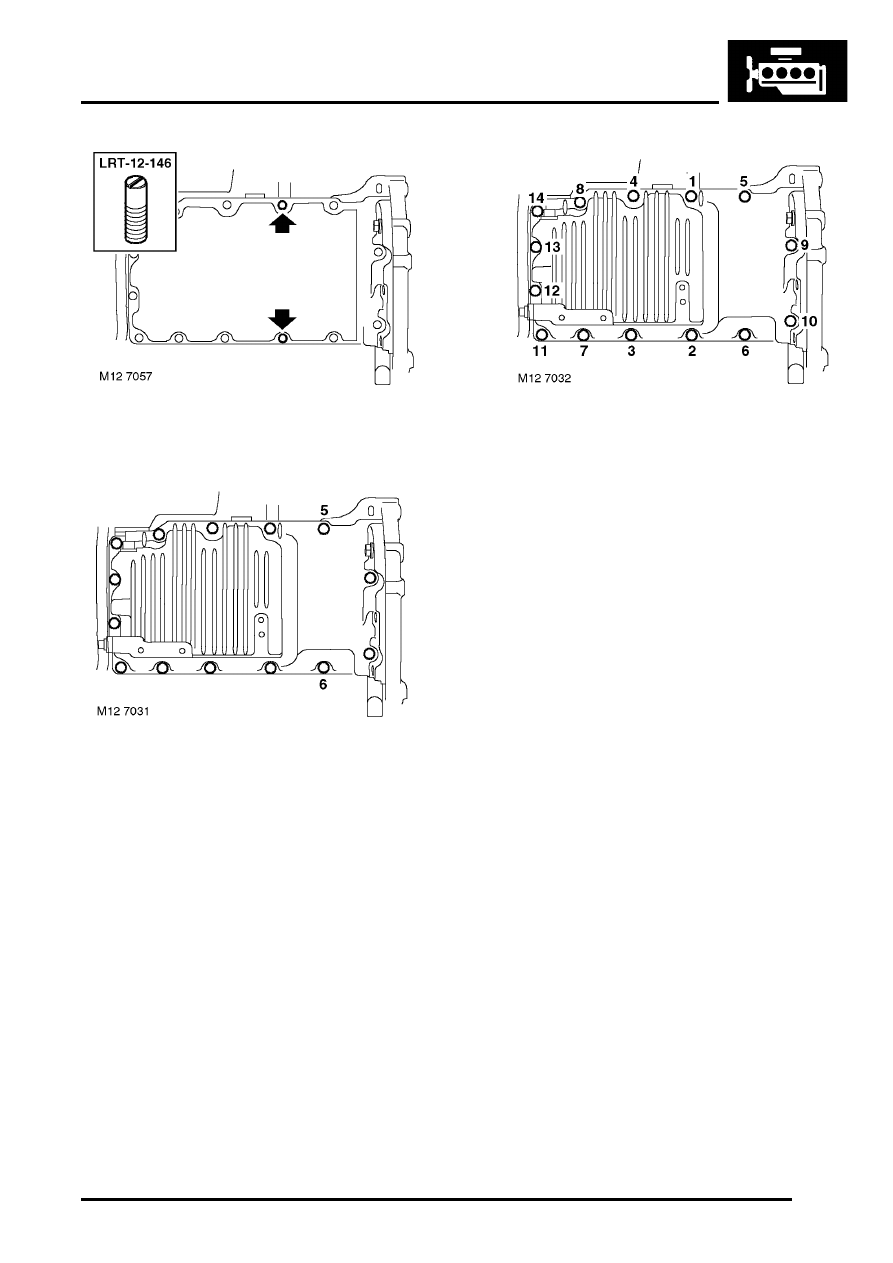
3. Fit alignment pins, LRT-12-146, to positions 

shown.

4. Position sump to bearing ladder, fit 2 bolts at 

positions 5 and 6 and tighten to 4 Nm (3 lbf.ft).

5. Fit 10 bolts into remaining holes, lightly tighten 

all bolts. Ensure that the two M8 x 60 longer 
bolts are fitted into rearmost holes in sump.

6. Fit bolts securing sump to gearbox housing, 

lightly tighten and then loosen bolts. This will 
correctly align the rear sump flange to gearbox.

7. Remove alignment pins, LRT-12-146, fit and 

lightly tighten 2 remaining bolts.

8. Ensure that the rear sump flange is aligned to 

gearbox housing and progressively tighten 
sump bolts in the sequence shown, M8 x 25 
bolts to 25 Nm (18 lbf.ft) and M8 x 60 bolts to 30 
Nm (22 lbf.ft).

9. Tighten bolts securing gearbox to sump to 45 

Nm (33 lbf.ft).

10. Position support bracket to IRD unit and engine 

sump, fit and tighten bolts securing support 
bracket to IRD to 50 Nm (37 lbf.ft) and bolts 
securing support bracket to engine sump to 45 
Nm (33 lbf.ft).

11. Fit and tighten upper bolt securing IRD support 

bracket to cylinder block to 45 Nm (33 lbf.ft).

12. Position engine lower steady bracket to sump, 

fit and tighten bolts to 100 Nm (74 lbf.ft).

13. Position lower engine steady to sump mounting 

bracket, fit and tighten bolt to 80 Nm (59 lbf.ft).

14. Tighten bolt securing lower engine steady to 

subframe to 80 Nm (59 lbf.ft).

15. Fit front exhaust pipe.


 + 

 MANIFOLDS & EXHAUST SYSTEMS 

- K SERIES 1.8, REPAIRS, Exhaust pipe - 
front.

16. Fill engine with oil.


 + 

 MAINTENANCE, MAINTENANCE, 

Engine Oil and Filter – K1.8.

ENGINE - K SERIES 1.8

12-2-38 REPAIRS

Switch - oil pressure

$% 12.60.50

Remove

1. Disconnect battery earth lead.
2. Raise front of vehicle.

WARNING: Do not work on or under a 
vehicle supported only by a jack. Always 
support the vehicle on safety stands.

3. Turn steering on RH lock.

4. Remove 3 bolts securing RH splash shield to 

body and remove shield.

5. Disconnect multiplug from oil pressure switch.
6. Position container below switch to catch oil 

spillage.

7. Remove oil pressure switch.

Refit

1. Clean threads of oil pressure switch and ensure 

mating face is clean.

2. Apply Loctite 577 to threads of switch.
3. Fit oil pressure switch and tighten to 17 Nm 

(12.5 lbf.ft).

4. Connect oil pressure switch multiplug.
5. Fit splash shield and secure with bolts.
6. Position steering wheel straight ahead.
7. Connect battery earth lead.
8. Check and top up engine oil.


 + 

 MAINTENANCE, MAINTENANCE, 

Engine Oil and Filter – K1.8.

ENGINE - K SERIES 1.8

REPAIRS 12-2-39

Valve - oil pressure relief

$% 12.60.56

Remove

1. Remove camshaft timing belt front lower cover.


 + 

 ENGINE - K SERIES 1.8, REPAIRS, 

Cover - timing belt - front lower - without A/
C.
 

 + 

 ENGINE - K SERIES 1.8, REPAIRS, 

Cover - timing belt - front lower - with A/C.

2. Unscrew plug, discard sealing washer.
3. Remove spring and relief valve.

CAUTION: Suitably protect timing belt from 
oil contamination.

4. Check that valve slides freely in bore and that 

bore and valve are free from scoring and 
corrosion.

Note: Light corrosion may be removed using 
grade 600 emery cloth soaked in oil.

5. Check spring free length.


 + 

 GENERAL DATA, Engine – K1.8 

Petrol.

CAUTION: Replace relief as an assembly if 
scoring of valve is evident or free length of 
spring is less than specified. Replace oil 
pump as an assembly if relief valve bore is 
scored.

Refit

1. Remove all traces of Loctite from plug and relief 

valve bore.

CAUTION: Do not use a tap.

2. Apply clean engine oil to valve and spring.
3. Fit valve and spring.
4. Fit a new sealing washer to plug and apply 

Loctite 577 to threads of plug.

5. Fit plug and tighten to 25 Nm (18 lbf.ft).
6. Fit camshaft timing belt lower cover.


 + 

 ENGINE - K SERIES 1.8, REPAIRS, 

Cover - timing belt - front lower - without A/
C.
 

 + 

 ENGINE - K SERIES 1.8, REPAIRS, 

Cover - timing belt - front lower - with A/C.

7. Check and top-up engine oil.


 + 

 MAINTENANCE, MAINTENANCE, 

Engine Oil and Filter – K1.8.

ENGINE - K SERIES 1.8

12-2-40 REPAIRS

Sensor - oil temperature

$% 12.60.65

Remove

1. Disconnect battery earth lead.
2. Raise front of vehicle.

WARNING: Do not work on or under a 
vehicle supported only by a jack. Always 
support the vehicle on safety stands.

3. Turn steering on RH lock.

4. Remove 3 bolts securing RH splash shield to 

body and remove shield.

5. Position container to catch oil spillage

6. Disconnect oil temperature sensor multiplug.
7. Remove oil temperature sensor.

Refit

1. Clean threads of oil temperature sensor, 

ensure mating face is clean.

2. Apply Loctite 577 to threads of sensor.
3. Fit  oil temperature sensor and tighten to 17 Nm 

(12.5 lbf.ft).

4. Connect oil temperature sensor multiplug.
5. Fit splash shield and secure with bolts.
6. Position steering wheel straight ahead.
7. Remove stands and lower vehicle.
8. Connect battery earth lead.
9. Check and top up engine oil.


 + 

 MAINTENANCE, MAINTENANCE, 

Engine Oil and Filter – K1.8.


Content   ..  64  65  66  67   ..