Discovery 2. Manual - part 652


  Index      Land Rover     Land Rover Discovery 2 - service manual 1999 year


Search            


Content   ..  650  651  652  653   ..


Discovery 2. Manual - part 652


EXTERIOR FITTINGS

REPAIRS

76-2-7

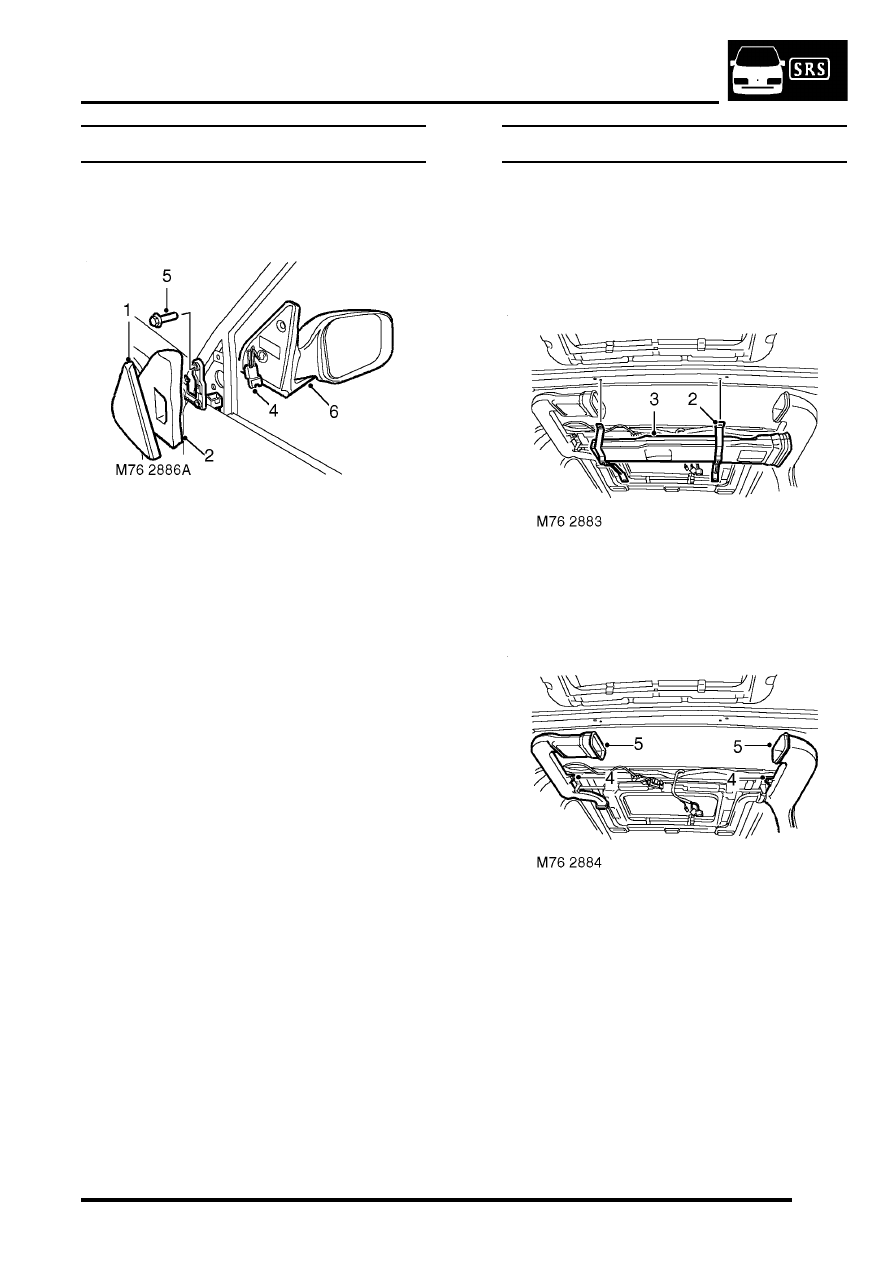
Mirror - exterior - electric 

$% 76.10.57 

Remove

1. Release cheater panel from front door. 
2. Remove anti-rattle foam pad from  front door. 
3. Release mirror multiplug from mounting  plate. 
4. Disconnect multiplug from mirror. 
5. Remove 3 bolts securing mirror to door. 
6. Remove mirror and collect mounting  plate. 

Refit

1. Fit mirror and mounting plate to door. 
2. Fit bolts securing mirror to door  and tighten to 

4 Nm (3 lbf.ft). 

3. Connect multiplug to mirror. 
4. Secure multiplug to mounting plate. 
5. Fit anti-rattle foam pad to front door. 
6. Secure cheater panel to front door. 

Roof bars 

$% 76.11.31 

Remove

1. Remove headlining. 


 INTERIOR TRIM COMPONENTS, 

REPAIRS, Headlining.

2. Models with rear A/C: Drill out 4 rivets 

securing rear centre duct to roof. 

3. Models with rear A/C: Release and remove 

rear centre duct. 

4. Models with rear A/C: Drill out 2 rivets 

securing each upper side duct to roof. 

5. Models with rear A/C: Remove upper side 

ducts.

EXTERIOR FITTINGS

76-2-8

REPAIRS

6. Remove 2 nuts securing each roof bar to  roof. 
7. Remove roof bars and collect foam pads  from 

each end. 

Refit

1. Fit roof bars to roof, ensuring foam  pads are 

correctly located. 

2. Fit nuts securing roof bars to  roof and tighten 

to 32 Nm (24 lbf.ft).  

3. Models with rear A/C: Fit upper side ducts and 

secure with rivets. 

4. Models with rear A/C: Fit rear centre duct and 

secure with rivets. 

5. Fit headlining. 


 + 

 INTERIOR TRIM COMPONENTS, 

REPAIRS, Headlining.

Bonnet  

$% 76.16.01.99

Remove

1. Support bonnet in open position.

2. Fit protection covers to wings and mark hinge 

outline on bonnet if bonnet is to be refitted.

3. Disconnect windscreen washer tube at elbow 

joint.

4. With assistance, remove bolts securing hinges 

to bonnet and remove bonnet.

Refit

1. With assistance, position bonnet to hinges. Fit 

and lightly tighten bolts.

2. Connect windscreen washer tube.
3. Close bonnet. Check that bonnet is aligned to 

both front wings and that gaps are equal. If 
necessary, adjust bonnet alignment and/or 
gaps.

4. Finally tighten hinge bolts to 25 Nm (18 lbf.ft).

EXTERIOR FITTINGS

REPAIRS

76-2-9

Cable - bonnet release - up to 03MY

$% 76.16.29 

Remove

1. Remove front grille.


 + 

 EXTERIOR FITTINGS, REPAIRS, 

Grille - front - up to 03MY.

2. Release LH headlamp from adjuster pin 

sockets. 

3. Disconnect 2 multiplugs from headlamp and 

remove headlamp. 

4. Drill out 4 rivets securing bonnet lock shield to 

bonnet platform and remove shield. 

5. Disconnect bonnet release cable inner and 

outer from lock. 

6. Remove 4 fasteners securing LH fascia closing 

panel to fascia and remove panel. 

7. Remove 2 nuts securing bonnet release  lever 

assembly to body. 

8. Remove bonnet release cable from lever 

assembly. 

9. Diesel models: Pull sound  insulation away 

from bulkhead for access to  bonnet release 
cable grommet. 

EXTERIOR FITTINGS

76-2-10 REPAIRS

10. Remove grommet from engine bulkhead. 
11. Tie a draw string to end of bonnet  release 

cable in passenger compartment. 

12. Pull bonnet release cable, from bonnet lock 

end, until whole of cable is released. 

13. Untie draw string from bonnet release  cable 

and remove cable. 

14. Remove grommet from cable. 

Refit

1. Fit grommet to bonnet release cable. 
2. Tie draw string to passenger compartment end 

of bonnet release cable. 

3. Use draw string to pull bonnet release cable 

into position.

4. Fit grommet to engine bulkhead.
5. Untie draw string from bonnet release  cable. 
6. Position bonnet release lever assembly  and 

connect bonnet release cable to lever. 

7. Fit release lever assembly to  body and tighten 

nuts to 10 Nm (7 lbf.ft) . 

8. Connect bonnet release cable to lock.
9. With assistance, operate bonnet release lever 

and check for correct operation of lock.

10. Fit fascia closing panel and secure with 

fasteners. 

11. Fit bonnet lock shield and secure with  rivets. 
12. Position headlamp to body, connect  multiplugs 

and fit headlamp to sockets. 

13. Fit front grille.


 + 

 EXTERIOR FITTINGS, REPAIRS, 

Grille - front - up to 03MY.

Cable - bonnet release - from 03MY

$% 76.16.29

Remove

1. Remove the front grille.


 EXTERIOR FITTINGS, REPAIRS, 

Grille - front - from 03MY.

2. Drill out 4 rivets securing bonnet lock shield to 

the bonnet locking platform and remove the 
shield.

3. Disconnect bonnet release cable from the 

bonnet lock.

4. Disconnect bonnet release cable from the front 

panel retaining clip.

M76 4573


Content   ..  650  651  652  653   ..