Discovery 2. Manual - part 506


  Index      Land Rover     Land Rover Discovery 2 - service manual 1999 year


Search            


Content   ..  504  505  506  507   ..


Discovery 2. Manual - part 506


FUEL DELIVERY SYSTEM - TD5

REPAIRS 19-1-15

REPAIRS

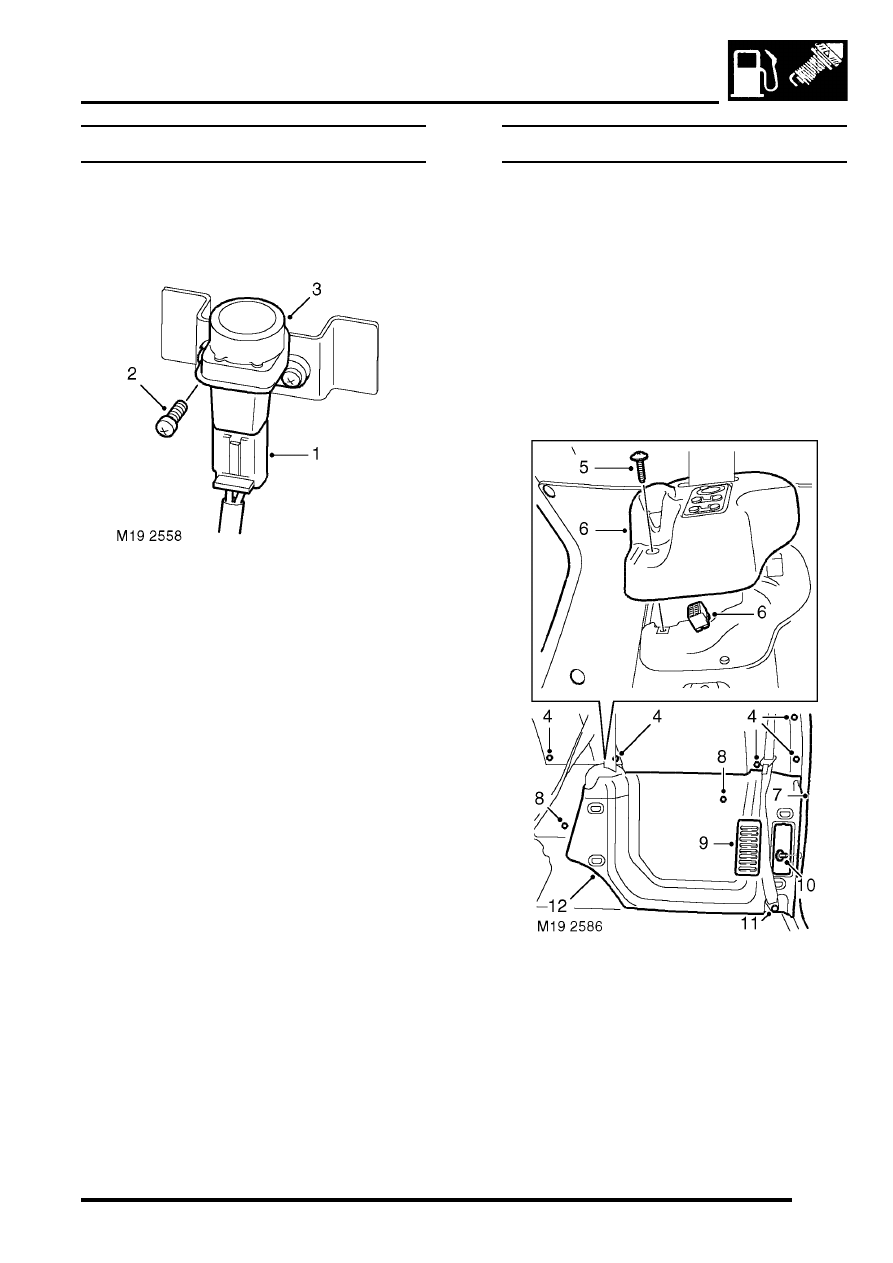
Switch - inertia - fuel cut-off

$% 19.22.09

Remove

1. Disconnect multiplug from fuel cut-off switch.
2. Remove 2 screws securing fuel cut-off switch to 

bulkhead.

3. Remove fuel cut-off switch from bulkhead.

Refit

1. Position fuel cut-off switch to bulkhead and 

secure with screws.

2. Connect multiplug to fuel cut-off switch.
3. To set the fuel cut-off switch, depress the top of 

the fuel cut-off switch.

Pump - fuel 

$% 19.45.08  

NOTE: The fuel pump and fuel gauge tank unit are 
integral parts of the fuel pump housing and cannot be 
renewed separately

Remove

1. Release fixings and remove battery cover.
2. Disconnect battery earth lead.
3. Models with third row seats: Remove RH 

third row seat.
 

 SEATS, REPAIRS, Seat - third row.

4. Remove 5 trim clips securing lower edge of RH 

'D' post trim casing. 

5. Models with rear ICE controls: Remove 

screw securing remote ICE controls to RH side 
trim casing. 

6. Models with rear ICE controls: Release ICE 

controls from RH side trim casing. Disconnect 
multiplug and remove ICE controls. 

7. Partially remove tail door aperture seal in the 

area of the RH side trim casing. 

FUEL DELIVERY SYSTEM - TD5

19-1-16 REPAIRS

8. Remove 2 trim clips securing RH side trim 

casing to body. 

9. Remove rear lamp access panel from RH side 

trim casing. 

10. Remove trim clip securing RH side trim casing 

to  lower 'E' post. 

11. Models with third row seats:Remove bolt 

securing lower mounting of RH third row seat 
belt to body. 

12. Remove RH side trim casing. 
13. Pull back loadspace carpet from fuel pump 

access panel. 

14. Remove 6 screws securing access panel. 
15. Remove access panel. 
16. Disconnect multiplug and 4 fuel hoses from fuel 

pump housing. 

CAUTION: Always fit plugs to open 
connections to prevent contamination.

17. Use LRT-19-009 to remove locking ring from 

fuel pump housing. 

18. Remove fuel pump housing. 
19. Remove and discard sealing ring from fuel 

pump housing. 

Refit

1. Clean fuel pump housing and mating face on 

fuel tank. 

2. Fit new seal to mating face on fuel tank. 
3. Fit fuel pump housing to fuel tank and use LRT-

19-009 to fit locking ring.

4. Connect multiplug and fuel hoses to fuel pump 

housing. Ensure each hose is installed in the 
connector with the corresponding colour 
code.

5. Fit access panel and secure with screws. 
6. Reposition loadspace carpet. 
7. Fit RH side trim casing. 
8. Models with third row seats:Fit bolt securing 

lower mounting of RH third row seat belt to 
body and tighten to 50 Nm (37 lbf.ft).  

9. Fit trim clip securing RH side trim casing to 

lower 'E' post. 

10. Fit rear lamp access panel to RH side trim 

casing. 

11. Fit trim clips securing RH side trim casing to 

body. 

12. Fit tail door aperture seal. 
13. Models with rear ICE controls: Connect 

multiplug to remote ICE  controls. 

14. Models with rear ICE controls: Fit ICE 

controls to trim casing and  secure with screw. 

15. Fit trim clips securing lower edge of  'D' post 

trim casing to body. 

16. Models with third row seats: Fit RH third row 

seat.
 

 SEATS, REPAIRS, Seat - third row.

17. Connect battery earth lead.

FUEL DELIVERY SYSTEM - TD5

REPAIRS 19-1-17

Tank - fuel  

$% 19.55.01

Remove

1. Drain fuel tank.


 + 

 FUEL DELIVERY SYSTEM - Td5, 

ADJUSTMENTS, Fuel tank - drain.

2. Raise rear of vehicle.

WARNING: Do not work on or under a 
vehicle supported only by a jack. Always 
support the vehicle on safety stands.

3. Release clips securing filler and breather hoses 

and release hoses from filler neck.

4. Disconnect fuel tank vent pipe from filler tube.
5. Support weight of fuel tank underneath cradle.

6. Remove 2 nuts and 2 bolts securing cradle to 

chassis.

7. With assistance, lower LH side of fuel tank then 

remove fuel tank from chassis. 

8. Remove fuel tank from cradle.

9. Remove 2 scrivets securing heat shield and 

remove heat shield. 

10. Release securing clip and remove breather 

hose from fuel tank.

Refit

1. Fit breather hose to fuel tank and secure with 

clip.

2. Position heat shield and secure with  scrivets.
3. With assistance, position fuel tank and cradle.
4. Fit nuts and bolts securing cradle to chassis. 

Tighten bolts to 50 Nm (37 lbf.ft) and nuts to 28 
Nm (21 lbf.ft).

5. Connect fuel tank vent pipe to filler tube.
6. Connect breather and filler hoses and secure 

with clips. 

FUEL DELIVERY SYSTEM - TD5

19-1-18 REPAIRS

Solenoid - fuel filler flap release  

$% 19.55.17 

Remove

1. Remove loadspace RH side trim casing


 + 

 INTERIOR TRIM COMPONENTS, 

REPAIRS, Trim casing - side - loadspace.

2. Remove 2 nuts and release solenoid from  

body panel. 

3. Disconnect multiplug and remove  solenoid. 

Refit

1. Position solenoid and connect multiplug. 
2. Position solenoid to panel and tighten  nuts. 
3. Fit loadspace RH side trim casing. 


 + 

 INTERIOR TRIM COMPONENTS, 

REPAIRS, Trim casing - side - loadspace.

Switch - fuel filler flap release - up to 
03MY

$% 19.55.23

Remove

1. Carefully remove switch. 
2. Disconnect multiplug from switch. 
3. Remove switch. 

Refit

1. Connect multiplug switch. 
2. Position switch and push to secure. 


Content   ..  504  505  506  507   ..