Discovery 2. Manual - part 414


  Index      Land Rover     Land Rover Discovery 2 - service manual 1999 year


Search            


Content   ..  412  413  414  415   ..


Discovery 2. Manual - part 414


ENGINE - TD5

REPAIRS 12-1-53

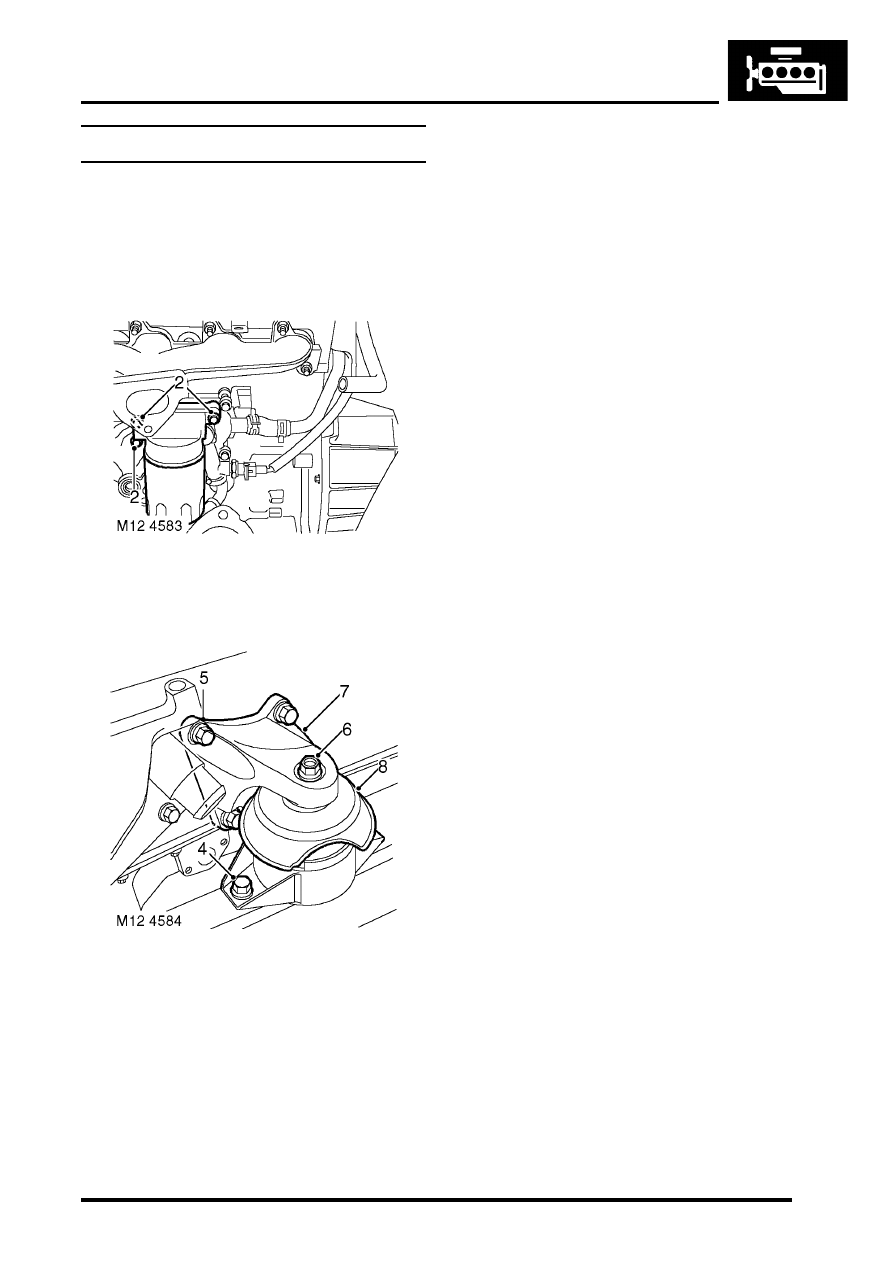
Mounting - front - LH 

$% 12.45.01 

Remove

1. Remove centrifuge assembly


 + 

 ENGINE - Td5, REPAIRS, Gasket - 

centrifuge oil drain pipe.

2. Remove 3 bolts, remove oil filter adaptor 

housing and discard gasket.

3. Fit suitable lifting chains to support  engine. 

4. With assistance remove 2 bolts securing  

engine mounting to chassis. 

5. Remove 4 bolts securing engine mounting  

bracket to cylinder block. 

6. Remove nut securing mounting to mounting  

bracket. 

7. Remove mounting and mounting bracket. 
8. Remove mounting shield. 

Refit

1. Fit shield to mounting. 

2. Fit mounting and mounting bracket. 
3. Fit mounting bracket to cylinder block and 

tighten –  bolts securing front LH engine 
mounting bracket to cylinder block to 48 Nm (35 
lbf.ft). 

4. With assistance, fit mounting to chassis and 

tighten –  bolts securing front LH engine 
mounting to chassis  to 85 Nm (63 lbf.ft). 

5. Fit mounting to mounting bracket and tighten –  

nut securing front LH mounting to mounting 
bracket to 85 Nm (63 lbf.ft). 

6. Remove engine support chains. 
7. Clean oil filter adaptor housing and mating 

face.

8. Fit   oil filter adaptor housing to oil cooler 

housing and tighten bolts to  25 Nm (18 lbf.ft). 

9. Fit centrifuge assembly. 


 + 

 ENGINE - Td5, REPAIRS, Gasket - 

centrifuge oil drain pipe.

ENGINE - TD5

12-1-54 REPAIRS

Mounting - front - RH 

$% 12.45.03 

Remove

1. Remove fixings and remove engine acoustic 

cover. 

2. Release fixings and remove battery cover.
3. Disconnect battery earth lead.
4. Raise front of vehicle.

WARNING: Do not work on or under a 
vehicle supported only by a jack. Always 
support the vehicle on safety stands.

5. Remove 4 bolts and move fuel cooler to  one 

side. 

6. Fit suitable lifting chains to support  engine. 

7. With assistance remove 2 bolts securing  

engine mounting to chassis. 

8. Remove 4 bolts securing engine mounting  

bracket to cylinder block. 

9. Remove nut securing mounting to mounting  

bracket. 

10. Remove mounting and mounting bracket. 

Refit

1. Fit mounting and mounting bracket. 
2. Fit  front RH engine mounting bracket to 

cylinder block and tighten bolts to 48 Nm (35 
lbf.ft).

3. With assistance, fit  front RH mounting to  

chassis and tighten bolts to 85 Nm (63 lbf.ft).

4. Fit  front RH mounting to mounting bracket  and 

tighten nut to  85 Nm (63 lbf.ft).

5. Remove engine support chains. 
6. Position   Fuel cooler to inlet manifold and 

tighten bolts to 25 Nm (18 lbf.ft).

7. Remove stand(s) and lower vehicle.
8. Connect battery earth lead.
9. Fit battery cover and secure with fixings.

10. Fit engine acoustic cover and secure with 

fixings.

ENGINE - TD5

REPAIRS 12-1-55

Mounting - engine - rear - LH  

$% 12.45.07 

Remove

1. Raise vehicle on ramp. 
2. Position jack to support gearbox. 

3. Remove 2 nuts and remove mounting. 
4. Remove heat shield from mounting. 

Refit

1. Clean mounting and mating faces. 
2. Position heat shield to mounting. 
3. Position   engine rear LH mounting and tighten 

nuts to 48 Nm (35 lbf.ft).

4. Lower support jack. 
5. Lower vehicle.

Mounting - engine - rear - RH

$% 12.45.09 

Remove

1. Raise vehicle on ramp. 

2. Position jack to support gearbox. 
3. Remove 2 nuts and remove mounting. 

Refit

1. Clean mounting and mating faces. 
2. Position   engine rear RH mounting and tighten 

nuts  to 48 Nm (35 lbf.ft).

3. Lower support jack. 
4. Lower vehicle.

ENGINE - TD5

12-1-56 REPAIRS

Flywheel  

$% 12.53.07 

Remove

1. Remove clutch assembly.


 + 

 CLUTCH - Td5, REPAIRS, Clutch 

assembly.

2. Remove and discard 8 bolts securing flywheel 

to  crankshaft and remove flywheel. 

Refit

1. Clean flywheel and mating face. 
2. Position flywheel to crankshaft, fit new bolts 

and working in a diagonal sequence tighten to 
40 Nm (30 lbf.ft), then a further 90

°

.

CAUTION: Do not carry out stages 1 and 2 in 
one operation.

3. Fit clutch assembly. 


 + 

 CLUTCH - Td5, REPAIRS, Clutch 

assembly.

Plate - drive - automatic 

$% 12.53.13 

Remove

1. Remove gearbox.


 AUTOMATIC GEARBOX - ZF4HP22 

- 24, REPAIRS, Gearbox - convertor and 
transfer gearbox - Diesel.

2. Remove and discard 8 bolts and remove 

converter  drive plate, spacer and starter ring 
gear. 

Refit

1. Clean drive plate, spacer and starter  ring gear. 
2. Fit starter ring gear, spacer and drive plate to 

crankshaft, fit new bolts and working in a 
diagonal sequence tighten to 40 Nm (30 lbf.ft), 
then a further 90

°

.

CAUTION: Do not carry out stages 1 and 2 in 
one operation.

3. Refit gearbox.


 AUTOMATIC GEARBOX - ZF4HP22 

- 24, REPAIRS, Gearbox - convertor and 
transfer gearbox - Diesel.


Content   ..  412  413  414  415   ..