Discovery 2. Manual - part 343


  Index      Land Rover     Land Rover Discovery 2 - service manual 1999 year


Search            


Content   ..  341  342  343  344   ..


Discovery 2. Manual - part 343


IN CAR ENTERTAINMENT

REPAIRS 86-6-33

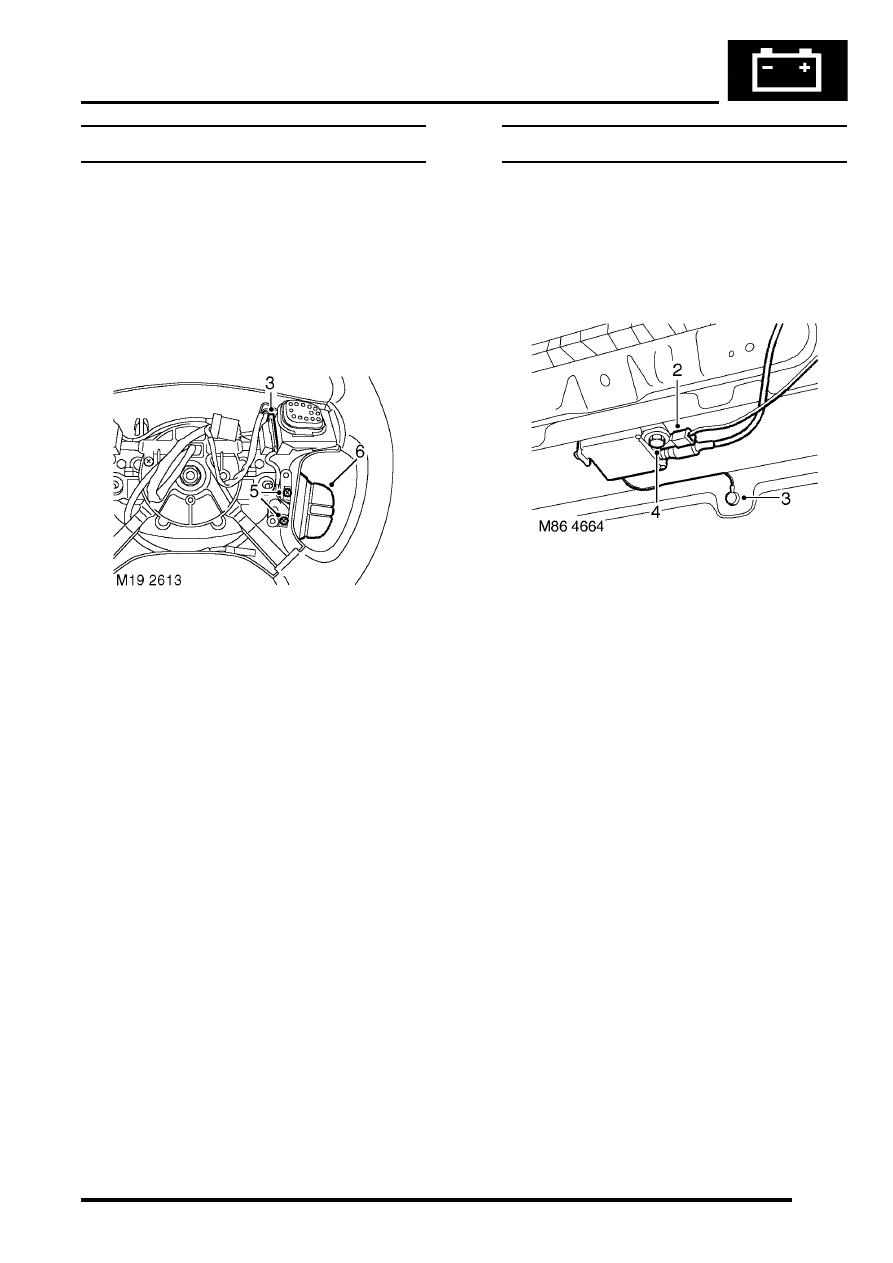
Switches - remote control - ICE  

$% 86.50.13 

Remove 

1. Remove the key from the starter switch. 

Disconnect both battery leads, negative lead 
first. Wait ten minutes before starting work. 

2. Remove driver's airbag module.


 + 

 RESTRAINT SYSTEMS, REPAIRS, 

Airbag module - drivers.

3. Release remote control switches multiplug and 

leads from steering wheel base. 

4. Disconnect  remote control switches multiplug 

from harness. 

5. Remove 2 screws securing remote control 

switches to steering wheel base. 

6. Release and remove remote control switches 

from steering wheel. 

Refit

1. Fit remote control switches to steering wheel 

and secure with screws.

2. Connect remote control switches multiplug to 

harness.

3. Secure leads and multiplug to base of  steering 

wheel. 

4. Fit driver's airbag module.


 + 

 RESTRAINT SYSTEMS, REPAIRS, 

Airbag module - drivers.

Amplifier - aerial

$% 86.50.29

Remove

1. Remove rear quarter upper trim casing.


 + 

 INTERIOR TRIM COMPONENTS, 

REPAIRS, Trim casing - 'D' post.

2. Disconnect coaxial lead and Lucar connector 

from amplifier.

3. Disconnect amplifier from aerial.
4. Remove bolt securing amplifier and remove 

amplifier.

Refit

1. Position amplifier and secure with bolt.
2. Connect aerial lead, Lucar connector and 

coaxial lead.

3. Fit rear quarter upper trim casing.


 + 

 INTERIOR TRIM COMPONENTS, 

REPAIRS, Trim casing - 'D' post.

IN CAR ENTERTAINMENT

86-6-34 REPAIRS

Speaker - mid range - front door  

$% 86.50.34 

Remove

1. Remove front door trim casing.  


 + 

 DOORS, REPAIRS, Trim casing - 

front door.

2. Remove locknut securing speaker to front  door 

trim casing. 

3. Remove speaker. 

Refit

1. Position speaker and secure to door  trim 

casing using locknut. 

2. Fit front door trim casing.  


 + 

 DOORS, REPAIRS, Trim casing - 

front door.

Speaker - high range - rear door  

$% 86.50.35 

Remove

1. Remove rear door trim casing.  


 + 

 DOORS, REPAIRS, Trim casing - 

rear door.

2. Remove speaker locknut. 
3. Remove speaker from door trim casing. 

Refit

1. Position speaker and secure withlocknut  to 

rear door trim casing. 

2. Fit rear door trim casing.  


 + 

 DOORS, REPAIRS, Trim casing - 

rear door.

IN CAR ENTERTAINMENT

REPAIRS 86-6-35

Amplifier - power  

$% 86.50.36 

Remove

1. Release fixings and remove battery cover.
2. Disconnect battery earth lead.

3. Remove 3 screws and 1 trim clip securing lower 

trim casing to LH front seat. 

4. Remove lower trim casing.
5. Move seat fully rearwards.

6. Remove 3 nuts securing power amplifier 

mounting bracket to body.

7. Release mounting bracket and, if applicable, 

disconnect multiplug from EAT ECU on 
underside of bracket.

8. Disconnect multiplug from power amplifier. 

9. Remove 3 screws securing power amplifier to 

mounting bracket and remove power amplifier.

Refit

1. Fit power amplifier to mounting bracket and 

secure with screws.

2. Position power amplifier and mounting bracket 

to body and connect power amplifier multiplug. 
If applicable, also connect EAT ECU multiplug.

3. Fit bracket to body mountings and secure with 

nuts. 

4. Position lower trim casing to seat and secure 

with fixings. 

5. Connect battery earth lead.
6. Fit battery cover and secure with fixings.

IN CAR ENTERTAINMENT

86-6-36 REPAIRS

Speaker - tail door  

$% 86.50.42

Remove

1. Remove tail door speaker trim casing.  


 + 

 INTERIOR TRIM COMPONENTS, 

REPAIRS, Trim casing - tail door speaker.

2. Remove 8 screws securing tail door speaker to 

tail door trim casing. 

3. Disconnect tail door speaker multiplug. 
4. Remove tail door speaker. 

Refit

1. Position tail door speaker to tail door and 

connect multiplug.

2. Fit screws securing tail door speaker to tail door 

trim casing.

3. Fit tail door speaker trim casing.  


 + 

 INTERIOR TRIM COMPONENTS, 

REPAIRS, Trim casing - tail door speaker.

CD autochanger  

$% 86.50.60 

Remove

1. Remove RH front seat. 


 + 

 SEATS, REPAIRS, Seat - front.

2. Disconnect multiplug from CD autochanger. 
3. Remove 4 nuts securing CD autochanger to 

floor. 

4. Remove CD autochanger. 
5. Remove 4 screws securing mounting brackets 

to CD autochanger and remove mounting 
brackets.

Refit

1. Position mounting brackets to CD autochanger 

and secure with screws.

2. Position CD autochanger to floor and  secure 

with nuts. 

3. Connect multiplug to CD autochanger. 
4. Fit RH front seat. 


 + 

 SEATS, REPAIRS, Seat - front.


Content   ..  341  342  343  344   ..