Discovery 2. Manual - part 300


  Index      Land Rover     Land Rover Discovery 2 - service manual 1999 year


Search            


Content   ..  298  299  300  301   ..


Discovery 2. Manual - part 300


AIR CONDITIONING

REPAIRS

82-39

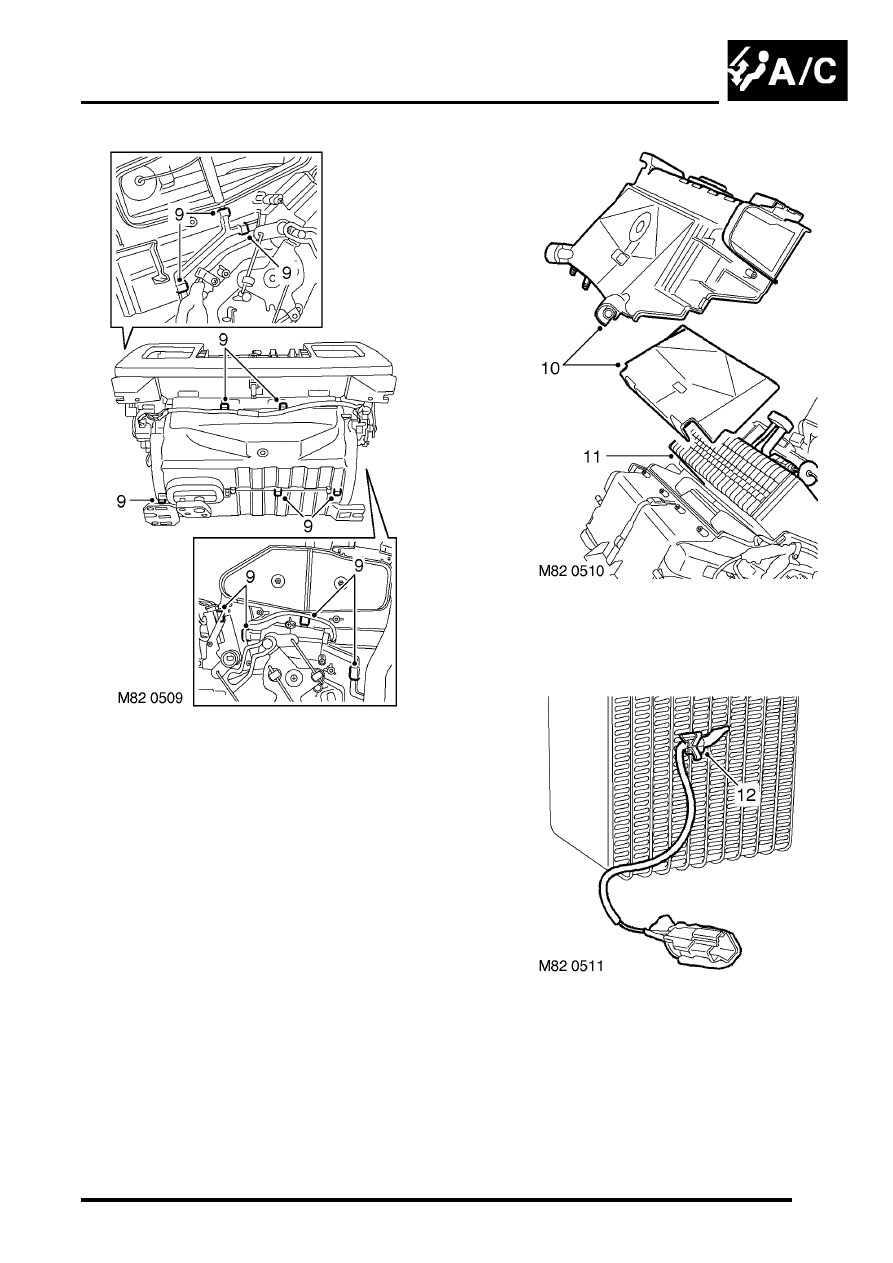
9. Remove 12 spring clips securing casings. 

10. Remove evaporator casing and collect  

insulation. 

11. Remove evaporator assembly. 

12. Remove evaporator thermistor. 

AIR CONDITIONING

82-40

REPAIRS

13. Remove covering from TX valve, release 2 

clips securing TX valve to pipe. 

14. Release 2 unions securing TX valve,  remove 

TX valve, remove and discard 'O'  rings. 

15. Release pipe union, remove pipe and  discard 

'O' ring.  

Refit

1. Using a new 'O' ring, position pipe to  

evaporator and tighten union.  

2. Using new 'O' rings, position TX valve. Connect 

pressure pipe union and tighten to 22 Nm (16 
lbf. ft). Connect evaporator pipe and tighten to 
32 Nm (24 lbf.ft).

3. Position TX valve sensor to pipe and  secure 

with clips. 

4. Fit sensor covering. 
5. Fit evaporator thermistor. 
6. Fit evaporator assembly. 
7. Fit insulation to evaporator casing and  fit 

casing. 

8. Secure spring clips. 
9. Fit and tighten casing screws. 

10. Fit heater matrix, ensuring matrix  temperature 

is correctly positioned. 

11. Fit coolant pipe saddle, fit and tighten screws 

securing saddle and pipe bracket. 

12. Fit and tighten temperature servo screws. 
13. Connect multiplug to evaporator thermistor. 
14. Clean any bulk head seal from casing. 
15. Fit bulkhead and evaporator pipe seals. 
16. Fit heater assembly.


 + 

 HEATING AND VENTILATION, 

REPAIRS, Heater assembly - models with 
air conditioning.

AIR CONDITIONING

REPAIRS

82-41

Expansion valve - (TXV) - rear

$% 82.26.01 

Remove

1. Depressurise air conditioning system.  


 + 

 AIR CONDITIONING, REFRIGERANT 

RECOVERY, RECYCLING AND 
RECHARGING, Refrigerant recovery, 
recycling and recharging.

2. Remove rear lower trim casing.  


 + 

 INTERIOR TRIM COMPONENTS, 

REPAIRS, Trim casing - side - loadspace.

3. Remove 5 bolts securing seat support  bracket 

and remove bracket. 

4. Release insulation from TXV pipe unions  and 

sensor. 

5. Remove clip securing sensor to pipe and  

release sensor. 

6. Loosen TXV pipe unions, release pipes  and 

remove TXV. 

7. Remove and discard 'O' rings. 

Refit

1. Lubricate new 'O' rings with clean  refrigerant oil 

and fit to TXV pipes. 

2. Position TXV, align pipes and tighten  unions. 
3. Connect sensor and secure with clip. 
4. Fit insulation to TXV valve and sensor. 
5. Position seat support bracket, fit  bolts and 

tighten to 24 Nm (18 lbf.ft) 

6. Repressurise air conditioning system.  


 + 

 AIR CONDITIONING, REFRIGERANT 

RECOVERY, RECYCLING AND 
RECHARGING, Refrigerant recovery, 
recycling and recharging.

7. Fit rear lower trim casing .  


 + 

 INTERIOR TRIM COMPONENTS, 

REPAIRS, Trim casing - side - loadspace.

AIR CONDITIONING

82-42

REPAIRS

Evaporator - rear

$% 82.26.20 

Remove

1. Remove evaporator assembly.


 + 

 AIR CONDITIONING, REPAIRS, 

Evaporator and motor assembly - rear.

2. Remove insulation from TXV. 
3. Release relay from support bracket. 
4. Remove ducting seal. 

5. Remove 4 screws securing lower part of  

casing, release and remove lower casing. 

6. Remove 6 screws and 4 clips securing  main 

casing and remove top half of casing. 

7. Loosen and release evaporator pipes  unions, 

release pipes and remove  evaporator. 

8. Remove and discard evaporator pipe 'O'  rings. 

Refit

1. Lubricate new 'O' rings with clean  refrigerant oil 

and fit to evaporator pipes 

2. Position evaporator, connect pipes and  tighten 

unions. 

3. Position main casing and secure with  clips and 

screws. 

4. Position lower part of casing and secure  with 

screws. 

5. Fit ducting seal 
6. Secure relay to support bracket. 
7. Fit insulation to TXV. 
8. Fit evaporator assembly.


 + 

 AIR CONDITIONING, REPAIRS, 

Evaporator and motor assembly - rear.


Content   ..  298  299  300  301   ..