Discovery (1995+): Body Repair Manual - part 23


  Index      Land Rover     Discovery Body Repair Manual - 1995 year


Search            


Content   ..  21  22  23  24   ..


Discovery (1995+): Body Repair Manual - part 23


76

CHASSIS AND BODY

30

REPAIR

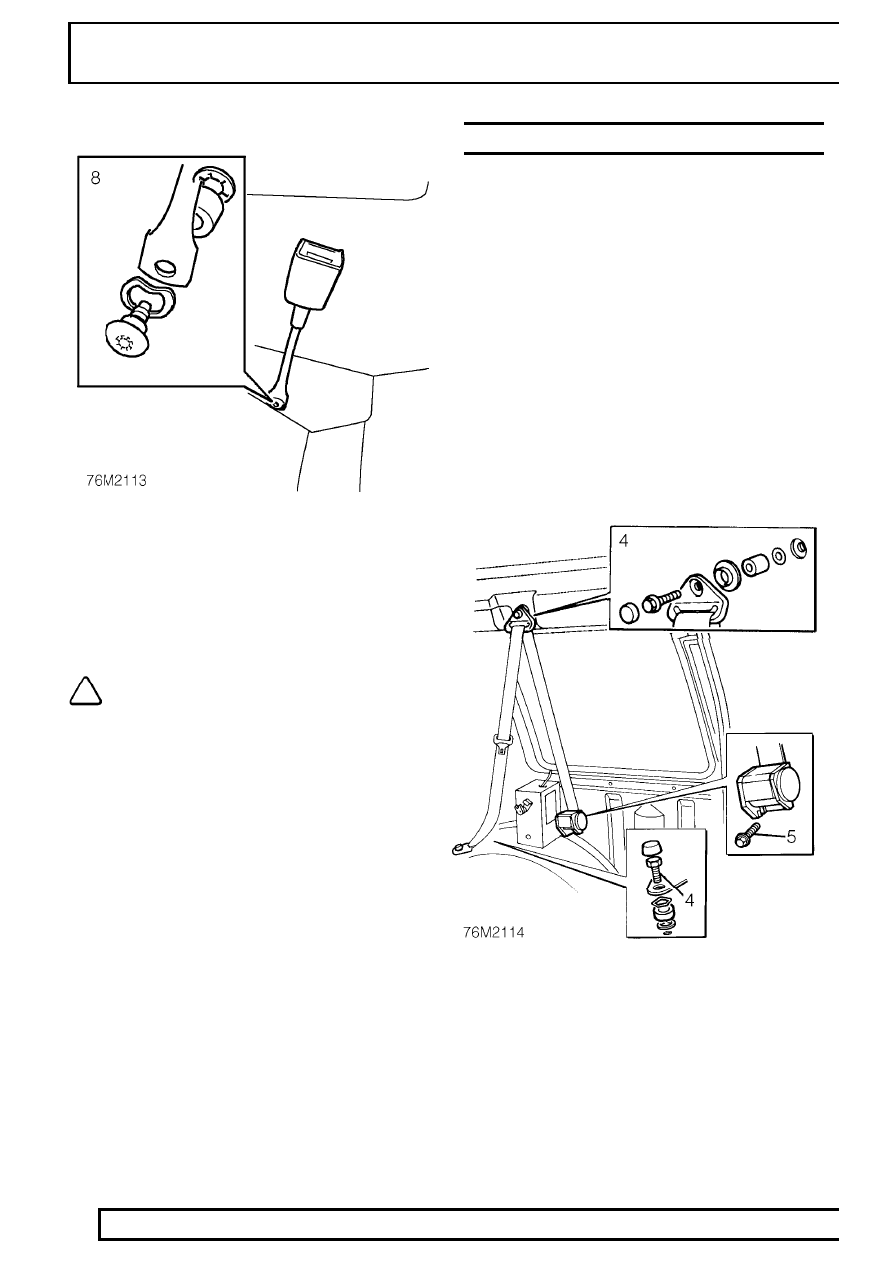
8. Release the Torx bolt to allow removal of the

seat belt stalk assembly.

Refit

9. Reverse removal procedure.

NOTE: Ensure the seat belt is not twisted.

10. Finally, tighten the seat belt bolts to

32 Nm (24

lbf ft) .

REAR OUTER SEATS BELT

Service repair no - 76.73.18

Remove

1. Remove the rear fold down seat (if applicable).

See this section.

2. Remove the speaker by releasing the screws

and disconnecting the Lucars. Withdraw the rear
quarter trim panel.

3. Remove the rear bodyside lower trim panel.

See

this section.

4. Remove the bolts securing the brackets to the

wheel arch and upper bodyside.

5. Remove the bolt securing the inertia reel to the

bodyside and withdraw the seat belt.

6. Remove the seat belt buckle strap from the floor

mounted bracket.

See this section.

Refit

7. Reverse removal procedure.
8. Finally, tighten the seat belt bolts to

32 Nm (24

lbf ft) .

CHASSIS AND BODY

31

REPAIR

REAR CENTRE SEAT BELT

Service repair no - 76.73.20

Remove

1. Pull both halves of the seat belt through to the

rear of the seat.

2. Pull back the load space carpet to reveal the

Torx bolt heads.

3. Remove the Torx bolt and plain washer securing

the belt bracket to load space floor.

4. Remove belt complete with bracket.
5. Repeat steps 2 to 4 for other half of belt.

Refit

6. Reverse removal procedure.
7. Finally, tighten the seat belt bolts to

32 Nm (24

lbf ft) .

REAR FOLD DOWN SEAT BELTS

Service repair no - 76. 73.28

Remove

1. Remove the fold down seat or pocket side panel,

whichever is applicable.

See this section.

2. Remove speaker by releasing screws and

disconnecting Lucars. Withdraw rear quarter trim
panel.

3. Remove the rear bodyside lower trim panel.

See

this section.

4. Remove the bolts securing the seat belt halves

to the body side.

Refit

5. Reverse removal procedure.
6. Finally, tighten the seat belt bolts to

32 Nm (24

lbf ft) .

76

CHASSIS AND BODY

32

REPAIR

REAR GRAB HANDLE

Service repair no - 76.58.35

Remove

1. Remove speaker and rear quarter trim panel.
2. Detach the foam strip.
3. Remove the four securing bolts and detach the

handle.

Refit

4. Reverse removal procedure.

CHASSIS AND BODY

33

REPAIR

WINGS [FENDERS]

Service repair no - 76.10.24

Remove

1. Disconnect battery negative lead.
2. Remove the headlamp surround.
3. Remove the front bumper assembly.
4. Remove the indicator repeater light.
5. Remove the four screws securing the wing

[fender] at the ’A’ post.

6. Remove the bolts securing the bottom of the

wing [fender] at the bumper retaining bracket
and at the sill finisher.

7. If removing the RH wing [fender] loosen the

radio aerial securing nut.

8. Remove the seven bolts from the drain channel

in the top of the wing [fender].

9. Break the sealed joints at the valance and ’A’

post; then complete the removal of the wing
[fender]. If removing a RH wing withdraw the
wing [fender] sufficiently to allow removal of the
aerial before completing the removal.

Cleaning/painting

10. Thoroughly clean all traces of existing sealant

from the sealing faces of the valance and ’A’
post.

11. Paint the cleaned surfaces with etch primer.
12. If the existing wing [fender] is to be refitted

repeat the cleaning and painting procedure on
the wing [fender] sealing surfaces.

Refit

13. Apply 3M 8572 Bolted Panel Sealer to the joint

faces on the valance and ’A’ post and to the
bracket face.

14. Refit the wing [fender], on RH wings [fenders] fit

the radio aerial, and secure with the bolts and
screws ensuring that the wing [fender] correctly
aligns with the bonnet [hood].


Content   ..  21  22  23  24   ..