Land Rover Discovery. Manual - part 114


  Index      Land Rover     Land Rover Discovery - service 1995-1996 year


Search            


Content   ..  112  113  114  115   ..


Land Rover Discovery. Manual - part 114


44

AUTOMATIC GEARBOX

18

REPAIR

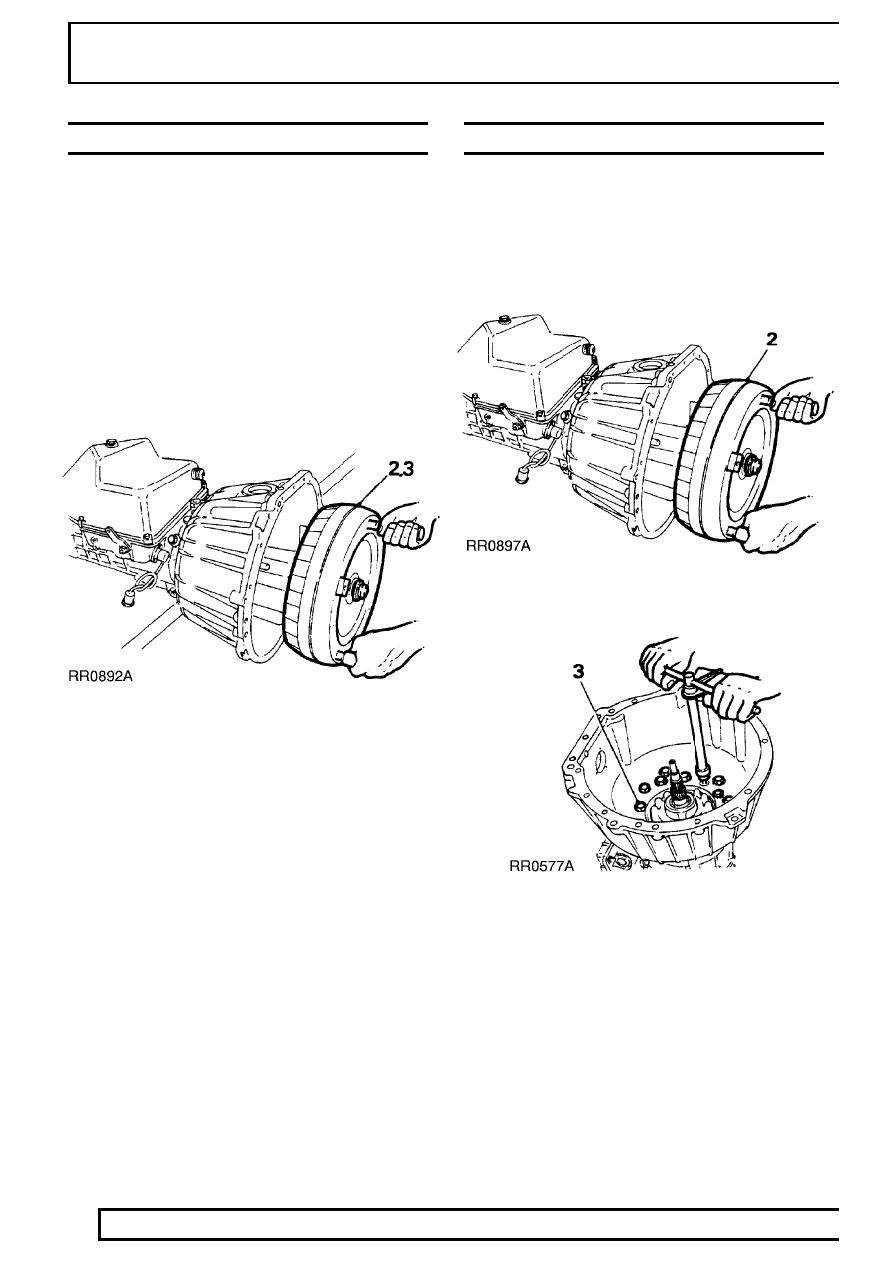
REPLACING TORQUE CONVERTER

1. Remove gearbox and transfer box assembly.

See LT230T Transfer Gearbox

2. Place gearbox on bench. Remove torque

converter using torque converter handles
18G1501, taking care not to damage torque
converter/oil pump housing oil seal.

3. Fit new torque converter using torque converter

handles 18G1501. Check dimension from
converter fixing boss to converter housing face is
50 mm. This shows converter is correctly seated
in housing.

4. Refit gearbox and transfer box assembly.

See

LT230T Transfer Gearbox

ELIMINATING LEAKS ON PUMP HOUSING

1. Remove gearbox and transfer box assembly.

See LT230T Transfer Gearbox

2. Place gearbox on bench. Remove torque

converter using torque converter handles
18G1501, taking care not to damage torque
converter/oil pump housing oil seal.

3. Remove twelve hexagonal bolts (inner ring

pattern).

4. Remove bell housing and pump assembly,

discard gasket.

5. Remove eight hexagonal bolts on rear of pump.

ZF

19

REPAIR

6. Screw in two bolts, diagonally opposite each

other. Tap lightly using a soft headed mallet to
remove pump assembly from intermediate plate.

7. Remove shaft sealing ring and ’O’ ring from

pump housing and discard.

8. Using oil seal replacer LST108 fit shaft seal ring

into pump housing.

9. Fit ’O’ ring onto circumference of pump housing.

10. Align dowel with hole in intermediate plate and

press pump housing home.

11. Fit pump housing to intermediate plate, tighten

eight bolts to

10 Nm.

12. Place bell housing and intermediate plate

assembly on bench, front face up. Using oil
pump rotation sleeve LST111, check that pump
gears rotate freely.

13. Before fitting intermediate plate and bell housing

assembly,check that thrust washer and axial
cage are seated on A clutch housing.

14. Place gasket and disc washer onto bell housing

and intermediate plate assembly using
Petroleum Jelly.

15. Fit bell housing and intermediate plate assembly

to gearcase. Tighten twelve bolts to

46 Nm.

16. Place end float gauge LST111 onto pump

housing and check that axial play is between
0.2-0.4 mm. Replace existing washer, situated at
rear of intermediate plate, with a suitable washer
to give required end float.

17. Refit torque converter into housing using torque

converter handles 18G1501, checking that
dimension from converter fixing bolt boss to
converter housing face is 50 mm. This shows
converter is properly seated in housing.

18. Refit gearbox/transfer box assembly.

See

LT230T Transfer Gearbox

44

AUTOMATIC GEARBOX

20

REPAIR

ELIMINATING LEAKS BETWEEN GEARBOX
HOUSING AND INTERMEDIATE PLATE

1. Remove gearbox and transfer box assembly.

See LT230T Transfer Gearbox

2. Place gearbox on bench. Remove torque

converter using torque converter handles
18G1501, taking care not to damage torque
converter/oil pump housing oil seal.

3. Remove twelve hexagonal bolts (inner ring

pattern).

4. Remove bell housing/intermediate plate

assembly from gearbox case and discard
gasket.

5. Place new gasket onto intermediate plate using

Petroleum Jelly.

6. Before fitting bell housing assembly check that

thrust washer and axial cage are seated on A
clutch housing.

7. Fit bell housing assembly with disc washer to

gearcase. Tighten twelve bolts to

46Nm.

8. Place end-float gauge LST111 onto pump

housing and check that axial play is between
0.2-0.4 mm. Replace existing washer, situated at
rear of intermediate plate, with a suitable washer
to give required end-float.

9. Refit torque converter using torque converter

handles 18G1501. Checking that dimension
from converter fixing boss to converter housing
case is 50mm. This dimension shows converter
is properly seated.

10. Refit gearbox/transfer box assembly.

See

LT230T Transfer Gearbox

ZF

21

REPAIR

REPLACING PUMP

Service repair no - 44.32.01

1. Remove gearbox and transfer box assembly.

See LT230T Transfer Gearbox

2. Place gearbox on bench. Remove torque

converter using torque converter handles
18G1501, taking care not to damage torque
converter/oil pump housing oil seal.

3. Remove twelve bolts (inner ring pattern).

4. Remove bell housing and pump assembly from

gearbox case, discard gasket.

5. Remove eight bolts on rear of pump.
6. Screw in two bolts,diagonally opposite each

other, tap lightly using a soft headed mallet to
free pump assembly from intermediate plate.

7. Fit new pump assembly, aligning dowel with hole

in intermediate plate, press pump housing home.

8. Secure pump housing to intermediate plate

using eight hexagonal bolts. Tighten to

10 Nm.

9. Place bell housing and intermediate plate

assembly on bench, front face up. Using oil
pump rotation sleeve LST111, check that pump
gears rotate freely.

10. Before replacing intermediate plate/bell housing

assembly check that thrust washer and axial
cage are seated on A clutch housing.

11. Place new gasket and disc washer onto bell

housing and intermediate plate assembly using
a Petroleum Jelly.

12. Fit bell housing and intermediate plate assembly,

tighten twelve bolts to

46 Nm.


Content   ..  112  113  114  115   ..