Land Rover Discovery. Manual - part 24


  Index      Land Rover     Land Rover Discovery - service 1995-1996 year


Search            


Content   ..  22  23  24  25   ..


Land Rover Discovery. Manual - part 24


12

ENGINE

14

REPAIR

FLYWHEEL

Service repair no - 12.53.07

Remove

1. Disconnect battery negative lead.
2. Remove gearbox.

See MANUAL GEARBOX,

Repair, R380 Manual Gearbox

3. Remove clutch.

See CLUTCH, Repair, Clutch

Assembly

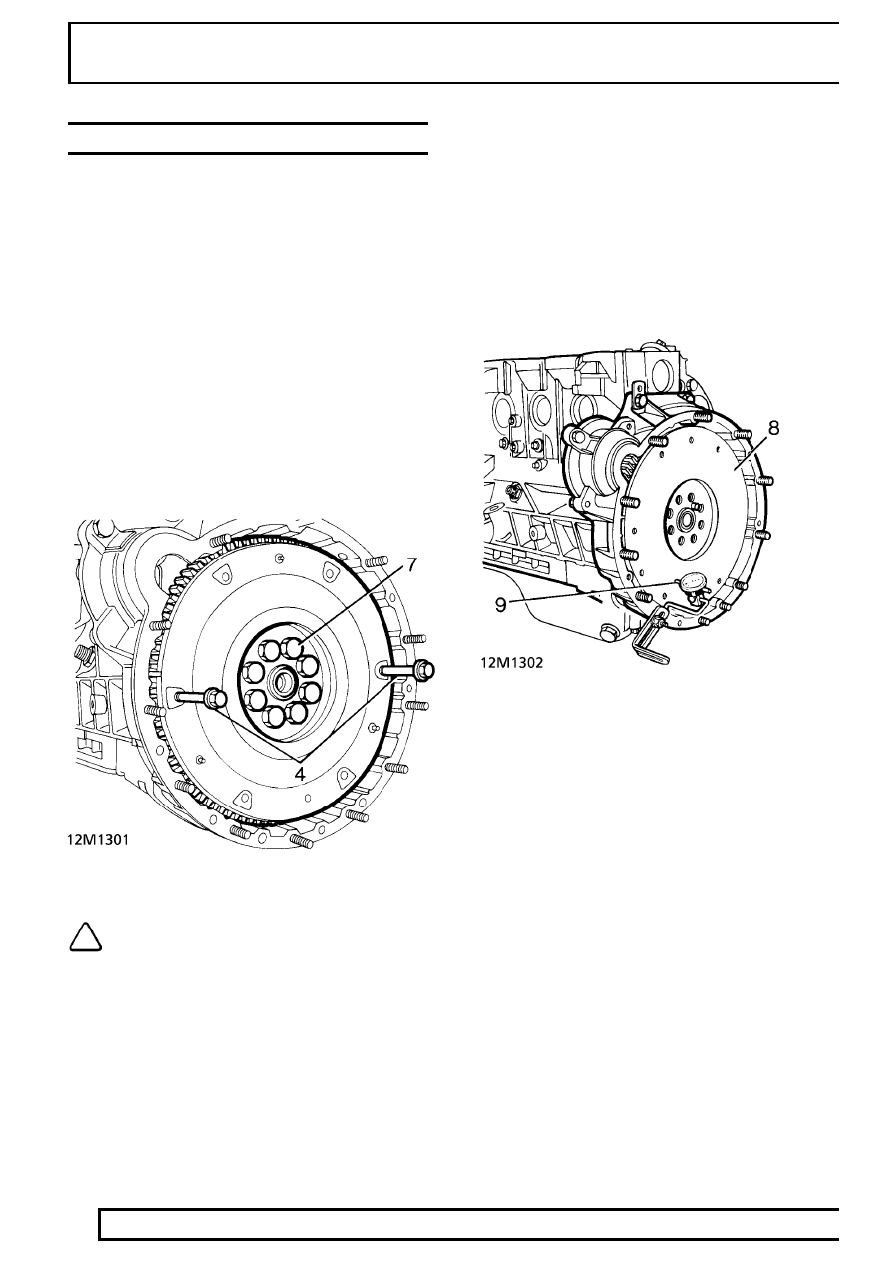
4. Fit two long 8mm bolts into the clutch bolt holes,

diametrically opposite, to use as handles when
lifting the flywheel off the crankshaft.

5. Remove fan cowl
6. Fit crankshaft pulley retainer LRT-12-080 and

secure with four bolts, to restrain crankshaft
while removing flywheel retaining bolts.

7. Remove the bolts and lift off flywheel.

NOTE: To prevent excessive flywheel
run-out, ensure that the mating faces of
the flywheel and crankshaft are clean.

Refit

8. Locate the flywheel on the crankshaft and

secure with new patched retaining bolts,
progressively tighten to

147 Nm.

9. Check the flywheel for possible run-out by

mounting a dial test indicator with the stylus in a
loaded condition resting on the flywheel face at a
radius of 114mm from the centre.

10. Turn the flywheel and check that run-out does

not exceed 0,05 to 0,07mm. Should run-out be
excessive, remove the flywheel and check again
for irregularities on the crankshaft and flywheel
mating faces and the dowel.

11. Reverse removal procedure. 1 to 6.

Tdi

15

REPAIR

CRANKSHAFT REAR OIL SEAL

Service repair no - 12.21.20

Remove

NOTE: The crankshaft rear oil seal is
retained in its own housing, if the seal
requires replacing the housing and seal

assembly (1) must be renewed complete with the
housing seal (3). Housing and seal assemblies are
supplied with their own former/seal guide (2)
already fitted. This former must not be removed
before fitting the assembly to the engine. If a seal
and housing assembly is received without a
former/guide fitted it must be returned to the
supplier. Used formers/guides must be discarded
immediately after use, under no circumstances
should they be reused on other assemblies.

1. Disconnect battery negative lead.
2. Remove gearbox.

See MANUAL GEARBOX,

Repair, R380 Manual Gearbox

3. Remove clutch.

See CLUTCH, Repair, Clutch

Assembly

4. Remove flywheel.

See Flywheel

5. Remove five bolts and withdraw seal housing

and seal assembly complete with gasket.

Refit

6. Insert slave studs to seal housing mounting face.
7. Position new seal housing gasket over slave

studs and crankshaft flange onto cylinder block.

12

ENGINE

16

REPAIR

8. Ensure housing seal is correctly seated in its

groove in new housing and seal assembly.

9. Fit new assembly, with former/guide in-situ, over

crankshaft flange, this action will eject
former/guide.

10. Secure assembly to cylinder block with five bolts

tightened to correct torque, removing slave studs
individually and inserting bolts.

11. Refit flywheel.

See Flywheel

12. Refit clutch.

See CLUTCH, Repair, Clutch

Assembly

13. Refit gearbox.

See MANUAL GEARBOX,

Repair, R380 Manual Gearbox

14. Reconnect battery negative lead.

CRANKSHAFT BEARING BUSH

Service repair no - 12.21.45

1. Disconnect battery negative lead.
2. Remove gearbox.

See MANUAL GEARBOX,

Repair, R380 Manual Gearbox

3. Remove clutch.

See CLUTCH, Repair, Clutch

Assembly

4. Remove flywheel.

See Flywheel

5. Remove bearing bush.

NOTE: The bearing bush can be removed
by using one of the following methods.

Method 1.
Obtain a short length of steel rod of a diameter having
a good slide fit in the bore of the bush. Pack the bore
with grease and insert the steel rod into the end of the
bore, give a sharp blow with a hammer and the
grease should drive out the bush. It is recommended
that the bush and rod be covered by a suitable cloth
or rag to prevent grease from splashing.

Tdi

17

REPAIR

Method 2.
Thread the bore of the existing bush and using a
suitable bolt extract the bush. Thoroughly clean bush
location ensuring all swarf is removed.

Fitting

6. Fit new bush using a suitable shouldered drift,

inserting bush flush with end of crankshaft.

7. Refit flywheel.

See Flywheel

8. Refit clutch.

See CLUTCH, Repair, Clutch

Assembly

9. Refit gearbox.

See MANUAL GEARBOX,

Repair, R380 Manual Gearbox

10. Reconnect battery negative lead.

FLYWHEEL HOUSING

Service repair no - 12.53.01

Remove

1. Disconnect battery negative lead.
2. Remove gearbox.

See MANUAL GEARBOX,

Repair, R380 Manual Gearbox

3. Remove clutch.

See CLUTCH, Repair, Clutch

Assembly

4. Remove flywheel.

See Flywheel

5. Remove starter motor.
6. Remove two bolts from top of flywheel housing.
7. Remove four bolts from bottom of flywheel

housing.

8. Remove six inner bolts and lift off flywheel

housing.

Refit

9. Clean rear face of housing and mating face on

block, ensuring all old sealant is removed.


Content   ..  22  23  24  25   ..