Defender 300Tdi (1996+). Manual - part 44


  Index      Land Rover     Defender 300Tdi - service repair manual 1996 year


Search            


Content   ..  42  43  44  45   ..


Defender 300Tdi (1996+). Manual - part 44


REAR AXLE AND FINAL DRIVE

1

DESCRIPTION AND OPERATION

DESCRIPTION

The welded steel rear axle casing houses a separate
spiral bevel type differential unit, which is off set to the
right of the vehicle centre line. The differential unit
drives the rear wheels via the axle shafts and fully
floating hubs which are mounted on tapered roller
bearings.

Lubrication

The differential is lubricated with oil and the hub
bearings with grease.

The hub bearings are fitted with inner and outer seals.
The outer seals prevent the differential oil mixing with
the hub grease and the inner seals prevent dirt
ingress into the hub.

Ventilation

Ventilation of the hub bearings is through the outer oil
seals and the differential ventilation pipe, which
terminates at a high level.
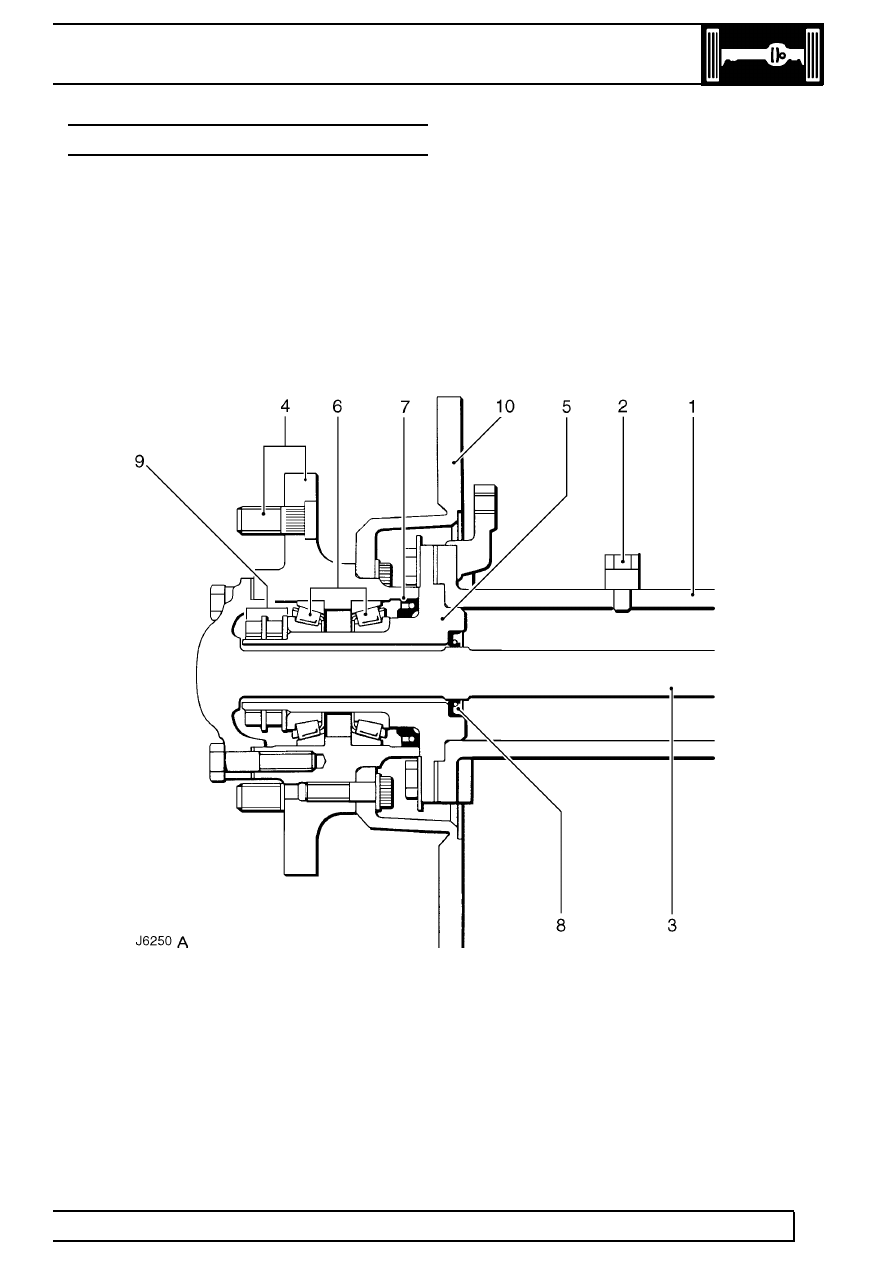
Rear axle hub - 90

1. Axle casing
2. Ventilation pipe
3. Axle shaft
4. Wheel studs and hub
5. Wheel bearing stub axle

6. Wheel bearings
7. Inner hub seal
8. Outer hub/axle shaft seal
9. Hub lock plate, thrust washer and nuts

10. Brake disc

51

REAR AXLE AND FINAL DRIVE

2

DESCRIPTION AND OPERATION

Rear axle hub - 110/130

1. Axle casing
2. Ventilation pipe
3. Axle shaft
4. Wheel studs and hub
5. Wheel bearing stub axle
6. Wheel bearings
7. Inner hub seal

8. Outer hub/axle shaft seal
9. Hub lock plate, thrust washer and nuts

10. Brake disc
11. Drive flange
12. Drive shaft circlip
13. Dust cap

REAR AXLE AND FINAL DRIVE

1

FAULT DIAGNOSIS

FAULT DIAGNOSIS

Complaint - Oil leaks

An external leak of lubrication from the hub seals can
be caused by a faulty internal seal. For example, if the
seals which separate the differential from the hubs are
faulty and the vehicle is operating or parked on an
embankment, oil from the differential may flood one
hub resulting in a lack of lubrication in the differential.

When a seal is found to be leaking check the axle
ventilation system, as a blockage can cause internal
pressure to force oil past the seals.

See ’Description and Operation’ for illustrations of oil
seal locations.

When investigating hub seal leaks check the grease
for dilution with oil. Also check the differential oil level,
for signs of metal particles in the oil and the condition
of internal seals.

If the vehicle is driven in deep water with defective oil
seals, water may contaminate the lubricants and raise
the differential oil level, giving a false impression that
the housing has been overfilled.

Do not assume that a high oil level in the
differential is due to over filling or, that a low level
is because of an external leak
.

REAR AXLE AND FINAL DRIVE

1

REPAIR

REAR AXLE

Service repair no - 51.25.01

Remove

WARNING: Remove and refit of axle
requires a further two persons to steady
the axle when lowering or repositioning

axle.

1. Drain brake system.
2. Support chassis rear.
3. Remove road wheels.
4. Support axle weight with hydraulic jack.
5. Disconnect shock absorbers.
6. Disconnect flexible brake hose at RH chassis

side member and breather hose at banjo
connection on axle casing.

7. Disconnect lower links at axle.

8. Mark differential and propeller shaft flanges with

identification marks for assembly.

9. Remove 4 nuts and bolts, lower propeller shaft

and tie to one side.

10. Disconnect pivot bracket ball joint at axle

bracket.

11. Release bolts and remove coil spring retaining

plates.

12. Lower axle and remove road springs.
13. If applicable, remove anti-roll bar links at axle

See REAR SUSPENSION, Repair, anti-roll
bar 
.

14. Remove axle assembly.


Content   ..  42  43  44  45   ..