Defender 300Tdi (1996+). Manual - part 12


  Index      Land Rover     Defender 300Tdi - service repair manual 1996 year


Search            


Content   ..  10  11  12  13   ..


Defender 300Tdi (1996+). Manual - part 12


MAINTENANCE

7

MAINTENANCE

RENEW AUXILIARY DRIVE BELT

Renew drive belt.

See ELECTRICAL, Repair,

Auxiliary drive belt

RENEW COMPRESSOR DRIVE BELT

Renew compressor drive belt.

See AIR

CONDITIONING, Repair, Compressor drive belt

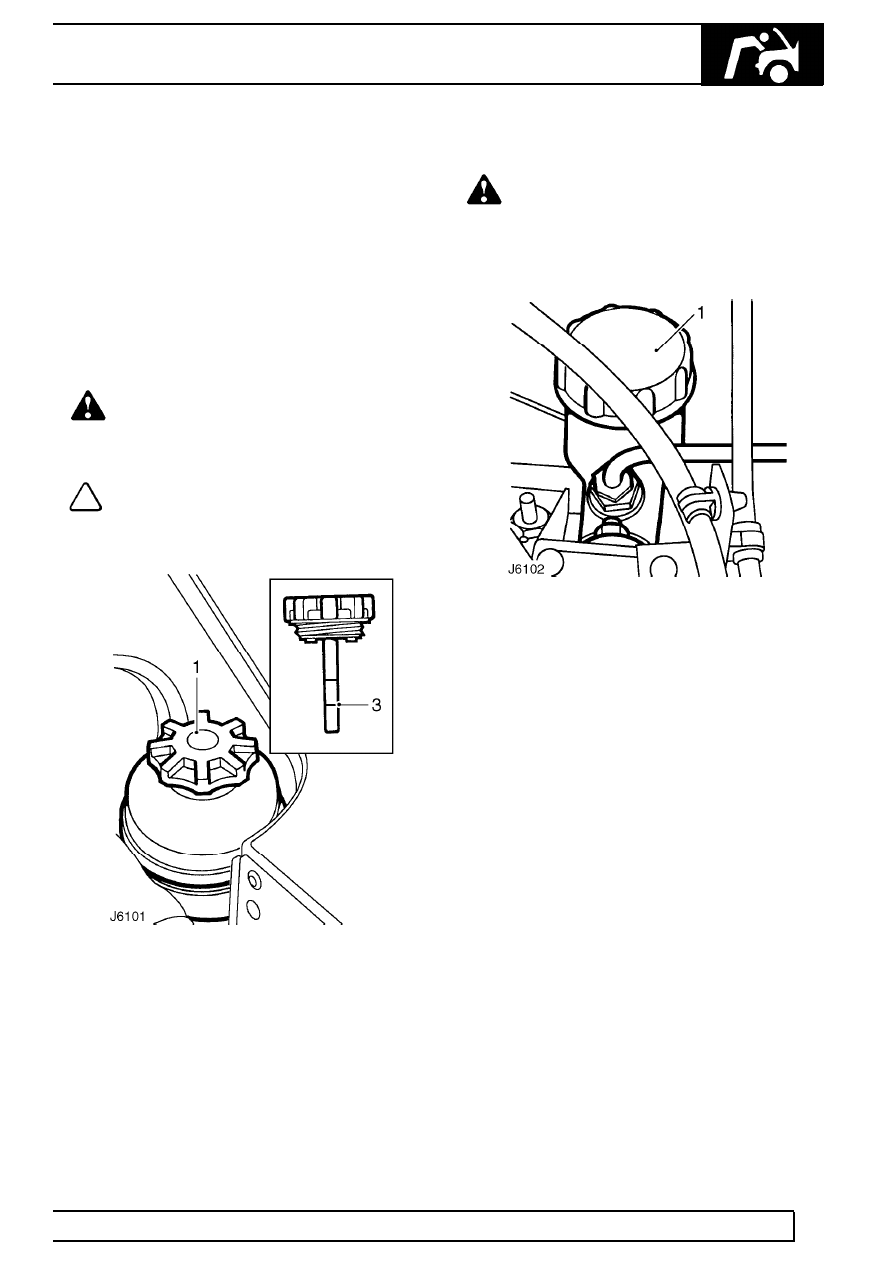
CHECK/TOP UP POWER STEERING RESERVOIR

WARNING: DO NOT start engine if fluid
level in reservoir has dropped below
dipstick - severe damage to the power

steering system could result.

NOTE: Check fluid level with engine
switched off and system cold. Ensure that
steering wheel is not turned after stopping

engine.

1. Clean and remove reservoir cap.
2. Wipe distick clean and fully refit cap.
3. Remove cap and check fluid level. Ensure fluid

level is between UPPER mark and end of
dipstick.

4. Top up, if necessary, with recommended fluid.

See LUBRICANTS, FLUIDS AND
CAPACITIES, Information, Recommended
lubricants and fluids 
DO NOT fill above
UPPER mark on dipstick.

CHECK/TOP UP CLUTCH FLUID RESERVOIR

WARNING: Clutch fluid will damage
painted surfaces; clean up any spillage
immediately and rinse with plenty of water.

If clutch fluid should come into contact with the
skin or eyes, rinse immediately with plenty of
water.

1. Clean and remove reservoir cap.
2. Check fluid level and top up if necessary,

maintaining the level approximately 10 mm (0.39
in) below top of reservoir, using recommended
fluid.

See LUBRICANTS, FLUIDS AND

CAPACITIES, Information, Recommended
lubricants and fluids

10

MAINTENANCE

8

MAINTENANCE

CHECK/TOP UP BRAKE FLUID RESERVOIR

WARNING: DO NOT drive the vehicle with
the fluid level below ’MIN’ mark.

Brake fluid will damage painted surfaces; clean up
any spillage immediately and rinse with plenty of
water.
If brake fluid should come into contact with skin
or eyes, rinse immediately with plenty of water.

1. Check the fluid level visually through transparent

side of reservoir without removing cap.

2. If level is below ’MAX’ mark clean and remove

reservoir cap.

3. Top up to ’MAX’ mark with recommended brake

fluid

See LUBRICANTS, FLUIDS AND

CAPACITIES, Information, Recommended
lubricants and fluids

CHECK/TOP UP WASHER RESERVOIR

Top up washer reservoir to within 25 mm (1.0 in) of
filler neck. Use a screen washer solvent/anti-freeze
solution to assist removing mud, flies, and road film
and protect against freezing.

LUBRICATE ACCELERATOR LINKAGES

Lubricate accelerator cable at adjustment ferrule and
linkage with injector pump and at pedal clevis pin.

CHECK/ADJUST ENGINE IDLE SPEED

Check/adjust low and high engine idle speed with
engine at normal running temperature.

See FUEL

SYSTEM, Adjustment, low and high idle speed
adjustment

CHECK/ADJUST STEERING BOX

Check steering box and pipes/hoses for fluid leaks.

Check that there is no backlash in steering box when
in straight ahead position. Adjust steering box if
necessary.

See STEERING, Adjustment, Power

steering box

VISUALLY CHECK INTERCOOLER/RADIATOR
FOR EXTERNAL OBSTRUCTIONS

Check intercooler/radiator for external obstructions. If
necessary, apply air pressure to engine side of matrix
to clear obstruction. If mud or dirt is evident, carefully
use a hose to wash away obstruction.

FLUSH DIESEL INTERCOOLER

Remove

1. Remove intercooler matrix.

See FUEL

SYSTEM, Repair, Intercooler

2. Flush matrix with ICI ’GENKLENE’ proprietary

cleaner, following manufacturers instructions.

3. Dry intercooler completely ensuring that no liquid

remains in matrix.

Refit

4. Refit intercooler matrix.

See FUEL SYSTEM,

Repair, Intercooler

MAINTENANCE

9

MAINTENANCE

UNDER VEHICLE MAINTENANCE

- 90 chassis, - 110/130 chassis

UNDER VEHICLE COMPONENTS

1. Swivel pin housing
2. Engine oil filter
3. Engine sump drain plug
4. Catalytic converter, if fitted
5. Transfer box filler/level plug
6. Intermediate exhaust silencer
7. Tail-pipe exhaust silencer

8. Rear axle filler/level plug
9. Rear axle drain plug

10. Propeller shaft universal joints
11. Fuel sedimenter, if fitted
12. Transfer box drain plug
13. Gearbox drain plug
14. Gearbox filler/level plug
15. Front axle drain plug
16. Front axle filler/level plug

10

MAINTENANCE

10

MAINTENANCE

NOTE: A chassis undertray may be fitted
on some vehicle derivatives to conform to
legal requirements. When under chassis

maintenance, or remove and refit procedures are
required, it may be necessary to remove the
undertray and/or integral access panels

See

CHASSIS AND BODY, Repair, Front undertray or
See CHASSIS AND BODY, Repair, Rear undertray

RENEW ENGINE OIL AND FILTER

1. Ensure vehicle is level.
2. Run engine to warm oil, switch off ignition.
3. Disconnect battery.
4. Place suitable drain tray under sump drain plug.

5. Remove drain plug from sump and allow oil to

drain completely.

6. Fit new sealing washer, replace plug and tighten

to

35 Nm (26 lbf/ft).

7. Place drain tray under oil filter.
8. Unscrew filter anti-clockwise, using a strap

wrench if necessary.

9. Clean mating face of oil filter adaptor.

10. Coat rubber sealing washer of new filter with

clean engine oil.

11. Screw filter on clockwise until sealing washer

touches adaptor mating face, tighten a further
half turn by hand only. DO NOT overtighten.

12. Clean and remove filler cap from rocker cover.
13. Pour in correct quantity and grade of new oil

from a sealed container.

See LUBRICANTS,

FLUIDS AND CAPACITIES, Information,
Recommended lubricants and fluids

14. Check that oil level is between upper and lower

marks on dipstick. DO NOT fill above upper
mark.

15. Firmly replace filler cap.
16. Reconnect battery, run engine and check oil filter

for leaks.

17. Stop engine, allow oil to run back into sump for a

few minutes and check oil level again. Top up if
necessary.


Content   ..  10  11  12  13   ..