Defender 90 NAS. Manual - part 56


  Index      Land Rover     Defender 90 NAS - service manual 1997 year


Search            


Content   ..  54  55  56  57   ..


Defender 90 NAS. Manual - part 56


STEERING

3

ADJUSTMENT

Adjust

7. Loosen clamps at both ends of track rod.
8. Rotate track rod to increase or decrease its

effective length until correct toe-out is obtained
See GENERAL SPECIFICATION DATA,
Information, Steering.

9. Push vehicle rearwards turning steering wheel

from side to side to settle ball joints. With road
wheels set in straight ahead position, push
vehicle forward a short distance.

10. Recheck track and adjust if necessary.
11. When alignment is correct, tap ball joints in

direction of arrows to maximum of travel, to
ensure full unrestricted movement of track rod.

12. Tighten clamp bolts to

14 Nm, 10 lbf ft.

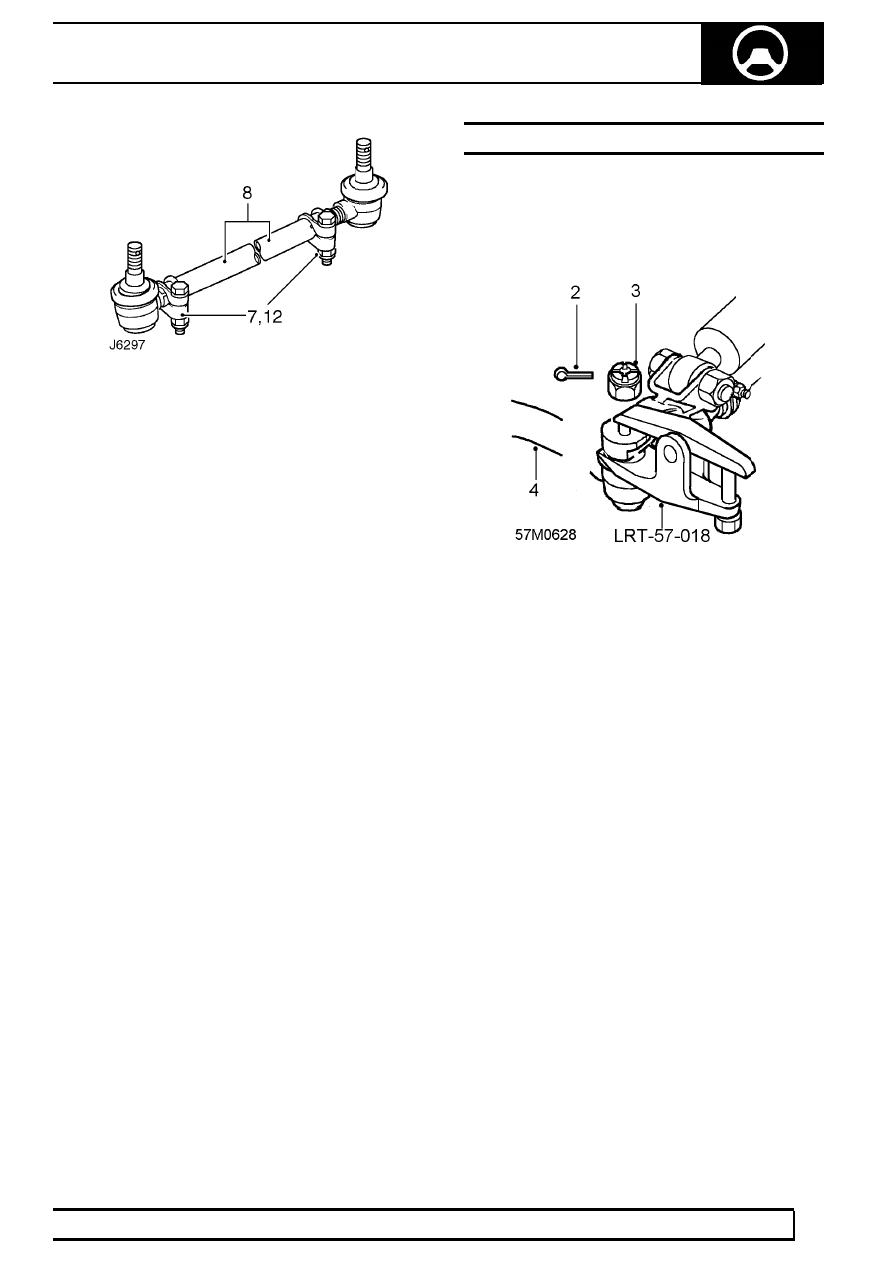
POWER STEERING BOX - CENTRALISE

Service repair no - 57.35.05

Adjust

1. Raise vehicle on ramp [hoist].

2. Remove split [cotter] pin from castellated nut

securing drag link to drop arm.

3. Remove castellated nut.
4. Using tool LRT-57-018 release drop arm from

drag link.

5. Turn steering wheel to full RH lock.
6. Turn steering wheel back exactly 2 turns.
7. Fit drop arm to drag link and fit castellated nut.
8. Tighten castellated nut to

40 Nm, 30 lbf ft and

fit new split [cotter] pin.

9. Lower vehicle.

57

STEERING

4

ADJUSTMENT

POWER STEERING SYSTEM - BLEED

Service repair no - 57.15.02

Check

1. Position container to collect any fluid spillage.
2. Ensure fluid in reservoir reaches dipstick

maximum.

3. Run engine to normal operating temperature.
4. Recheck and correct reservoir fluid level.

NOTE: During instructions 4 to 6, maintain
maximum fluid level in reservoir. Do not
increase engine speed or move steering

wheel.

5. With engine at idle speed, loosen bleed screw

on steering box. Tighten bleed screw when fluid
emerges.

6. Check fluid level.
7. Fit reservoir cap.
8. Clean away fluid around bleed screw.
9. Check hose connections, pump and steering box

for fluid leaks by holding steering on full lock in
both directions.

CAUTION: Do not maintain this pressure
for more than 30 seconds in any one
minute to avoid overheating fluid and

possibly damaging seals.

10. Remove container.
11. Carry out road test.

STEERING

1

REPAIR

POWER STEERING BOX

Service repair no - 57.10.01

General precautions

Whenever any part of the system is removed or
disconnected, utmost cleanliness must be
observed.

Disconnected ports and hoses must be plugged
to prevent ingress of dirt. If metal sediment is
found in system, establish the cause, rectify and
flush system.

Do not start engine until reservoir is full as pump
will be damaged.

Metric pipe fittings are used with ’O’ ring pipe
ends on fittings to steering box.

Follow normal ’O’ ring replacement procedure
whenever pipes are disconnected.

Ensure compatible metric components are used
when fitting replacement pipes.

CAUTION: After refitting steering linkage
parts, follow correct procedure to ensure
that road wheels, steering box and

steering wheel are correctly positioned relative to
each other when in the straight ahead condition.

NOTE: When drag link is disconnected
from steering box, travel available at
steering wheel to each full lock is not

equal.

Remove

1. Raise vehicle on ramp.
2. Remove panhard rod.

See FRONT

SUSPENSION, Repair, panhard rod

3. Remove bolt securing steering damper to drag

link.

4. Release steering damper from drag link.
5. Remove split pin from castellated nut securing

drag link to drop arm.

6. Remove castellated nut.

57

STEERING

2

REPAIR

7. Using tool LRT-57-018 release drop arm from

drag link.

8. Loosen, but do not remove, nut securing tie bar

to mounting arm.

9. Remove 2 bolts securing tie bar to steering box.

10. Move tie bar aside.
11. Position container to collect any fluid spillage.
12. Lower vehicle.
13. Remove filler cap from power steering fluid

reservoir.

14. Loosen union securing feed pipe to steering box.
15. Disconnect feed pipe from steering box.
16. Loosen union securing return pipe to steering

box.

17. Disconnect return pipe from steering box.

CAUTION: Plug the connections.

18. Centralise steering.

See Adjustment, power

steering box - centralise

19. Remove pinch bolt securing steering column

universal joint to steering box.

20. Loosen pinch bolt securing universal joint to

steering column.

21. Slide universal joint up steering column and

release from steering box.

22. Remove 4 bolts securing steering box to chassis

side member and collect 2 tab washers.

23. With assistance, lower steering box from vehicle

and remove.

Refit

24. Clean mating faces of steering box and chassis

side member.

25. With assistance, position steering box to vehicle,

ensuring locating peg is engaged.

26. Fit bolts and tab washers securing steering box

to chassis and tighten bolts to

80 Nm, 60 lbf ft.

27. Connect steering column to steering box.
28. Tighten universal joint pinch bolts to

25 Nm, 19

lbf ft.

29. Remove plugs from steering box and pipes.
30. Connect feed pipe to steering box and tighten

union to

15 Nm, 11 lbf ft.

31. Connect return pipe to steering box and tighten

union to

20 Nm, 15 lbf ft.

32. Fit fluid reservoir cap.
33. Raise vehicle on ramp.
34. Position tie bar to steering box and loosely fit

bolts and washers.

35. Tighten nut securing tie bar to mounting arm to

80 Nm, 60 lbf ft and then back-off one complete
turn.

36. Tighten bolts securing tie bar to steering box to

81 Nm, 60 lbf ft and then back-off one complete
turn.

37. Fit drop arm to drag link and fit castellated nut.
38. Tighten castellated nut to

40 Nm, 30 lbf ft and

fit new split pin.

39. Connect steering damper to drag link.
40. Fit and tighten bolt securing damper.
41. Fit Panhard rod.

See FRONT SUSPENSION,

Repair, panhard rod; Refit

42. Lower vehicle.
43. Bleed power steering system.

See Adjustment,

power steering system - bleed

44. Test drive vehicle using both full locks to settle

steering components. If possible, drive vehicle
over uneven ground and include harsh braking.

WARNING: Do not test drive vehicle on
public highway.

45. Drive vehicle in a straight line on level ground

and stop.

46. Tighten nut securing tie bar to mounting to

110

Nm, 81 lbf ft.

47. Tighten bolts securing tie bar to steering box to

81 Nm, 60 lbf ft.

48. Ensure steering wheel is correctly aligned when

wheels are positioned straight ahead.

49. Road test vehicle.


Content   ..  54  55  56  57   ..