Defender 90 NAS. Manual - part 31


  Index      Land Rover     Defender 90 NAS - service manual 1997 year


Search            


Content   ..  29  30  31  32   ..


Defender 90 NAS. Manual - part 31


COOLING SYSTEM

1

REPAIR

EXPANSION TANK

Service repair no - 26.15.01

Remove

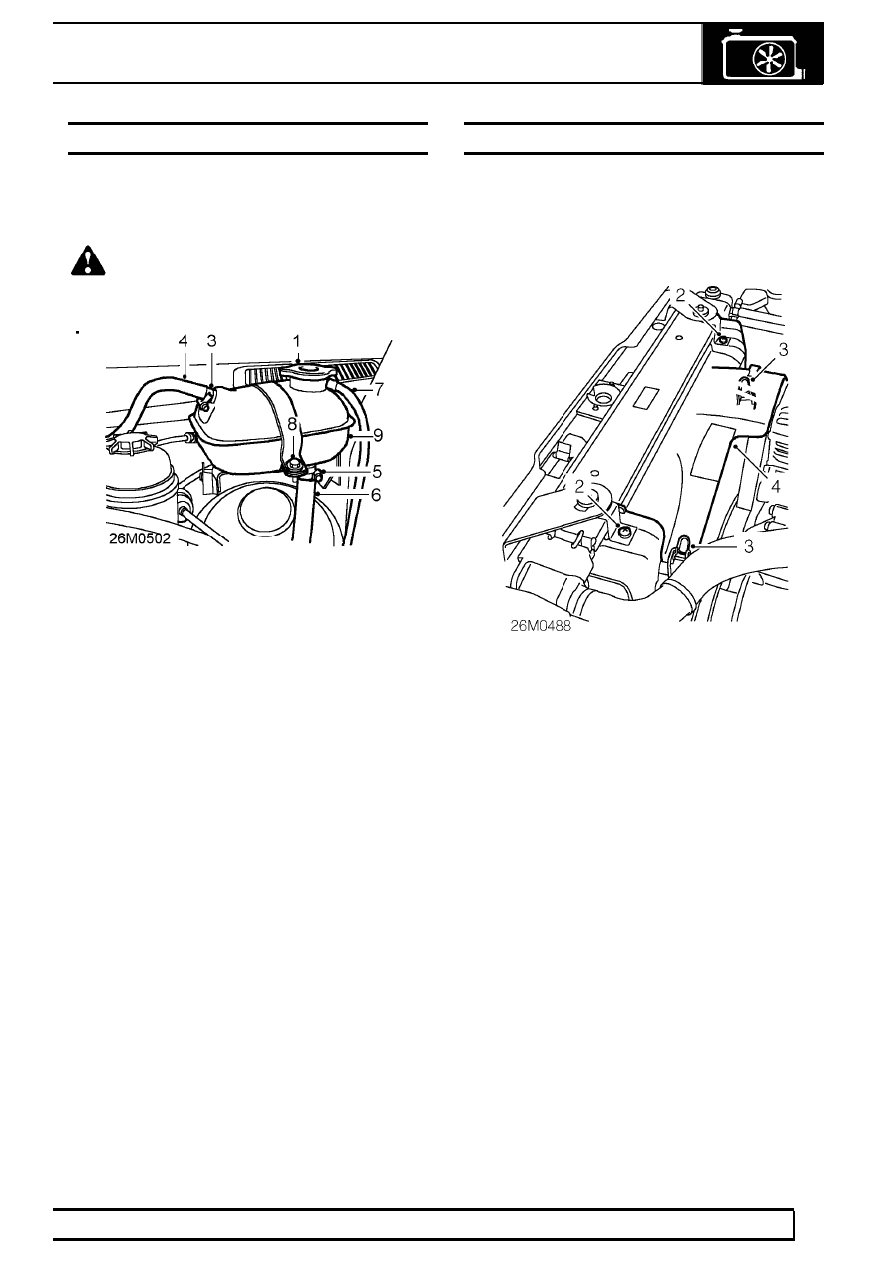
WARNING: Do not remove expansion tank
filler cap when engine is hot. The cooling
system is pressurised and personal

scalding could result.

1. Remove expansion tank filler cap by slowly

turning it anti-clockwise. Pause to allow pressure
to escape then continue to turn in same direction
and remove.

2. Position container to collect any coolant spillage.
3. Loosen clip securing radiator hose to expansion

tank.

4. Release radiator hose from expansion tank.
5. Loosen clip securing coolant hose to underside

of expansion tank.

6. Release coolant hose from expansion tank.
7. Remove overflow pipe from expansion tank.
8. Remove clamping bolt from expansion tank

mounting bracket and collect nut and washer.

9. Lift mounting bracket clamp and remove

expansion tank.

Refit

10. Fit expansion tank to mounting bracket.
11. Fit and tighten nut and bolt securing expansion

tank to mounting bracket.

12. Fit overflow pipe to expansion tank.
13. Connect coolant hose to underside of expansion

tank and secure with clip.

14. Connect radiator hose to expansion tank and

secure with clip.

15. Remove container.
16. Top-up engine coolant.

VISCOUS COUPLING

Service repair no - 26.25.19

Remove

1. Disconnect battery negative lead.

2. Remove 2 screws securing radiator top

mountings to fan upper cowl.

3. Release 2 clips securing fan upper cowl to lower

cowl.

4. Remove fan upper cowl.

26

COOLING SYSTEM

2

REPAIR

5. Position tool LRT-12-093 to hold coolant pump

pulley.

6. Loosen viscous coupling nut using tool

LRT-12-094.

7. Remove tool LRT-12-093.
8. 
Remove viscous coupling assembly.

Do not carry out further dismantling if component
is removed for access only.

9. Remove 4 Allen screws securing fan blades to

coupling.

10. Remove fan blades from coupling.

Refit

11. Clean mating faces of fan blades and coupling.
12. Fit fan blades to coupling and secure with Allen

screws.

13. Position coupling assembly and start tightening

nut.

14. Position tool LRT-12-093 to hold pulley.
15. Tighten viscous coupling assembly nut using

tool LRT-12-094.

16. Remove tools.
17. Fit fan upper cowl and secure with clips.
18. Align fan cowl fixings to upper mounting brackets

and secure with screws.

19. Reconnect battery negative lead.

COOLING SYSTEM

3

REPAIR

RADIATOR

Service repair no - 26.40.01

Remove

1. Disconnect battery negative lead.
2. Drain cooling system.

See Adjustment, drain

and refill

3. Remove 8 screws securing front grille to body.
4. Remove front grille.

5. Remove 4 bolts securing radiator top mountings

to bonnet locking panel and collect nuts.

6. Remove radiator top mountings.
7. Remove fan cowl upper mounting brackets.

8. Loosen clip and disconnect top hose from

radiator.

9. Remove 2 clips securing fasn cowl to radiator.

26

COOLING SYSTEM

4

REPAIR

10. Remove fan cowl.
11. Loosen clip and disconnect throttle body to

radiator hose.

12. Loosen clip and disconnect expansion tank to

radiator hose.

13. Position container beneath engine oil cooler pipe

unions.

14. Loosen engine cooler pipes and disconnect from

radiator.

15. Remove and discard ’O’ rings from oil cooler

pipes.

16. Plug oil cooler pipe connections.
17. Loosen clip and disconnect bottom hose from

radiator.

18. Release radiator from lower mounting rubbers

and remove radiator.

Refit

19. Fit radiator and secure to lower mounting

rubbers.

NOTE: Ensure condenser lower mounting
brackets are located to radiator lower
mounting brackets.

20. Connect bottom hose to radiator and secure with

clip.

21. Remove plugs from engine oil cooler pipe

connections.

22. Clean oil cooler pipe connections.
23. Lubricate NEW ’O’ rings with clean engine oil

and fit to pipes.

24. Connect oil cooler pipes to radiator and tighten

unions to

30 Nm, 22 lbf ft.

25. Remove container.
26. Connect expansion tank hose to radiator and

tighten clip.

27. Connect throttle body hose to radiator and

tighten clip.

28. Fit fan cowl to radiator.
29. Fit fan cowl lower retaining clips.
30. Connect top hose to radiator and tighten clip.
31. Fit fan upper cowl and secure with clips.
32. Fit fan cowl upper mounting brackets.
33. Fit radiator top mountings and secure with

screws and bolts.

34. Fit front grille and secure with screws.
35. Refill cooling system.

See Adjustment, drain

and refill

36. Reconnect battery negative lead.


Content   ..  29  30  31  32   ..