Defender (1999-2002). Manual - part 93


  Index      Land Rover     Defender - service manual 1999-2002 year


Search            


Content   ..  91  92  93  94   ..


Defender (1999-2002). Manual - part 93


CHASSIS AND BODY

1

REPAIR

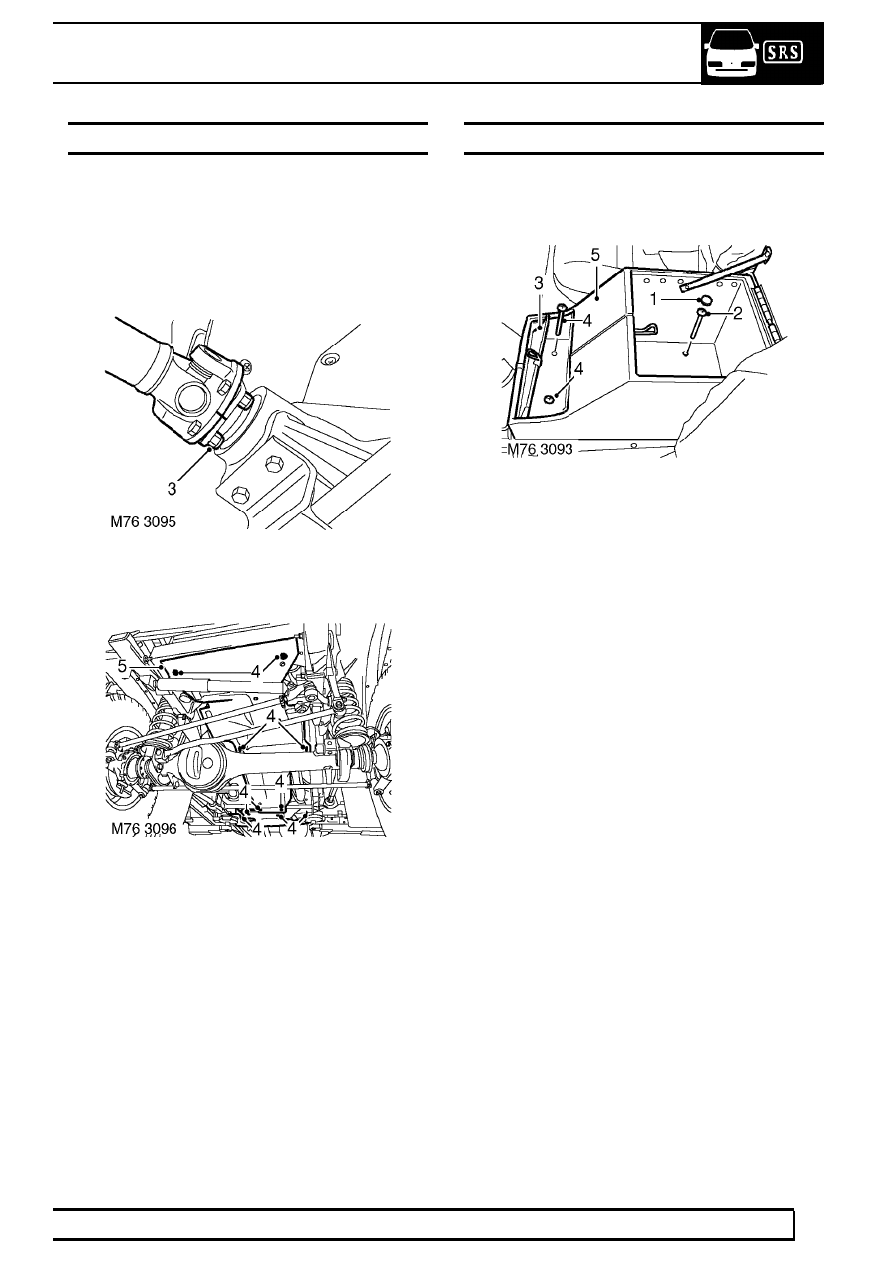
PANEL - UNDERBELLY - FRONT AND CENTRE

Service repair no - 76.10.50

Remove

1. Raise vehicle on 4 post ramp.
2. Mark front propellor shaft and front differential

flanges for reassembly.

3. Remove 4 bolts and release propellor shaft from

front differential.

4. Remove 12 bolts securing front and centre

underbelly panels.

5. Remove front and centre underbelly panels.

Refit

6. Position front and centre underbelly panels.
7. Fit and tighten bolts securing front and centre

underbelly panels.

8. Position front propellor shaft to differential and

tighten bolts to 48 Nm (35 lbf.ft).

9. Lower vehicle.

CUBBY BOX

Service repair no - 76.25.04

Remove

1. Open cubby box lid and remove 2 caps

concealing rear fixing bolts.

2. Remove bolts securing rear of cubby box.
3. Open flap concealing front fixing bolts.
4. Remove bolts securing front of cubby box.
5. Remove cubby box.

Refit

6. Fit cubby box to vehicle.
7. Fit bolts securing front of cubby box and

reposition flap.

8. Fit bolts securing rear of cubby box.
9. Fit caps over bolts.

10. Close cubby box lid.

76

CHASSIS AND BODY

2

REPAIR

TRIM CASING - TAIL DOOR - UP TO 02MY

Service repair no - 76.34.09

Remove

1. Remove 2 bolts securing grab handle to tail

door.

2. Remove grab handle.
3. Remove 2 screws securing wiper motor cover.
4. Remove wiper motor cover.

5. Remove 7 screws securing trim casing to door.
6. Remove 2 screws securing wiper motor harness

cover.

7. Remove harness cover.
8. Release 7 of 8 trim studs securing trim casing.
9. Remove trim casing from remaining stud.

10. Collect door lock cover.

Refit

11. Position door lock cover.
12. Position trim casing and secure trim casing.
13. Position harness cover and secure with screws.
14. Secure trim pad with screws.
15. Fit wiper motor cover and secure with screws.
16. Fit grab handle and secure with screws.

CHASSIS AND BODY

3

REPAIR

LATCH - TAIL DOOR - UP TO 02MY

Service repair no - 76.37.16

Remove

1. Remove tail door trim casing. See this Section.

2. Collect latch cover.
3. Remove 2 screws securing latch to door and

collect captive nut bracket.

4. Remove 2 nuts securing latch to door and collect

captive bolt bracket.

5. Remove latch assembly and collect foam

gasket.

Refit

6. Fit foam gasket and latch assembly to tail door.
7. Fit captive nut and bolt brackets to tail door.
8. Secure latch to tail door with nuts and screws.
9. Fit cover to latch.

10. Fit tail door trim casing. See this Section.

CARPET - LUGGAGE COMPARTMENT

Service repair no - 76.49.04

Remove

1. Remove 7 screws and remove carpet retainer.
2. Remove bolt covers and remove rear seat belt

bolts.

3. Release rear seat catches and fold seats

forward.

4. Remove luggage compartment carpet.

Refit

5. Position carpet.
6. Fold rear seats to position.
7. Align rear seat belts and tighten tighten bolts.
8. Fit bolt covers.
9. Position carpet retainer and tighten screws.

76

CHASSIS AND BODY

4

REPAIR

WING - FRONT

Service repair no - 76.10.24

Remove

1. Remove wheel arch liner. See this Section.
2. Remove front grille. See this Section.
3. Release fixings and remove cooling fan cowl.

4. Remove air cleaner grille from front wing.
5. Remove 4 screws securing air intake elbow to

wing.

6. Remove 7 screws and remove heater air intake

grille from wing.

7. Remove 2 bolts securing heater air intake

bracket to inner wing. Remove bracket.

8. Remove heater air intake from wing and collect

seal.

9. Remove 2 bolts securing EGR solenoid to inner

wing and lay aside.

10. Remove 3 studs securing expansion tank pipe to

inner wing.

11. Remove 2 bolts securing PAS reservoir to inner

wing and lay aside.

12. Remove 4 bolts securing outer wing to inner

wing.


Content   ..  91  92  93  94   ..