Defender (1993+). Manual - part 90
 

  Index      Land Rover     Defender - service manual 1993 year


Search            


Content   ..  88  89  90  91   ..


Defender (1993+). Manual - part 90


CHASSIS 

AND BODY 

8. 

The  top  edge 

of 

the  trim  is  held 

to 

the 

inner 

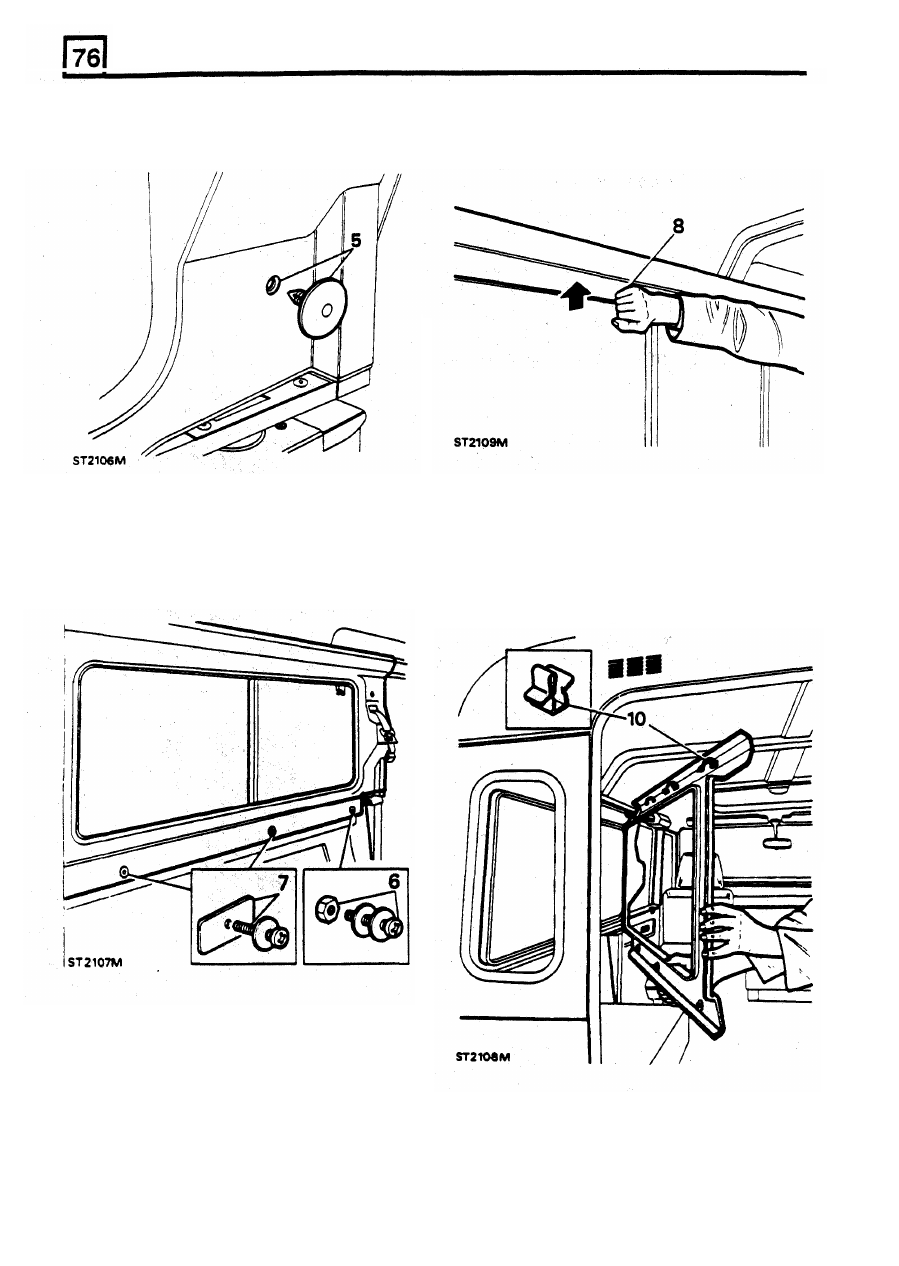
5.  Using  a  screwdriver,  carefully  lever  the  trim 

retaining button from  the 

'C' 

post. The  button 

cant  rail  by  three  spring 

clips. 

Strike 

upwards 

is held  by  a 'fir-tree'  type peg. 

with  the  hand,  as  illustrated,  to  release  t h e  

trim. 

6. 

Remove  the  trim  lower  three  fixings.  The 

9.


Feed 

the  seat  belt  through  the  aperture  and 

7.  The  rear  and  center  fixings 

are  a  screw, 

To refit 

remove the trim from the vehicle. 

washer and 

nut  welded  to  a  plate.  When  the 

boxed section 

of 

the attachment side member. 

10. 

Feed  the  seat  belt  through  the  trim  aperture 
fasten  the 

top 

edge 

of 

the  trim 

to  the  inner 

cant rail with the three  spring clips. 

20 

REVISED: OCT 

1993 

forward fixing is a screw, two washers and a 
nut. 

screw  is  removed,  the  plate  will  fall  into  the 

CHASSIS 

AND BODY 

11. 

Secure  the  lower  edge 

of 

the  trim  with  the 

three  screws  by  reversing  the  removal 
process.  Secure  the  rear  and  centre  screws 
first  and  note  that  the  nut  is  to  the  rear,  the 
plate towards the  trim. 

12. 

Fit  the  plastic retaining button. 

upper anchorage. 

13.  Fit  the  seat  belt  lower  anchorage  and  secure 

with  the  special  bolt,  spacer  and  washers,  as 

3.  Carefully  lever-out  the  plastic  button  and 

illustrated. tighten the bolt to 20,3 Nm. 

14.  Similarly,  fit  the  seat  belt  upper  anchorage 

and tighten the special bolt to 20,3  Nm.  Fit the 

Refit 

finisher  to  the  seat  belt  aperture  in  the  trim 
panel  and  the  plastic  cover  to  the  anchorage 

4.  Reverse the  removal  procedure ensuring  that 

bolt. 

the  upper  anchorage  bolt  and  fittings  are 
correctly  fitted  and  tightened  to  the  specified 
torque  as  described  in  instruction  14  for 

refitting the  rear side trim. 

5.  Fit  the  plastic  cover  over  the  anchorage  bolt 

and  secure the  lower  end  of  the  trim  with  the 
retaining button. 

REMOVING 'B' POST TRIM DEFENDER  110 

Remove 

1 .  

Remove  the  plastic  cover  from  the  seat  belt 

2.  Remove the upper anchorage bolt  and fittings 

remove the  trim. 

15.  Fit  the  seat  and  squab  frame  and  secure  the 

seat cushion to the 

frame 

with the tapes. 

16. 

Fit  the  rear  quarter  light trim. 

21 

REVISED: OCT 1993 

CHASSIS 

AND BODY 

REMOVING 

REAR 

QUARTER  LIGHT 

TRIM 

DEFENDER 

110 

Remove 

1 .  

Pull 

the trim  panel away from  the quarter  light 

with  fingers  thereby  releasing  the  retaining 
spring clips  from  the  vertical rail  and  withdraw 

the  panel. 

REMOVING GRAB HANDLES DEFENDER 110 

Remove 

1 .  

Lift 

the plastic finishers 

to 

expose the  securing 

screws. 

2. 

Remove  the  four  screws 

to 

release  the  grab 

handle. 

NOTE: 

In  order  to  remove  the  trim  above  the 

door  between  the  'B'  and 

'C' 

post  on 

'110' 

Station  Wagons,  the  'B' post trim 

as 

well 

as 

the 

grab 

handle  must 

be 

removed.  The  trim  above 

2.  Reverse 

the 

removal 

procedure 

whilst 

the  door 

is 

held 

by 

clips, 

the  same 

as 

used  for 

the  side  trim 

Refit 

3.  Reverse instructions 

and 

2. 

Refit 

ensuring that the two  metal lugs locate behind 
the side trim. 

3.  Align  the  two  spring  clips  with  the  vertical 

rail 

and 

tap 

the 

panel into 

position with the 

hand. 

22 

REVISED: OCT 

1993 

CHASSIS AND  BODY 

DOOR 

LOCK, 

REAR  DOOR  DEFENDER 

110 

FRONT AND  REAR  DOORS DEFENDER 90 

Removal, Defender 

110 

Refitting 

15. 

Apply  sealant to  the  lock  retainer  plates 

16.  Fit  the  lock  to  the  door  with  a new  gasket  and 

complete with  the  lock trim 

1. 

Remove the  grab handle from the  rear door 

17 

Secure  with  the  retainer  plates  screws. 

Remove the  rear  wiper  motor cover. 

washers  and nuts. 

3. 

Remove the  harness cover  from  the  rear door 

Close  the  door  and  check  for  correct  latching 

Remove the  rear door trim  pad. 

with  the  striker.  Adjust  the  striker  as 

5.  Remove the screws,  washers and  nut retainer 

necessary. 

securing the top  of  the  lock to the  door. 

19.  Refit  the  trim  pad,  the  harness  and  wiper 

6.  Remove the  nuts, washers  and  screw  retainer 

securing  the  bottom 

of 

the  lock  to  the  door. 

7.  Withdraw the lock complete with trim. 

Removal, Defender 90 

8.  Remove the trim from  lock. 

9. 

Remove the  door  lock  gasket. 

1. 

Remove the  screws,  washers and  nut  retainer 

10.  Clean sealant from the  retainer plates. 

(10) 

securing the  top of  the lock to the door 

2.  Remove the  nuts, washers  and  screw  retainer 

(10)  securing  the  b o t t o m  of  the 

lock 

to  the 

door. 

18 

motor covers and the grab  handle. 

Barrel removal 

11.  Insert the key  in the  barrel. 

3. 

Withdraw the  lock. 

12.  Depress the lock barrel plunger. 
13.  Withdraw the barrel from the lock. 

Refitting 

Barrel refitting. 

4.  Apply sealant to the lock retainer plates. 

5.  Fit  the lock to the  door with  a new  gasket. 

14.  Refit the barrel in reverse of removal. 

6.  Secure  with  the  retainer  plates,  screws, 

washers  and  nuts. 

7. 

Close  the  door  and  check  for  correct  latching 
with the  striker. 

8.  Adjust  the  striker  as  necessary 

ADDITION: OCT 1993 

23 


Content   ..  88  89  90  91   ..