Defender (1993+). Manual - part 54


  Index      Land Rover     Defender - service manual 1993 year


Search            


Content   ..  52  53  54  55   ..


Defender (1993+). Manual - part 54


LT230T TRANSFER GEARBOX 

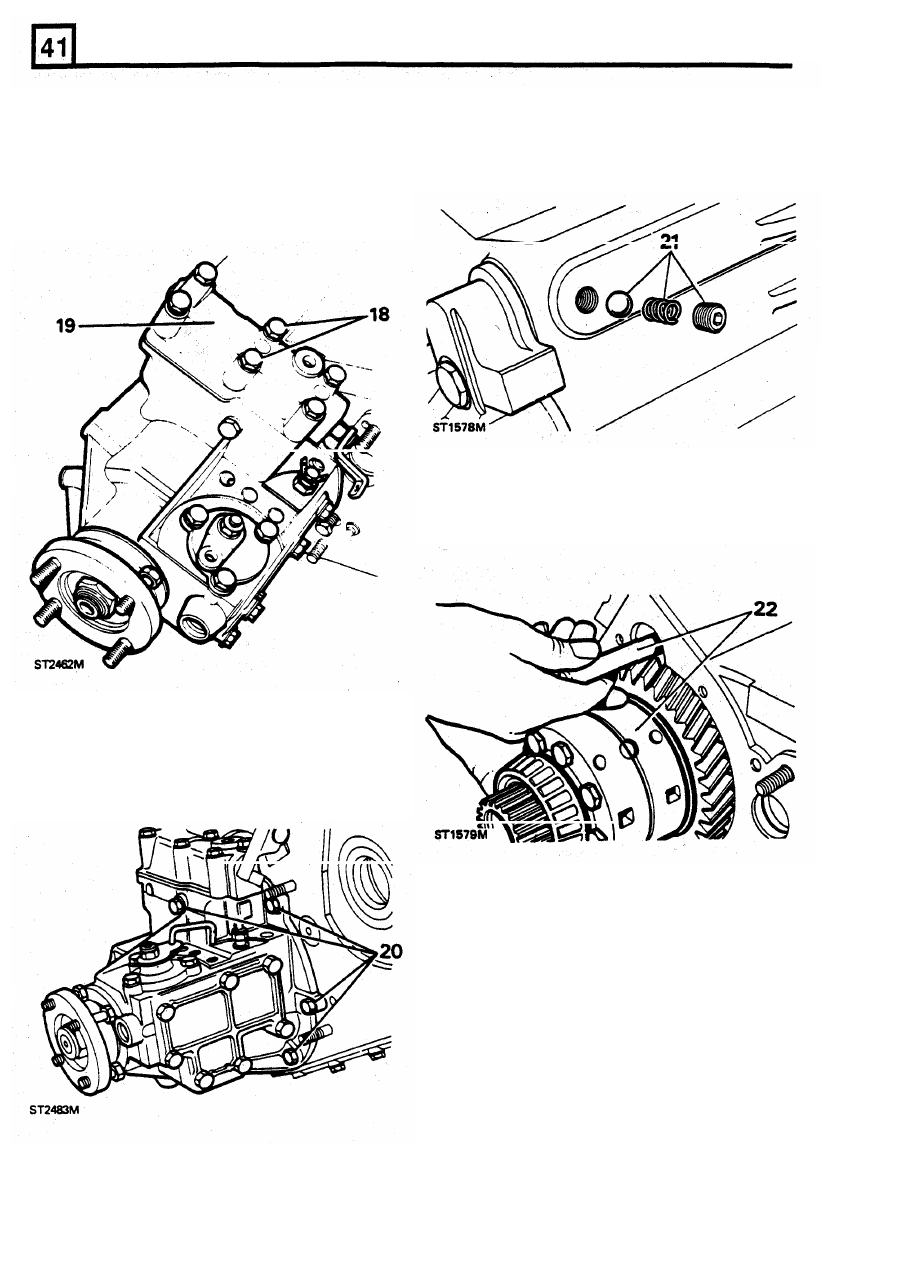
22.  Withdraw  the  centre  differential  and  selector 

shaft/fork  assembly. 

High/low cross - shaft housing removal 

Centre differential removal 

18. 

Remove  the  six  bolts  and  washers  retaining 

21. 

Remove  high/low  selector  shaft  detent  plug, 

the  cross  -  shaft  housing  ground  lead  and 

spring  and  retrieve  the  ball  with  a  suitable 

retaining clip. 

magnet. 

19. 

Remove the cross 

shaft  housing and  gasket 

discard the gasket. 

Front output housing removal 

20.  Remove  the  eight  bolts  and  washers  and 

detach  the  output  housing  from  the  transfer 
box  casing,  taking  care  not  to  mislay  the 
dowel. Remove the gasket and discard. 

Rear output housing removal 

23. 

Remove six  bolts and washers and detach the 
rear  output  housing and  shaft  assembly 

from 

the transfer casing. 

24. 

Remove the gasket and discard. 

12 

REISSUED: FEB 

1993 

LT230T TRANSFER GEARBOX 

Transfer case overhaul - reassembling 

29. 

If  previously  removed, 

fit 

studs  and  dowels 

to 

front  face 

of  the  transfer  casing.  Use  new 

components where necessary. 

NOTE:  The  position  of  the  radial  dowel 

blade  is set  in line with the  circle which  is 
formed 

by 

the  front  output  housing  fixing 

damage. 

Remove 

if 

replacements 

are 

holes. 

required. 

26. 

Remove  the  magnetic  drain  plug,  copper 

30.  Refit  magnetic  drain  plug  with  new  copper 

washer  'and  filler/level  plug.  Discard  the 

washer  and  tighten  to  the  specified  torque, 

washer. 

Transfer case, dismantle and overhaul 

25. 

Inspect  the  studs  and  dowels  for  wear  or 

loosely 

fit 

the filler/level plug. 

27. 

Drive out  differential rear bearing track. 

28. 

Clean all areas of  the transfer casing ensuring 
all  traces 

of 

'Loctite' 

are 

removed 

from 

faces 

and threads. 

REISSUED: FEB 

1993 

13 

LT230T 

TRANSFER GEARBOX 

Rear output housing dismantle and overhaul 

4. 

Remove  housing  from  the  vice  and  drive  out 

the  output-shaft,  by  striking  the  flange  end  of 

5. 

Carefully  lever  off  the 

oil 

catch  ring  using  a 

6. 

Remove and  discard the  seal  from  the  output 

2.  Remove  output  flange  with  circlip  attached. 

If 

housing  using  tool  18G  1271 

to 

avoid 

damaging the housing. 

1. 

Using  flange  wrench  18G1205  and  socket 

the shaft. 

wrench,  remove the  flange  nut,  steel  and  felt 
washers,  Ensure  flange  bolts  are  fully 

screwdriver in the 

slot 

provided. 

engaged in the wrench. 

necessary, use a 

two 

legged puller. 

NOTE:  The circlip need  only be  released 

if 

the flange bolts are 

to 

be 

replaced. 

7.  Using circlip pliers, remove the circlip retaining 

the bearing. 

8. 

Drive  out  the  bearing  from  the  rear 

of  the 

housing. 

3. 

Remove speedo  -  drive  housing.  This can be 
eased 

out 

with a screwdriver. 

14 

REISSUED: 

FEB 

1993 

LT230T TRANSFER 

GEARBOX 

9.  Remove  speedometer  gear  (driven)  from  its 

housing. 

10.  Remove the ' O '  ring and oil seal and discard. 

16.  Carefully  coat  the  lips 

of 

the  seal  with  clean 

grease  and  refit  oil  catch  ring  onto  output 

17.  Fit the ' O '  ring and  oil seal  (lip  side inwards) 

to 

speedometer housing. 

18.  Lubricate the ‘O’ 

ring 

and seal with 

oil, 

19. 

Locate  speedometer  gear  (driven)  in  housing 

11. 

Slide 

off 

spacer  and  speedometer  drive  gear 

housing. 

from output shaft. 

12.  Clean all  parts, replace the 

'0' ring, oil  seals, 

felt  seal  and  flange  nut.  Examine  all  other 
parts 

wear  or  damage  and  renew,  if 

necessary. 

and press into position. 

Reassembling 

rear output housing 

13.  Press  output  bearing into the  housing. 

Do  not 

use  excessive  force. 

To  facilitate  fitting  the 

bearing, heat the output housing case. 

(This 

is 

not to  exceed 100°C  (212°F)). 

14. 

Retain bearing with circlip, using circlip pliers. 

15.  Pre-grease between the  seal  lips  and  fit  new 

seal, lip side leading, using 

tool 

18G1422. The 

seal should just  make contact with the bearing 
circlip. 

REISSUED: FEB 

1993 

15 


Content   ..  52  53  54  55   ..