Defender (1993+). Manual - part 43


  Index      Land Rover     Defender - service manual 1993 year


Search            


Content   ..  41  42  43  44   ..


Defender (1993+). Manual - part 43


7. 

Clean and examine all components and  renew 
where necessary. 

8. 

Assemble  above  parts  in  reverse order  using 
multi-purpose grease on gear  lever. 

NOTE:  Ensure  spring  loaded  pad  is  properly 
located and that the lever is fitted to the housing 
with  the  pad  on  the  opposite  side  to  the  bias 
spring. Leave bias spring adjusting screws slack 
until assembly 

of  gearbox. 

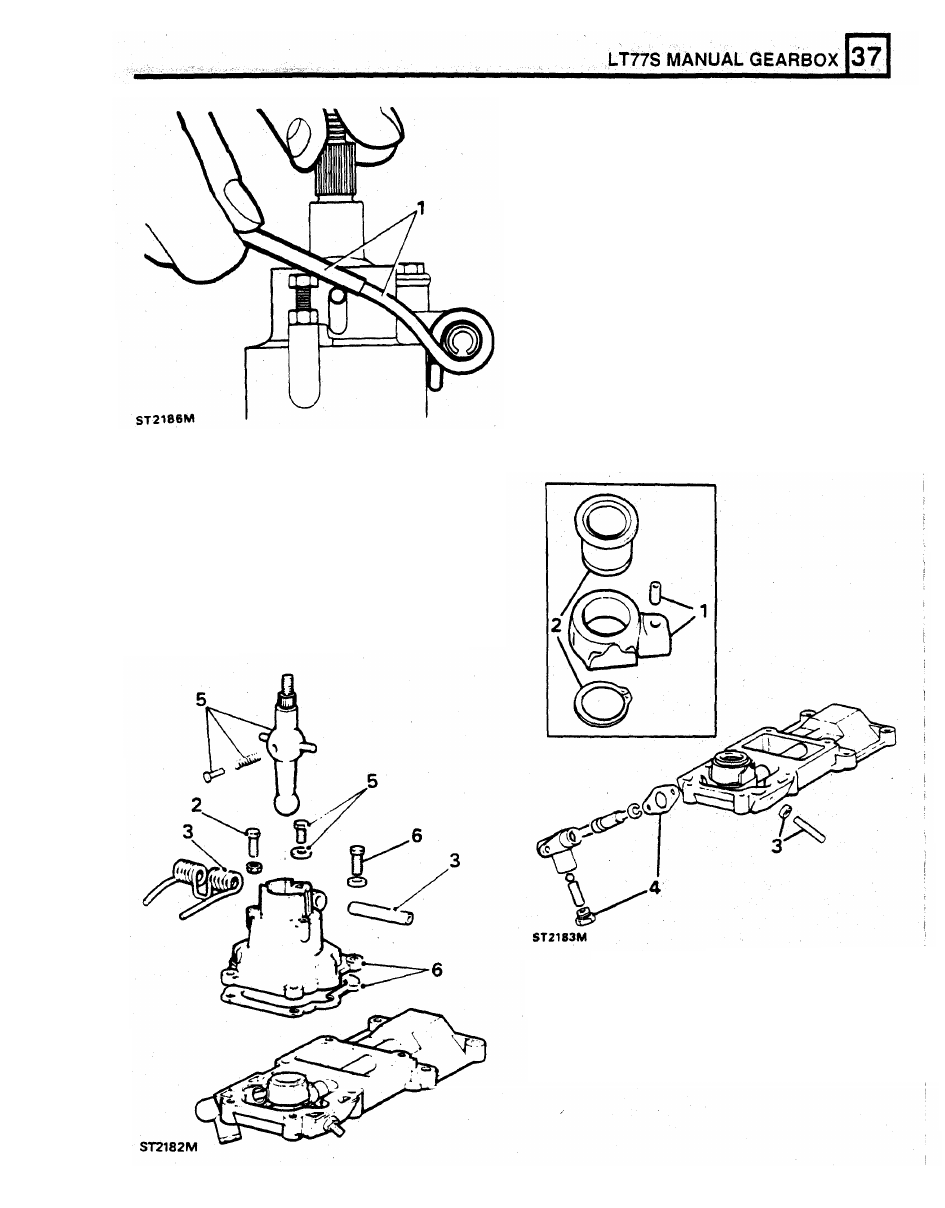
Remote gear lever housing. 

1. 

Release  socket  headed  screw 

to 

remove 

2.  Remove  circlip  to  release  seating  from 

3. 

Remove fifth gear  locknut and stud. 

trunnion. 

trunnion. 

3. 

Drive-out roll pin to  remove bias spring. 

4. 

Remove reverse gear  plunger and shim. 

4. 

Remove gear  lever extension from  lower  gear 
lever. 

5.  Remove  bolt  and  special  washer 

to 

remove 

lower gear lever. 

WARNING:  Hold  the  nylon  spring  loaded  pad 
while  removing  the  lever  to  prevent 

it 

causing 

personal injury. 

6. 

Remove  gear  selector  housing  from  remote 
housing. 

5.  Remove fifth gear 

spool guide. 

6.  Remove blanking plug. 
7.  Drift-out roll pin securing quadrant to shaft. 

8. 

Withdraw  selector  shaft through hole. 

9. 

Remove selector shaft 

“O” 

ring. 

10. 

Remove circlip  to  release rollers and 

pin 

from 

quadrant. 

11. 

Clean and examine all components and renew 
where necessary. 

12.  Assemble  housing 

by 

first  fitting 

“O” 

ring 

to 

shaft. 

13. 

Fit quadrant and secure with 

roll pin. 

14. 

Fit rollers and secure with circlip. 

15.  Fit  fifth  gear  spool  retainer  and  apply  Loctite 

290 to bolt threads. 

16.  Apply  Loctite 290 

to 

reverse switch threads. 

17. 

Fit seating to trunnion and secure with circlip. 

18. 

Fit  trunnion 

to  shaft  and  apply  Loctite 

to 

retaining screw threads. 

19.  Fit reverse gear plunger and original shims. 

20. 

Fit fifth gear stud stop and locknut. 

21. 

Fit new 

bucker plug with Hylomar PL 32. 

22.  Fit gear  selector housing 

to remote housing. 

LT77S 

MANUAL GEARBOX 

GEAR SELECTOR HOUSING - 

MAIN GEARBOX 

1.  Gear selector housing 

14.  Reverse gear plunger 

2.  Gasket 

15.  Gear lever seating 

3.  Roll pin 

16.  Trunnion 

4.  Bias spring 

17.  Circlip 

5.  Gear lever retaining screw and washer 

18.  Trunnion retaining screw 

6.  Selector housing screws 

19.  ' 0  ring 

7.  Gear lever 

20.  Selector shaft 

8.  Nylon pad and spring 

21.  Quadrant 

9.  Gear lever extension 

22.  Roll pin 

10.  Remote housing 

23.  Rollers 

11.  Gasket 

24.  Pin 

12.  Fifth gear spool guide 

25.  Blanking plug 

13.  Fifth gear stop screw and lock nut 

REISSUED: 

FEB 

1993 

15 

LT77S 

MANUAL GEARBOX 

Reverse gear plunger assembly. 

NOTE: 

Assemble 

the 

housing 

using 

1.  Remove plug spring and ball. 

2.  Remove circlip to release plunger and spring. 

9.  Fit  internal  and  external  " O "   rings  to  fork 

3.  Clean and examine components. 

assembly. 

4.  Assemble 

plunger 

and 

spring 

with 

10.  Fit detent spring. 

multi-purpose grease and secure with circlip. 

11.  Fit  "O"  rings  to  end cover and  fit to short  end 

5.  Lubricate  and  fit  detent  ball  and  spring  with 

of cross shaft. 

light oil.  Apply Loctite 290 to plug threads and 

12.  Insert  shaft  into  fork  and  secure  end  cover 

fit. 

with screws. 

6.  Check that plunger returns when depressed. 

13.  Fit  Nylon  seat,  groove  downwards,  to  gear 

lever. 

14.  Fit  gear  lever  and  seat  to  cross  shaft  and 

secure with circlip. 

15.  Fit  bushes  to  gear  lever  and  secure  with 

clevis pin and split pin. 

multi-purpose grease on all moving parts. 

Transfer gear  housing. 

1.  Remove  the  four  screws  and  remove  gaiter 

assembly. 

2.  Disconnect the gear lever from selector fork. 
3.  Retrieve the non metallic bushes. 
4.  Remove  circlip  to  release  ball  and  seat  and 

withdraw gear lever. 

5.  Remove  screws  from  end  cover  to  withdraw 

cover and cross shaft. 

6.  Remove selector fork. 

7.  Remove detent spring and plate. 
8.  Clean and examine all parts and renew where 

necessary. 

16 

REISSUED: 

FEB 

1993 


Content   ..  41  42  43  44   ..