Jeep XJ. Manual - part 801


  Index      Jeep     Jeep XJ - service repair manual 2001 year


Search            


Content   ..  799  800  801  802   ..


Jeep XJ. Manual - part 801


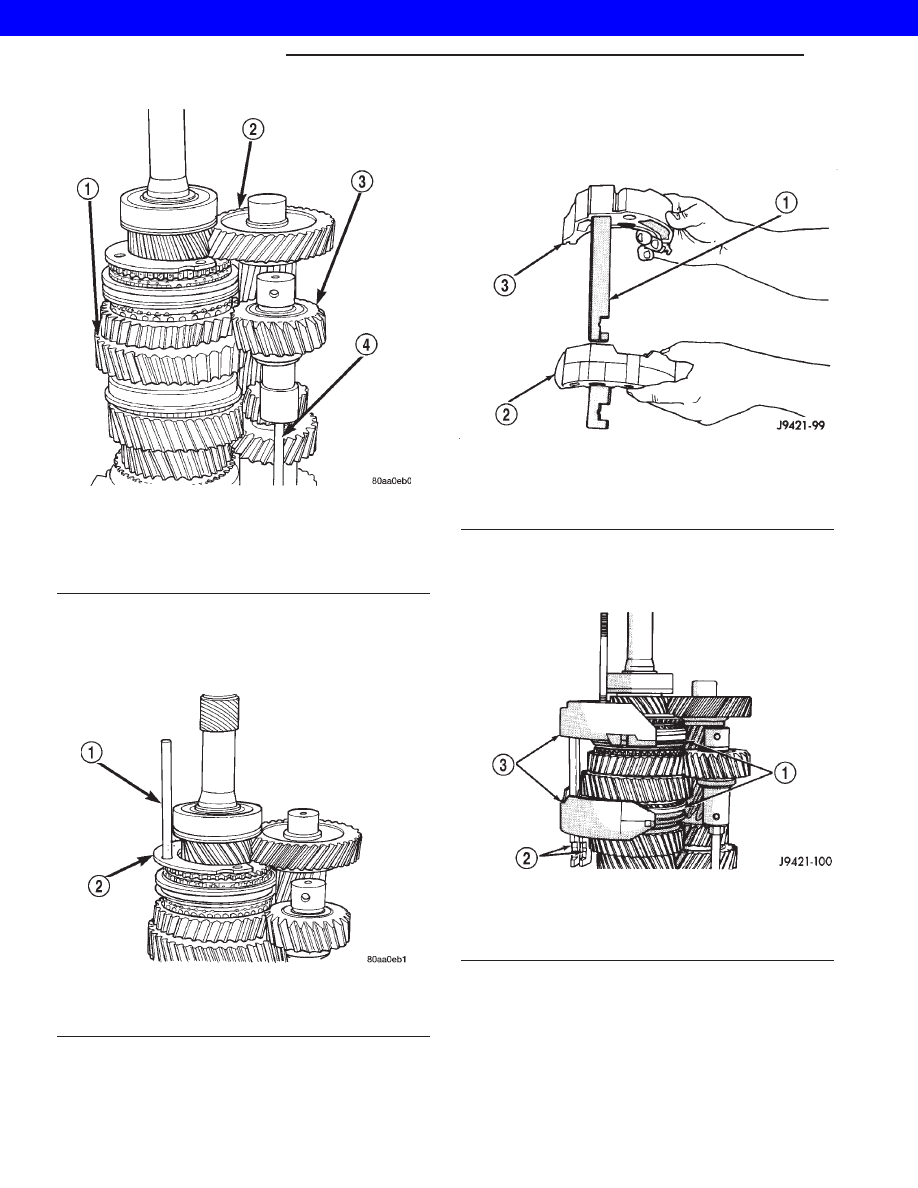
(11) On 2-wheel drive transmission, thread one

Alignment Pin 8120 in center or passenger side hole
of output shaft bearing retainer. Then position
retainer on fifth gear as shown (Fig. 87).

(12) Assemble 1-2 and fifth reverse-shift forks (Fig.

88). Arm of fifth-reverse fork goes through slot in 1-2
fork.

(13) Install

assembled

shift

forks

in

synchro

sleeves (Fig. 89). Verify forks are properly seated in
sleeves.

REAR HOUSING - 2WD

(1) Drive adapter housing alignment dowels back

into housing until dowels are flush with mounting
surface (Fig. 90).

Fig. 86 REVERSE IDLER ASSEMBLY POSITION

1 - OUTPUT SHAFT AND GEARTRAIN
2 - COUNTERSHAFT
3 - REVERSE IDLER ASSEMBLY
4 - TOOL PEDESTAL

Fig. 87 POSITIONING OUTPUT SHAFT BEARING

1 - SPECIAL TOOL 8120
2 - OUTPUT SHAFT BEARING RETAINER

Fig. 88 1-2 AND FIFTH-REVERSE

1 - INSERT ARM THROUGH 1-2 FORK
2 - 1-2 FORK
3 - FIFTH-REVERSE FORK

Fig. 89 SHIFT FORKS IN SYNCHRO

1 - SYNCHRO SLEEVES
2 - FORK ARMS
3 - SHIFT FORKS

21s - 26

MANUAL NV 3550

XJ

MANUAL NV 3550 (Continued)

2001 JEEP CHEROKEE

(2) Apply liberal quantity of petroleum jelly to

countershaft rear bearing and bearing race.

(3) Install countershaft rear bearing in bearing

race (Fig. 91).

CAUTION: Be sure the large diameter side of the
roller retainer faces the countershaft and the small
diameter side faces the race and housing (Fig. 92).

(4) Apply extra petroleum jelly to hold counter-

shaft rear bearing in place when housing is installed.

(5) Apply light coat of petroleum jelly to shift shaft

bushing/bearing in rear housing (Fig. 92).

(6) Reach into countershaft rear bearing with fin-

ger and push each bearing roller outward against
race. Then apply extra petroleum jelly to hold rollers
in place. This avoids having rollers becoming dis-
placed during housing installation.

(7) Install rear housing onto geartrain (Fig. 93).

Verify bearing retainer pilot stud is in correct bolt
hole in housing. Also be sure countershaft and output
shaft bearings are aligned in housing and on counter-
shaft. It may be necessary to lift upward on counter-
shaft slightly to ensure that the countershaft rear
bearing engages to the countershaft before the rear
output shaft bearing engages the housing.

(8) Seat rear housing on output shaft rear bearing

and countershaft. Use plastic or rawhide mallet to
tap housing into place.

(9) Apply Mopar Gasket Maker or equivalent, to

housing bolt threads, bolt shanks and under bolt
heads (Fig. 94).

(10) Start first two bolts in retainer (Fig. 95). It

may be necessary to move retainer rearward (with
pilot stud) in order to start bolts in retainer.

Fig. 90 REAR HOUSING DOWELS

1 - HOUSING ALIGNMENT DOWELS
2 - REAR HOUSING
3 - DOWEL FLUSH WITH SURFACE

Fig. 91 COUNTERSHAFT REAR BEARING

1 - COUNTERSHAFT REAR BEARING
2 - REAR BEARING RACE
3 - REAR HOUSING
4 - PETROLEUM JELLY

Fig. 92 COUNTERSHAFT REAR BEARING SEATED

1 - SHIFT SHAFT BUSHING/BEARING
2 - COUNTERSHAFT REAR BEARING

XJ

MANUAL NV 3550

21s - 27

MANUAL NV 3550 (Continued)

2001 JEEP CHEROKEE

(11) Remove Alignment Pin 8120 and install last

retainer bolt (Fig. 95).

(12) Tighten all three retainer bolts to 30-35 N·m

(22-26 ft. lbs.).

ADAPTER HOUSING - 4WD

(1) Install rear bearing in adapter housing. Use

wood hammer handle or wood dowel to tap bearing
into place.

(2) Position rear bearing retainer in adapter hous-

ing (Fig. 96).

Fig. 93 REAR HOUSING - 2WD

1 - REAR HOUSING
2 - SHIFT FORKS AND GEARTRAIN

Fig. 94 SEAL RETAING BOLTS

1 - MOPAR GASKET MAKER (OR LOCTITE 518)
2 - RETAINER AND HOUSING BOLTS
3 - APPLY SEALER TO UNDERSIDE OF BOLT HEAD, SHANK
AND THREADS

Fig. 95 PILOT STUD AND RETAINER BOLTS - 2WD

1 - BEARING RETAINER BOLT
2 - SPECIAL TOOL 8120

Fig. 96 ADAPTER HOUSING - 4WD

1 - BEARING RETAINER
2 - RETAINER BOLT
3 - IDLER SHAFT NOTCH
4 - COUNTERSHAFT BEARING RACE
5 - REAR BEARING

21s - 28

MANUAL NV 3550

XJ

MANUAL NV 3550 (Continued)

2001 JEEP CHEROKEE

(3) Apply Mopar Gasket Maker or equivalent, to

threads, bolt shanks and under hex heads of bearing
retainer bolts (Fig. 94).

(4) Apply liberal quantity of petroleum jelly to

countershaft rear bearing and bearing race.

(5) Install countershaft rear bearing in bearing

race (Fig. 92).

CAUTION: Be sure the large diameter side of the
roller retainer faces the countershaft and the small
diameter side faces the race and housing (Fig. 92).

(6) Apply extra petroleum jelly to hold counter-

shaft rear bearing in place when housing is installed.

(7) Apply light coat of petroleum jelly to shift shaft

bushing/bearing in adapter housing (Fig. 92).

(8) Install adapter housing on geartrain.
(9) Install rear bearing snap ring on output shaft

(Fig. 97).

(10) Lubricate lip of new rear seal (Fig. 98) with

Mopar Door Ease or transmission fluid.

(11) Install new rear seal in adapter housing bore

with Installer C-3860-A. Verify seal is seated in hous-
ing bore (Fig. 98).

SHIFT SHAFT, SHAFT LEVER AND BUSHING AND
SHIFT SOCKET

(1) Verify that all synchro sleeves are in Neutral

position (centered on hub).

CAUTION: The transmission synchros must all be
in Neutral position for assembly. Otherwise the
housings, shift forks and gears can be damaged
during installation of the two housings.

(2) Install 3-4 shift fork in synchro sleeve (Fig. 99).

Verify that groove in fork arm is aligned with grooves
in 1-2 and fifth-reverse fork arms as shown.

(3) Slide the end of shift shaft with shaft detent

notches through 3-4 shift fork.

(4) Assemble shift shaft shift lever and bushing

(Fig. 100). Be sure slot in bushing is facing up and
roll pin hole for lever is aligned with hole in shaft.

(5) Install assembled lever and bushing on shift

shaft (Fig. 101).

(6) Slide shift shaft through 1-2 and fifth-reverse

fork and into shift lever opening in rear housing (Fig.
102).

Fig. 97 REAR BEARING SNAP RING - 4WD

1 - SNAP RING PLIERS
2 - SNAP RING
3 - OUTPUT SHAFT

Fig. 98 REAR SEAL

1 - REAR SEAL
2 - SEAL LIP
3 - OUTPUT SHAFT

Fig. 99 3-4 SHIFT FORK

1 - 3-4 FORK
2 - ALIGN GROOVES IN FORK ARMS

XJ

MANUAL NV 3550

21s - 29

MANUAL NV 3550 (Continued)

2001 JEEP CHEROKEE


Content   ..  799  800  801  802   ..