Jeep XJ. Manual - part 484
 

  Index      Jeep     Jeep XJ - service repair manual 2001 year


Search            


Content   ..  482  483  484  485   ..


Jeep XJ. Manual - part 484


INSTALLATION

(1) Position the weatherstrip on the door.
(2) Push weatherstrip down to seat onto door.

REAR DOOR GLASS RUN CHANNEL
WEATHERSTRIP

REMOVAL

(1) Remove door trim panel.
(2) Remove waterdam.
(3) Remove window glass.
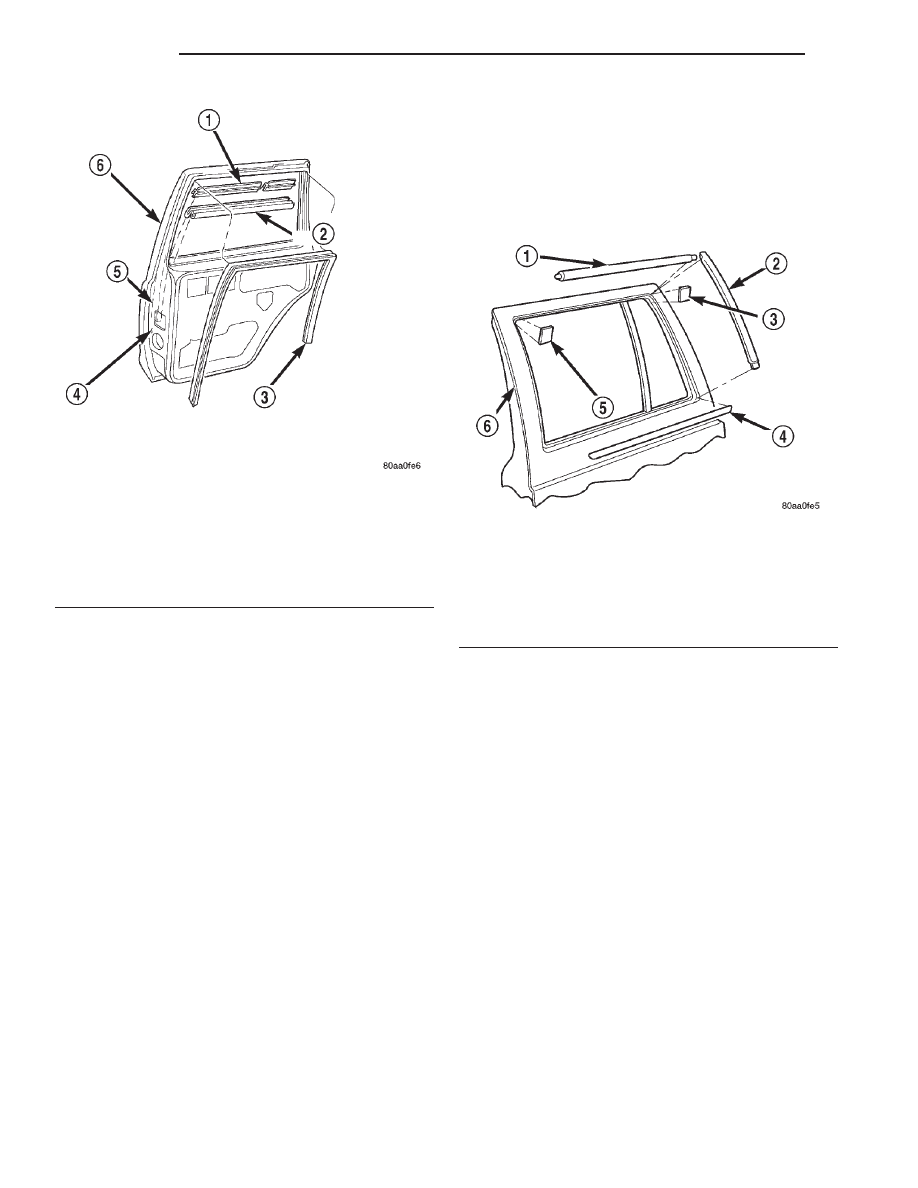
(4) Starting at rear corner, peel weatherstrip from

around door frame (Fig. 53).

INSTALLATION

(1) Starting at the top corner, press seal into place.

A small amount of adhesive can be used to hold the
weatherstrip in-place, if necessary.

(2) As applicable, move downward evenly until the

weatherstrip seal is fully seated in the channel.

(3) Install window glass.
(4) Install waterdam.
(5) Install door trim panel.

REAR DOOR GLASS EXTERIOR MOLDING

REMOVAL

(1) Open the window.
(2) Remove the outer belt molding.
(3) Pry and pull the molding sections from the

door panel flange (Fig. 54).

INSTALLATION

(1) Starting at the forward end of the upper mold-

ing, force the molding onto the door panel flange and
continue rearward until it is completely seated on
the flange.

(2) Mate the rear molding with the upper molding

and force the molding edge inward.

(3) Continue pressing and moving downward to

complete the installation.

(4) Install the outer belt molding.

REAR DOOR WEATHERSTRIP

REMOVAL

(1) Remove B-pillar upper trim.
(2) Remove inner scuff plate.
(3) Remove B-pillar lower trim.
(4) Remove upper door opening trim.
(5) Grasp seal and separate from door opening

(Fig. 55).

Fig. 53 Rear Door Inner/Outer Belt Weatherstrip

1 – OUTER BELT WEATHERSTRIP
2 – INNER BELT WEATHERSTRIP
3 – GLASS CHANNEL WEATHERSTRIP
4 – DOOR INNER PANEL
5 – GLASS CHANNEL
6 – DOOR OUTER PANEL

Fig. 54 Rear Glass Exterior Molding

1 – UPPER MOLDING
2 – MOLDING
3 – SHIM
4 – OUTER BELT MOLDING
5 – SHIM
6 – OUTER DOOR PANEL

23 - 46

BODY

XJ

REMOVAL AND INSTALLATION (Continued)

INSTALLATION

(1) When installing a door opening weatherstrip

seal, start at the door sill center line.

(2) Move upward and around edge of door opening.

Seat seal on flange.

(3) Move upward and around the perimeter of the

door opening and seat the weatherstrip on the flange
(Fig. 56).

(4) Install upper door opening trim.
(5) Install inner scuff plate.
(6) Install B-pillar lower trim panel.
(7) Install B-pillar upper trim panel.

REAR DOOR WINDOW REGULATOR

REMOVAL

(1) Remove the door trim panel.
(2) Remove the waterdam.
(3) Remove the bolt attaching the window glass to

the regulator and support the glass (Fig. 57).

(4) Remove the lower bolts attaching the regulator

to the inner door panel (Fig. 58).

(5) Remove the nuts attaching the regulator motor

to the inner door panel, if equipped.

(6) Loosen the upper bolt that attaches the regula-

tor to the inner door panel.

(7) Disconnect the wire harness connector from the

regulator drive motor, if equipped.

(8) Remove the regulator and drive motor, if

equipped.

INSTALLATION

(1) Position window regulator and, if equipped,

drive motor within the door panels.

(2) Install the fasteners attaching the regulator to

the door inner panel.

(3) Connect the regulator wire harness connector.
(4) Position the window glass at the regulator and

install the retainer, bushing and bolt.

(5) Install the waterdam.
(6) Install the trim panel.

REAR DOOR WINDOW GLASS

REMOVAL

(1) Lower the window glass.
(2) Remove the trim panel.

Fig. 55 Door Opening Weatherstrip

1 – FRONT DOOR SEAL
2 – A PILLAR
3 – SECONDARY DOOR SEAL
4 – FRONT DOOR SEAL
5 – REAR DOOR SEAL
6 – ENDS MEET AT CENTERLINE
7 – A PILLAR

Fig. 56 Door Opening Weatherstrip

1 – VENT HOLES
2 – VENT HOLES
3 – FINISH
4 – START
5 – FINISH
6 – START
7 – B-PILLAR
8 – SEAL
9 – REAR DOOR WEATHERSTRIP SEAL
10 – FRONT DOOR WEATHERSTRIP SEAL
11 – FLANGE
12 – SEAL
13 – FLANGE

XJ

BODY

23 - 47

REMOVAL AND INSTALLATION (Continued)

(3) Remove the waterdam.
(4) Remove inner and outer beltline weatherstrip.
(5) Remove the window weatherstrip from the

door.

(6) Remove the division bar/stationary glass (Fig.

59).

(7) Remove the window glass screw, bushing and

retainer from the regulator.

(8) Remove the window glass from door.

INSTALLATION

(1) Install the glass in the door, and install the

retainer, bushing and screw.

(2) Tighten the glass attaching screw 6 N·m (53 in-

lbs) torque.

(3) Install the division bar/stationary glass in the

door.

(4) Install the glass run channel weatherstrip.
(5) Install the inner and outer beltline weather-

strip.

(6) Install the waterdam.
(7) Install the trim panel.

BODY SIDE MOLDING

REMOVAL

(1) Loosen the body side molding (Fig. 60) with a

heat gun.

(2) Lift edge of molding with a putty knife and

peel molding from body panel. Apply heat to any
location where the molding remains adhered to a
panel.

(3) Remove the adhesive from the body panel with

Mopar Super Clean solvent or equivalent.

(4) If the original molding will be installed, also

remove all adhesive from it.

INSTALLATION

(1) If the original molding will be installed, apply

3M 5344 double-sided tape on the molding.

(2) For vertical alignment, use masking tape or a

string as reference.

Fig. 57 Regulator To Glass Screw Removal/

Installation

1 – ANCHOR
2 – RETAINER (WITH TABS)
3 – BRACKET
4 – REGULATOR
5 – SCREW AND BUSHING
6 – WINDOW GLASS

Fig. 58 Rear Door Window

1 – REAR DOOR
2 – LOOSEN BOLT
3 – REMOVE NUTS
4 – REMOVE BOLTS
5 – REGULATOR MOTOR

Fig. 59 Division Bar/Stationary Glass

1 – UPPER SCREW
2 – GLASS
3 – LOWER SCREW
4 – DIVISION BAR

23 - 48

BODY

XJ

REMOVAL AND INSTALLATION (Continued)

(3) Remove the backing from the tape, align the

molding and position it on the body panel.

(4) Press the molding onto the body panel with a

roller or hand pressure.

REAR FENDER FLARE

REMOVAL

(1) Remove the screw attaching the lower part of

flare to the bottom of the fender.

(2) Remove the nuts attaching the fender flare

retainer to the wheelhouse liner (Fig. 61).

(3) Separate the fender flare and retainer from the

fender.

INSTALLATION

(1) Position the fender flare and retainer on the

fender.

(2) Install the nuts attaching the fender flare and

retainer to the wheelhouse liner.

(3) Install the screw attaching the lower part of

flare to the bottom of the fender.

QUARTER WINDOW APPLIQUE

REMOVAL

(1) Remove the liftgate pillar trim.
(2) Remove nuts from inside vehicle (Fig. 62).
(3) Using a trim sick or equivalent, carefully pry

the applique the from panel.

INSTALLATION

(1) Position the replacement applique the on panel

and install the nuts.

(2) Install the liftgate pillar trim.

DRIP RAIL MOLDING

REMOVAL

(1) Pry the clips from the roof flange.
(2) Remove the clips and molding from the roof

flange (Fig. 62).

Fig. 60 Body Side Molding—4-Door

Fig. 61 Fender Flare

1 – CENTER RETAINER
2 – WHEELHOUSE LINER
3 – BODY
4 – REAR RETAINER
5 – FENDER FLARE

Fig. 62 Quarter Window Applique and Drip Molding

1 – VEHICLE ROOF
2 – DRIP MOLDING
3 – DRIP MOLDING CLIP
4 – DRIP MOLDING
5 – CLIP
6 – QUARTER WINDOW APPLIQUE
7 – VEHICLE BODY
8 – NUT
9 – SEALANT

XJ

BODY

23 - 49

REMOVAL AND INSTALLATION (Continued)


Content   ..  482  483  484  485   ..