Jeep XJ. Manual - part 449


  Index      Jeep     Jeep XJ - service repair manual 2001 year


Search            


Content   ..  447  448  449  450   ..


Jeep XJ. Manual - part 449


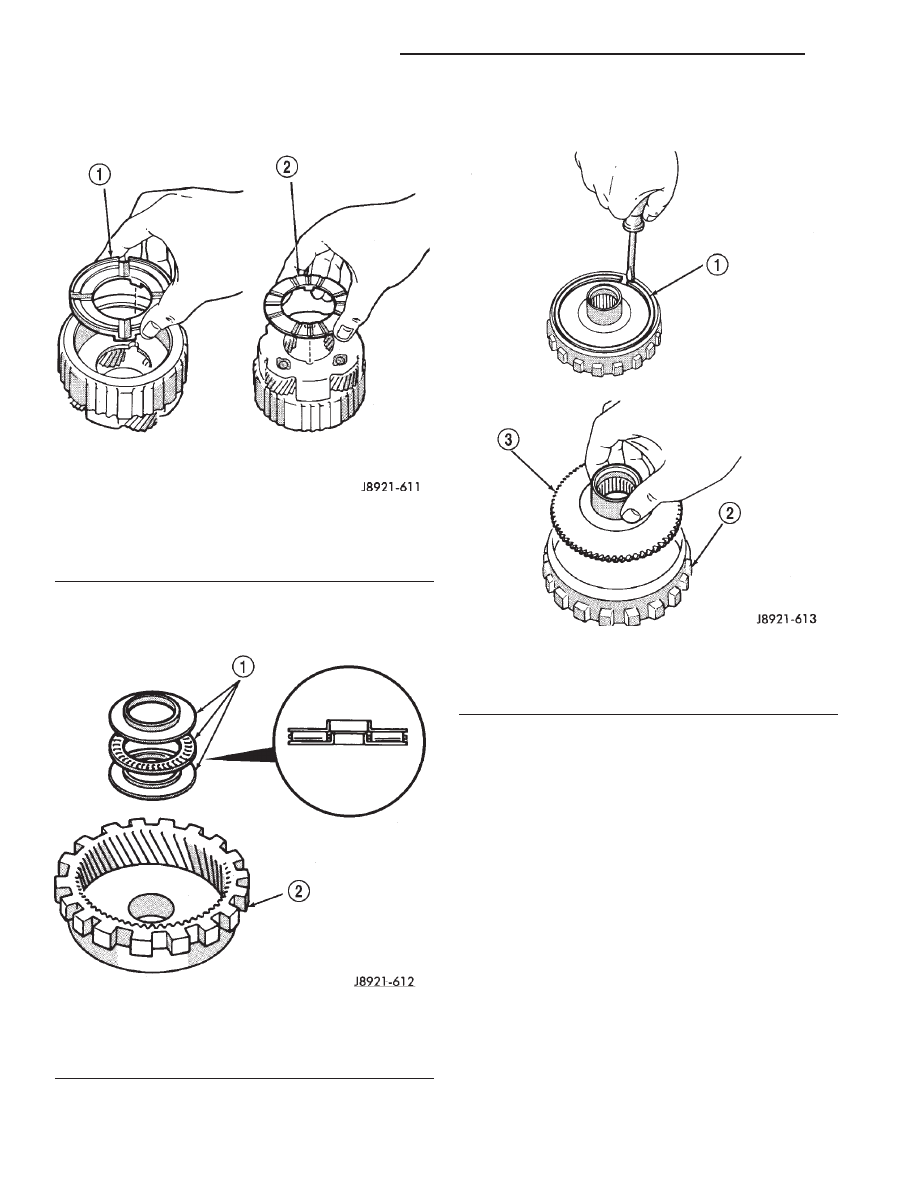
(10) Remove front and rear thrust washers from

planetary gear (Fig. 294).

(11) Remove thrust bearing and washers from ring

gear (Fig. 295).

(12) Remove ring gear snap ring and remove ring

gear hub (Fig. 296).

(13) Inspect and replace any worn or damaged

planetary gear components.

ASSEMBLY

(1) Measure thickness of each brake pack disc.

Minimum thickness is 1.51 mm (0.0594 in.). Replace
all discs if any disc is thinner than specified.

(2) Install hub and snap ring in ring gear (Fig.

296)

(3) Identify ring gear thrust bearing and races by

following dimensions (Fig. 295) :

• Outer diameter of bottom race is 44.8 mm (1.764

in.) and inner diameter is 27.6 mm (1.087 in.).

• Outer diameter of bearing is 44.7 mm (1.760 in.)

and inner diameter is 30.1 mm (1.185 in.).

• Outer diameter of upper race is 44.8 mm (1.764

in.) and inner diameter is 28.8 mm (1.134 in.).

(4) Lubricate ring gear thrust bearing and races

with petroleum jelly and install them in ring gear
(Fig. 295).

Fig. 294 Removing/Installing Rear Planetary Thrust

Washers

1 – FRONT THRUST WASHER
2 – REAR THRUST WASHER

Fig. 295 Removing/Installing Ring Gear Thrust

Bearing And Races

1 – THRUST BEARING AND RACES
2 – RING GEAR

Fig. 296 Removing/Installing Ring Gear Hub

1 – SNAP RING
2 – RING GEAR
3 – HUB

21 - 332

AW–4 AUTOMATIC TRANSMISSION

XJ

DISASSEMBLY AND ASSEMBLY (Continued)

(5) Coat planetary thrust washers with petroleum

jelly and install them in gear (Fig. 294).

(6) Install No. 2 one–way clutch bottom end cap

into the planetary gear.

(7) Install No. 2 one–way clutch in planetary gear.

Be sure flanged side of clutch faces upward (Fig.
297).

(8) Install No. 2 one–way clutch top end cap into

the planetary gear.

(9) Install clutch retaining snap ring and install

clutch inner race (Fig. 292). Turn race counterclock-
wise to ease installation.

(10) Verify one–way clutch operation. Hold gear

and turn inner race in both directions. Race should
turn freely counterclockwise, but lock when turned
clockwise.

(11) Install planetary gear in ring gear.
(12) Install thrust bearing and washers onto the

ring gear (Fig. 295).

(13) Assemble clutch discs and clutch plates (Fig.

289). Sequence is disc first, then a plate. Use seven
discs and plates.

(14) Install brake pack on planetary gear (Fig.

289).

(15) Install new seal ring on output shaft (Fig.

288). Be sure ring ends are interlocked as shown.

TRANSMISSION VALVE BODY

The valve body assembly consists of two sections

which are the upper body and lower body (Fig. 298)
and (Fig. 299). Disassembly, inspection and overhaul
procedures for each section are outlined separately.
Refer to the appropriate procedure as needed.

Fig. 297 Installing No. 2 One–Way Clutch

1 – FLANGED SIDE OF CLUTCH
2 – NO. 2 ONE-WAY CLUTCH
3 – REAR PLANETARY

XJ

AW–4 AUTOMATIC TRANSMISSION

21 - 333

DISASSEMBLY AND ASSEMBLY (Continued)

Fig. 298 Lower Body Components

1 – RETAINER
2 – STRAINERS
3 – PRESSURE RELIEF VALVE
4 – NO. 2 SOLENOID AND O-RING
5 – ACCUMULATOR CONTROL VALVE
6 – RETAINER
7 – SLEEVE
8 – CLIP
9 – PRESSURE REDUCING PLUG
10 – NO. 3 SOLENOID AND O-RING
11 – NO. 1 SOLENOID AND O-RING

12 – RETAINER
13 – SLEEVE
14 – PLUNGER
15 – VALVE SPRING
16 – WASHER
17 – PRIMARY REGULATOR VALVE
18 – CHECK VALVE AND BALL
19 – LOWER BODY
20 – CHECK VALVE
21 – 1-2 SHIFT VALVE
22 – PLUG

21 - 334

AW–4 AUTOMATIC TRANSMISSION

XJ

DISASSEMBLY AND ASSEMBLY (Continued)

Fig. 299 Upper Body Components

XJ

AW–4 AUTOMATIC TRANSMISSION

21 - 335

DISASSEMBLY AND ASSEMBLY (Continued)


Content   ..  447  448  449  450   ..