Jeep XJ. Manual - part 372


  Index      Jeep     Jeep XJ - service repair manual 2001 year


Search            


Content   ..  370  371  372  373   ..


Jeep XJ. Manual - part 372


ASSEMBLY

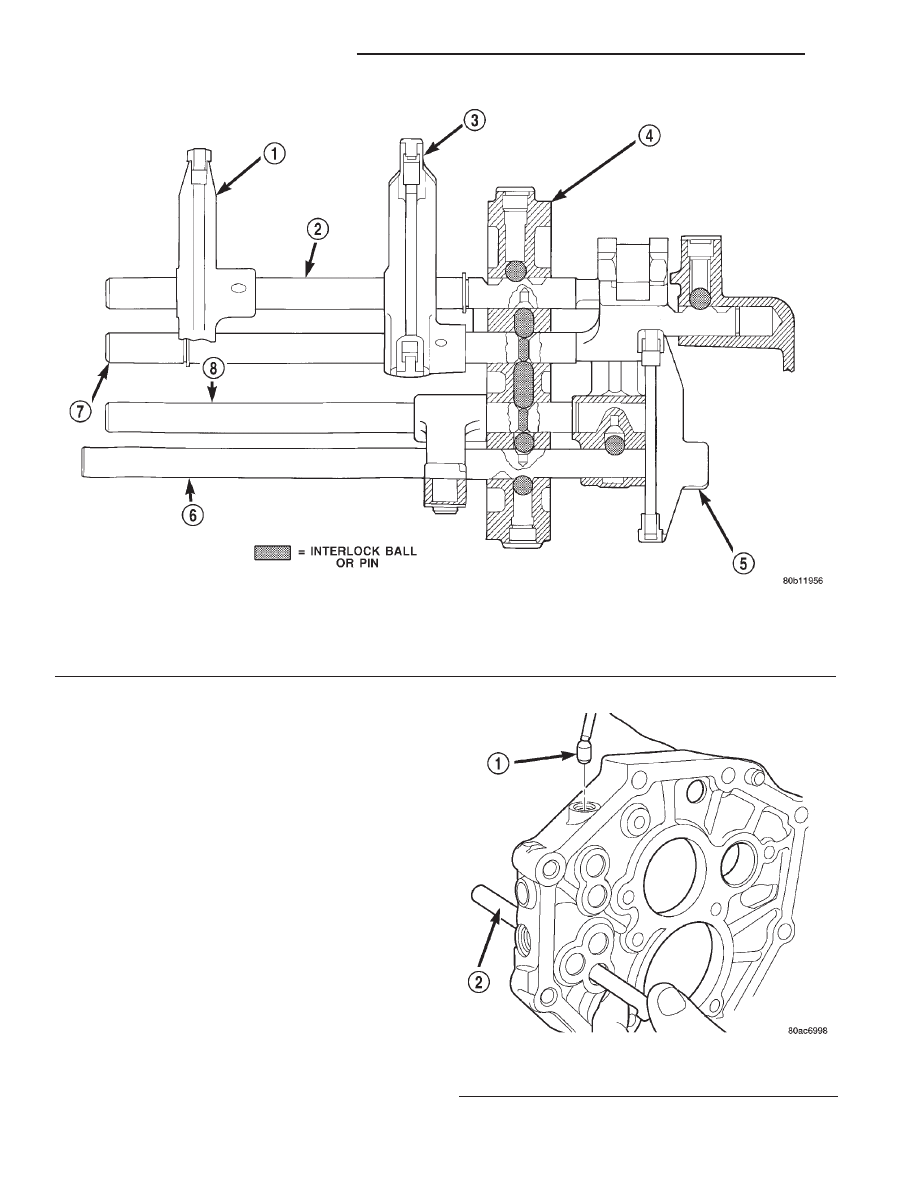
Refer to (Fig. 74) while assembling and installing

the shift rail components. Also, verify that all shift
rail components are in their neutral position when
installing the check balls and interlock pins.

(1) Install the 3–4 shift rail into the intermediate

plate.

(2) Install the 1–2 elongated check ball into the

intermediate plate (Fig. 75).

(3) Install the interlock pin into the 1–2 shift rail

(Fig. 76).

(4) Install the 1–2 shift rail into the intermediate

plate.

Fig. 74 Shift Rail Components

1 – 3–4 FORK
2 – 3–4 SHIFT RAIL
3 – 1–2 FORK
4 – INTERMEDIATE PLATE

5 – FIFTH GEAR FORK
6 – FIFTH GEAR SHIFT RAIL
7 – 1–2 SHIFT RAIL
8 – REVERSE SHIFT RAIL

Fig. 75 Install 1–2 Check Ball

1 – 1–2 CHECK BALL
2 – 3–4 SHIFT RAIL

21 - 24

AX5 MANUAL TRANSMISSION

XJ

DISASSEMBLY AND ASSEMBLY (Continued)

(5) Install snap-ring onto 3–4 shift rail.
(6) Install the reverse check ball into the interme-

diate plate (Fig. 77).

(7) Install the interlock pin into the reverse shift

rail (Fig. 78).

(8) Assemble the reverse arm bracket to the

reverse fork (Fig. 79).

(9) Install reverse shift rail into intermediate plate

and position reverse arm bracket to intermediate
plate (Fig. 80).

Fig. 76 Install 1–2 Shift Rail Interlock Pin

1 – INTERLOCK PIN
2 – 1–2 SHIFT RAIL

Fig. 77 Install Reverse Check Ball

1 – REVERSE CHECK BALL

Fig. 78 Install Reverse Interlock Pin

1 – REVERSE SHIFT RAIL
2 – INTERLOCK PIN

Fig. 79 Install Reverse Arm Bracket to Fork

1 – REVERSE SHIFT FORK
2 – REVERSE ARM BRACKET

XJ

AX5 MANUAL TRANSMISSION

21 - 25

DISASSEMBLY AND ASSEMBLY (Continued)

(10) Install snap-ring onto reverse shift rail (Fig.

81).

(11) Install reverse shift head and rail assembly

into the intermediate plate.

(12) Install the fifth gear interlock ball and check

ball (Fig. 82).

(13) Install fifth gear shift rail (Fig. 83).

(14) Remove the intermediate plate from the vise,

rotate the plate 180°, and reinstall the plate in the
vise using the same bolt and washer mounting set-
up.

(15) Install the shift rail detent balls in the inter-

mediate plate.

Fig. 80 Install Reverse Shift Rail

1 – REVERSE SHIFT RAIL AND REVERSE FORK ASSEMBLY

Fig. 81 Install Reverse Snap-ring

1 – SNAP RING
2 – REVERSE SHIFT RAIL

Fig. 82 Install Fifth Gear Check Ball

1 – FIFTH GEAR CHECK BALL

Fig. 83 Install Fifth Gear Shift Rail

1 – INTERMEDIATE PLATE
2 – FIFTH GEAR SHIFT RAIL

21 - 26

AX5 MANUAL TRANSMISSION

XJ

DISASSEMBLY AND ASSEMBLY (Continued)

(16) Install the shift rail detent springs in the

intermediate plate. Note that the bottom detent
spring is shorter than the others.

(17) Install the shift rail detent plugs in the inter-

mediate plate.

(18) Install the 1–2 shift fork onto the 1–2 and 3–4

shift rails (Fig. 84).

(19) Install the snap-ring onto the 1–2 shift rail.
(20) Install the 3–4 shift fork onto the 3–4 shift

rail (Fig. 85).

(21) Install mainshaft into the intermediate plate

by guiding the output shaft through opening in inter-
mediate plate until the shift forks are aligned with
the appropriate synchronizer sleeves. The mainshaft
rear bearing will be started in the intermediate plate
but not fully driven in at this point.

(22) While an assistant supports the mainshaft,

align rear of countershaft with inner race of counter-
shaft rear bearing.

(23) Raise countershaft upward until gears mesh

with the mating gears on the mainshaft.

(24) Using a suitable rubber mallet, tap on the

input shaft and the front of the countershaft equally
to install the mainshaft rear bearing into the inter-
mediate plate and the rear of the countershaft into
the rear countershaft bearing. It may be necessary to
occasionally hold the countershaft into the intermedi-
ate plate and tap the countershaft rear bearing onto
the countershaft and into the intermediate plate.

(25) Install snap-rings onto the rear mainshaft and

countershaft bearings.

(26) Install the bolts to hold the reverse shift arm

bracket to the intermediate plate.

(27) Install new bolts to hold the shift forks to the

shift rails (Fig. 86).

(28) Position the mainshaft rear bearing retainer

over the output shaft and onto the intermediate
plate.

(29) Install new bolts to hold the bearing retainer

to the intermediate plate.

(30) Move the reverse shift arm into the reverse

gear position. The reverse gear position is with the
arm moved away from the intermediate plate (Fig.
87).

(31) Install the reverse idler gear assembly into

position on the mainshaft and reverse shift arm.

Fig. 84 Install 1–2 Shift Fork

1 – 1–2 SHIFT FORK
2 – 3–4 SHIFT RAIL
3 – 1–2 SHIFT RAIL

Fig. 85 Install 3–4 Shift Fork

1 – 3–4 SHIFT FORK
2 – 3–4 SHIFT RAIL
3 – 1–2 SHIFT RAIL
4 – 1–2 SHIFT FORK

Fig. 86 Install Shift Fork Bolts

1 – 1–2 SHIFT FORK
2 – 3–4 SHIFT FORK

XJ

AX5 MANUAL TRANSMISSION

21 - 27

DISASSEMBLY AND ASSEMBLY (Continued)


Content   ..  370  371  372  373   ..